Hashicorp Vault/VSO on K8S
Vault 설치 ON k8s
실습 환경 구성 ( k8s cluster m Vault 설치 )
# Cluster 생성
howoo@ttokkang-ui-MacBookAir ~/Desktop/work/Gasida_series/practice/cicd-labs main ± kind create cluster --name myk8s --image kindest/node:v1.32.8 --config - <<EOF
kind: Cluster
apiVersion: kind.x-k8s.io/v1alpha4
nodes:
- role: control-plane
labels:
ingress-ready: true
extraPortMappings:
- containerPort: 30000 # Vault Web UI
hostPort: 30000
- containerPort: 30001 # Sample application
hostPort: 30001
EOF
Creating cluster "myk8s" ...
✓ Ensuring node image (kindest/node:v1.32.8) 🖼
✓ Preparing nodes 📦
✓ Writing configuration 📜
✓ Starting control-plane 🕹️
✓ Installing CNI 🔌
✓ Installing StorageClass 💾
Set kubectl context to "kind-myk8s"
You can now use your cluster with:
kubectl cluster-info --context kind-myk8s
# 설치 확인
howoo@ttokkang-ui-MacBookAir ~/Desktop/work/Gasida_series/practice/cicd-labs main ± docker ps
CONTAINER ID IMAGE COMMAND CREATED STATUS PORTS NAMES
65069c3aeac9 kindest/node:v1.32.8 "/usr/local/bin/entr…" 15 seconds ago Up 14 seconds 0.0.0.0:30000-30001->30000-30001/tcp, 127.0.0.1:60972->6443/tcp myk8s-control-plane
howoo@ttokkang-ui-MacBookAir ~/Desktop/work/Gasida_series/practice/cicd-labs main ± kubectl get nodes
NAME STATUS ROLES AGE VERSION
myk8s-control-plane Ready control-plane 83s v1.32.8
# node에 기본 tool 설치
docker exec -it myk8s-control-plane sh -c 'apt update && apt install tree psmisc lsof wget net-tools dnsutils tcpdump ngrep iputils-ping git vim -y'
.
.
Setting up bind9-host (1:9.18.41-1~deb12u1) ...
Setting up libperl5.36:arm64 (5.36.0-7+deb12u3) ...
Setting up tcpdump (4.99.3-1) ...
Setting up ngrep (1.47+ds1-5+b1) ...
Setting up perl (5.36.0-7+deb12u3) ...
Setting up bind9-dnsutils (1:9.18.41-1~deb12u1) ...
Setting up dnsutils (1:9.18.41-1~deb12u1) ...
Setting up liberror-perl (0.17029-2) ...
Setting up git (1:2.39.5-0+deb12u2) ...
Processing triggers for libc-bin (2.36-9+deb12u10) ...
# Vault 설치
howoo@ttokkang-ui-MacBookAir ~/Desktop/work/Gasida_series/practice/cicd-labs main ± helm repo add hashicorp https://helm.releases.hashicorp.com
"hashicorp" already exists with the same configuration, skipping
howoo@ttokkang-ui-MacBookAir ~/Desktop/work/Gasida_series/practice/cicd-labs main ± helm repo update
Hang tight while we grab the latest from your chart repositories...
...Successfully got an update from the "hashicorp" chart repository
...Successfully got an update from the "argo" chart repository
...Successfully got an update from the "grgo" chart repository
...Successfully got an update from the "agrgo" chart repository
...Successfully got an update from the "prometheus-community" chart repository
...Successfully got an update from the "geek-cookbook" chart repository
...Successfully got an update from the "bitnami" chart repository
Update Complete. ⎈Happy Helming!⎈
howoo@ttokkang-ui-MacBookAir ~/Desktop/work/Gasida_series/practice/cicd-labs main ± helm search repo hashicorp/vault
NAME CHART VERSION APP VERSION DESCRIPTION
hashicorp/vault 0.31.0 1.20.4 Official HashiCorp Vault Chart
hashicorp/vault-secrets-gateway 0.0.2 0.1.0 A Helm chart for Kubernetes
hashicorp/vault-secrets-operator 1.0.1 1.0.1 Official Vault Secrets Operator Chart
# Create a k8s namespace
helm upgrade vault hashicorp/vault -n vault -f vault-values.yaml --install --dry-run=client
helm upgrade vault hashicorp/vault -n vault -f vault-values.yaml --install --version 0.31.0
# 배포 확인
howoo@ttokkang-ui-MacBookAir ~/Desktop/work/Gasida_series/practice/cicd-labs main ± kubectl get-all -n vault
NAME NAMESPACE AGE
configmap/kube-root-ca.crt vault 27m
configmap/vault-config vault 25m
endpoints/vault vault 25m
endpoints/vault-internal vault 25m
endpoints/vault-ui vault 25m
persistentvolumeclaim/audit-vault-0 vault 25m
persistentvolumeclaim/data-vault-0 vault 25m
pod/vault-0 vault 25m
secret/sh.helm.release.v1.vault.v1 vault 25m
serviceaccount/default vault 27m
serviceaccount/vault vault 25m
service/vault vault 25m
service/vault-internal vault 25m
service/vault-ui vault 25m
controllerrevision.apps/vault-7594f49575 vault 25m
statefulset.apps/vault vault 25m
endpointslice.discovery.k8s.io/vault-d8xjg vault 25m
endpointslice.discovery.k8s.io/vault-internal-phm5l vault 25m
endpointslice.discovery.k8s.io/vault-ui-r64sd vault 25m
howoo@ttokkang-ui-MacBookAir ~/Desktop/work/Gasida_series/practice/cicd-labs main ± kubectl get sts,pods,svc,ep,pvc,cm -n vault
NAME READY AGE
statefulset.apps/vault 0/1 26m
.
.
.
# Vault Status 명령으로 Sealed 상태 확인
kubectl exec -ti vault-0 -n vault -- vault status
Key Value
--- -----
Seal Type shamir
Initialized false
Sealed true
Total Shares 0
Threshold 0
.
.
.
# Vault 로그 확인
howoo@ttokkang-ui-MacBookAir ~/Desktop/work/Gasida_series/practice/cicd-labs main ± stern -n vault -l app.kubernetes.io/name=vault
vault-0 vault 2025-12-01T02:02:43.807Z [INFO] core: security barrier not initialized
vault-0 vault 2025-12-01T02:02:43.807Z [INFO] core: seal configuration missing, not initialized
vault-0 vault 2025-12-01T02:02:48.805Z [INFO] core: security barrier not initialized
vault-0 vault 2025-12-01T02:02:48.805Z [INFO] core: seal configuration missing, not initialized
vault-0 vault 2025-12-01T02:02:53.826Z [INFO] core: security barrier not initialized
vault-0 vault 2025-12-01T02:02:53.827Z [INFO] core: seal configuration missing, not initialized
vault-0 vault 2025-12-01T02:02:58.811Z [INFO] core: security barrier not initialized
vault-0 vault 2025-12-01T02:02:58.811Z [INFO] core: seal configuration missing, not initialized
Vault Unseal
- 쉬운 설명
- Unseal key를 여러 조각으로 나눠서 여러 사람에게 나눠준다
- Ex : 총 5조각 중 3조각이 모이면 열 수 있게 설정
- 이렇게 하면 한 사람이 key를 다 갖고 있지 않기 때문에 혼자서는 아무것도 할 수 없음
- 이러한 과정을 가능하게 해주는것이 vault unseal
howoo@ttokkang-ui-MacBookAir ~/Desktop/work/Gasida_series/practice/cicd-labs main ± kubectl exec vault-0 -n vault -- vault operator init \
-key-shares=1 \
-key-threshold=1 \
-format=json > cluster-keys.json
# Cluster-keys.json 파일 확인
howoo@ttokkang-ui-MacBookAir ~/Desktop/work/Gasida_series/practice/cicd-labs main ± cat cluster-keys.json | jq
{
"unseal_keys_b64": [
"kMhfCMstHhzYVnBobb51ztbkKdiML+beVGjdFshXYNs="
],
"unseal_keys_hex": [
"90c85f08cb2d1e1cd85670686dbe75ced6e429d88c2fe6de5468dd16c85760db"
],
"unseal_shares": 1,
"unseal_threshold": 1,
"recovery_keys_b64": [],
"recovery_keys_hex": [],
"recovery_keys_shares": 0,
"recovery_keys_threshold": 0,
"root_token": "hvs.9UqYwzkOWQr09tXxr6daJtSj"
# unseal key found in cluster-keys.json
howoo@ttokkang-ui-MacBookAir ~/Desktop/work/Gasida_series/practice/cicd-labs main ± jq -r ".unseal_keys_b64[]" cluster-keys.json
kMhfCMstHhzYVnBobb51ztbkKdiML+beVGjdFshXYNs=
# 환경 변수 지정
howoo@ttokkang-ui-MacBookAir ~/Desktop/work/Gasida_series/practice/cicd-labs main ± VAULT_UNSEAL_KEY=$(jq -r ".unseal_keys_b64[]" cluster-keys.json)
# Unseal Vault running on the vault-0 pod
oo@ttokkang-ui-MacBookAir ~/Desktop/work/Gasida_series/practice/cicd-labs main ± kubectl exec vault-0 -n vault -- vault operator unseal $VAULT_UNSEAL_
KEY
Key Value
--- -----
Seal Type shamir
Initialized true
Sealed false
Total Shares 1
Threshold 1
Version 1.20.4
Build Date 2025-09-23T13:22:38Z
Storage Type file
Cluster Name vault-cluster-0b4e84bc
Cluster ID 644f1035-8de4-b952-38a8-2291929de215
HA Enabled false
# vault-0 pod 확인
howoo@ttokkang-ui-MacBookAir ~/Desktop/work/Gasida_series/practice/cicd-labs main ± kubectl get pod -n vault
NAME READY STATUS RESTARTS AGE
vault-0 1/1 Running 0 91m
# root token found in cluster-keys.json
howoo@ttokkang-ui-MacBookAir ~/Desktop/work/Gasida_series/practice/cicd-labs main ± jq -r ".root_token" cluster-keys.json
hvs.9UqYwzkOWQr09tXxr6daJtSj
Vault login with CLI
howoo@ttokkang-ui-MacBookAir ~/Desktop/work/Gasida_series/practice/cicd-labs main ± brew tap hashicorp/tap
✔︎ JSON API cask.jws.json [Downloaded 15.0MB/ 15.0MB]
✔︎ JSON API formula.jws.json [Downloaded 31.7MB/ 31.7MB]
howoo@ttokkang-ui-MacBookAir ~/Desktop/work/Gasida_series/practice/cicd-labs main ± brew install hashicorp/tap/vault
==> Auto-updating Homebrew...
Adjust how often this is run with `$HOMEBREW_AUTO_UPDATE_SECS` or disable with
`$HOMEBREW_NO_AUTO_UPDATE=1`. Hide these hints with `$HOMEBREW_NO_ENV_HINTS=1` (see `man brew`).
Warning: hashicorp/tap/vault 1.21.1 is already installed and up-to-date.
To reinstall 1.21.1, run:
brew reinstall vault
howoo@ttokkang-ui-MacBookAir ~/Desktop/work/Gasida_series/practice/cicd-labs main ± vault --version
Vault v1.21.1 (2453aac2638a6ae243341b4e0657fd8aea1cbf18), built 2025-11-18T13:04:32Z
# vault status 확인
howoo@ttokkang-ui-MacBookAir ~/Desktop/work/Gasida_series/practice/cicd-labs main ± export VAULT_ADDR='http://localhost:30000'
howoo@ttokkang-ui-MacBookAir ~/Desktop/work/Gasida_series/practice/cicd-labs main ± vault status
Key Value
--- -----
Seal Type shamir
Initialized true
Sealed false
Total Shares 1
Threshold 1
Version 1.20.4
Build Date 2025-09-23T13:22:38Z
Storage Type file
Cluster Name vault-cluster-0b4e84bc
Cluster ID 644f1035-8de4-b952-38a8-2291929de215
HA Enabled false
# Root token으로 로그인
howoo@ttokkang-ui-MacBookAir ~/Desktop/work/Gasida_series/practice/cicd-labs main ± vault login
Token (will be hidden):
Success! You are now authenticated. The token information displayed below
is already stored in the token helper. You do NOT need to run "vault login"
again. Future Vault requests will automatically use this token.
howoo@ttokkang-ui-MacBookAir ~/Desktop/work/Gasida_series/practice/cicd-labs main ± kubectl get svc,ep -n vault vault
NAME TYPE CLUSTER-IP EXTERNAL-IP PORT(S) AGE
service/vault NodePort 10.96.100.179 <none> 8200:30000/TCP,8201:32355/TCP 107m
NAME ENDPOINTS AGE
endpoints/vault 10.244.0.7:8201,10.244.0.7:8200 107m
Vault UI 접속
# audit용 pvc 확인
howoo@ttokkang-ui-MacBookAir ~/Desktop/work/Gasida_series/practice/cicd-labs main ± kubectl get pvc -n vault
NAME STATUS VOLUME CAPACITY ACCESS MODES STORAGECLASS VOLUMEATTRIBUTESCLASS AGE
audit-vault-0 Bound pvc-2e799b30-961c-47f8-8190-6e2674136d79 10Gi RWO standard <unset> 110m
data-vault-0 Bound pvc-ac3a224e-da7c-4fa7-bed9-0c30d3e81479 10Gi RWO standard <unset> 110m
# audit pv에 저장될 수 있게 file audit log 설정
howoo@ttokkang-ui-MacBookAir ~/Desktop/work/Gasida_series/practice/cicd-labs main ± vault audit enable file file_path=/vault/logs/audit.log
Success! Enabled the file audit device at: file/
howoo@ttokkang-ui-MacBookAir ~/Desktop/work/Gasida_series/practice/cicd-labs main ± vault audit list -detailed
Path Type Description Replication Options
---- ---- ----------- ----------- -------
file/ file n/a replicated file_path=/vault/logs/audit.log
# log 확인
howoo@ttokkang-ui-MacBookAir ~/Desktop/work/Gasida_series/practice/cicd-labs main ± kubectl exec -it vault-0 -n vault -- tail -f /vault/logs/audit.log
{"request":{"id":"c1088d68-0c5c-2b02-9b01-fb923ed81388","namespace":{"id":"root"},"operation":"update","path":"sys/audit/test"},"time":"2025-12-01T03:19:23.069745045Z","type":"request"}
{"auth":{"accessor":"hmac-sha256:1784dd5122a5b64cd6c80637f1e74b830a895a707065ba99ce5a9a52c46a518a","client_token":"hmac-sha256:f836428ff71412d9825c112538204f1911b56f264944655fecaf45ebc8fe2c3c","display_name":"root","policies":["root"],"policy_results":{"allowed":true,"granting_policies":[{"type":""},{"name":"root","namespace_id":"root","type":"acl"}]},"token_policies":["root"],"token_issue_time":"2025-12-01T02:55:08Z","token_type":"service"},"request":{"client_id":"0DHqvq2D77kL2/JTPSZkTMJbkFVmUu0TzMi0jiXcFy8=","client_token":"hmac-sha256:f836428ff71412d9825c112538204f1911b56f264944655fecaf45ebc8fe2c3c","client_token_accessor":"hmac-sha256:1784dd5122a5b64cd6c80637f1e74b830a895a707065ba99ce5a9a52c46a518a","data":{"description":"hmac-sha256:d20db63032eb13c56df927a27eeef285db1462578802011bc35422fed0d8d963","local":false,"options":{"file_path":"hmac-sha256:b69bafa34b8f5255e95c3f07dc1b8911e69746870f31fa641091455b6a95cfe1"},"type":"hmac-sha256:36e93a388d112b164efef4f4410471a476bc3e99d456e929dfec10d71ee7267f"},"headers":{"user-agent":["Go-http-client/1.1"]},"id":"e7cc8645-fde1-e434-e33b-7de18eaf928c","mount_accessor":"system_a863f780","mount_class":"secret","mount_point":"sys/","mount_running_version":"v1.20.4+builtin.vault","mount_type":"system","namespace":{"id":"root"},"operation":"update","path":"sys/audit/file","remote_address":"10.244.0.1","remote_port":64206},"time":"2025-12-01T03:19:23.072529043Z","type":"response"}
{"auth":{"accessor":"hmac-sha256:1784dd5122a5b64cd6c80637f1e74b830a895a707065ba99ce5a9a52c46a518a","client_token":"hmac-sha256:f836428ff71412d9825c112538204f1911b56f264944655fecaf45ebc8fe2c3c","display_name":"root","policies":["root"],"policy_results":{"allowed":true,"granting_policies":[{"type":""},{"name":"root","namespace_id":"root","type":"acl"}]},"token_policies":["root"],"token_issue_time":"2025-12-01T02:55:08Z","token_type":"service"},"request":{"client_id":"0DHqvq2D77kL2/JTPSZkTMJbkFVmUu0TzMi0jiXcFy8=","client_token":"hmac-sha256:f836428ff71412d9825c112538204f1911b56f264944655fecaf45ebc8fe2c3c","client_token_accessor":"hmac-sha256:1784dd5122a5b64cd6c80637f1e74b830a895a707065ba99ce5a9a52c46a518a","headers":{"user-agent":["Go-http-client/1.1"]},"id":"ec68e283-8154-6180-3a5b-29d287032b0f","mount_class":"secret","mount_point":"sys/","mount_running_version":"v1.20.4+builtin.vault","mount_type":"system","namespace":{"id":"root"},"operation":"read","path":"sys/audit","remote_address":"10.244.0.1","remote_port":38407},"time":"2025-12-01T03:19:31.867071892Z","type":"request"}
{"auth":{"accessor":"hmac-sha256:1784dd5122a5b64cd6c80637f1e74b830a895a707065ba99ce5a9a52c46a518a","client_token":"hmac-sha256:f836428ff71412d9825c112538204f1911b56f264944655fecaf45ebc8fe2c3c","display_name":"root","policies":["root"],"policy_results":{"allowed":true,"granting_policies":[{"type":""},{"name":"root","namespace_id":"root","type":"acl"}]},"token_policies":["root"],"token_issue_time":"2025-12-01T02:55:08Z","token_type":"service"},"request":{"client_id":"0DHqvq2D77kL2/JTPSZkTMJbkFVmUu0TzMi0jiXcFy8=","client_token":"hmac-sha256:f836428ff71412d9825c112538204f1911b56f264944655fecaf45ebc8fe2c3c","client_token_accessor":"hmac-sha256:1784dd5122a5b64cd6c80637f1e74b830a895a707065ba99ce5a9a52c46a518a","headers":{"user-agent":["Go-http-client/1.1"]},"id":"ec68e283-8154-6180-3a5b-29d287032b0f","mount_accessor":"system_a863f780","mount_class":"secret","mount_point":"sys/","mount_running_version":"v1.20.4+builtin.vault","mount_type":"system","namespace":{"id":"root"},"operation":"read","path":"sys/audit","remote_address":"10.244.0.1","remote_port":38407},"response":{"data":{"file/":{"description":"hmac-sha256:d20db63032eb13c56df927a27eeef285db1462578802011bc35422fed0d8d963","local":false,"options":{"file_path":"hmac-sha256:b69bafa34b8f5255e95c3f07dc1b8911e69746870f31fa641091455b6a95cfe1"},"path":"hmac-sha256:1505a2a94a41e8b3b410ad70a293bbbfc4541bcd1fb0d69a6b4f5be0fd6a8b2b","type":"hmac-sha256:36e93a388d112b164efef4f4410471a476bc3e99d456e929dfec10d71ee7267f"}},"mount_accessor":"system_a863f780","mount_class":"secret","mount_point":"sys/","mount_running_plugin_version":"v1.20.4+builtin.vault","mount_type":"system"},"time":"2025-12-01T03:19:31.867452678Z","type":"response"}
Set a secret in vault
# Enable an instance of the kv-v2 secrets engine at the path secret
howoo@ttokkang-ui-MacBookAir ~/Desktop/work/Gasida_series/practice/cicd-labs main ± vault secrets enable -path=secret kv-v2
Success! Enabled the kv-v2 secrets engine at: secret/
# 확인
howoo@ttokkang-ui-MacBookAir ~/Desktop/work/Gasida_series/practice/cicd-labs main ± vault secrets list -detailed
Path Plugin Accessor Default TTL Max TTL Force No Cache Replication Seal Wrap External Entropy Access Options Description UUID Version Running Version Running SHA256 Deprecation Status
---- ------ -------- ----------- ------- -------------- ----------- --------- ----------------------- ------- ----------- ---- ------- --------------- -------------- ------------------
cubbyhole/ cubbyhole cubbyhole_45e49c9d n/a n/a false local false false map[] per-token private secret storage 0bae9dfc-23b5-7601-fe21-2c23256497cc n/a v1.20.4+builtin.vault n/a n/a
identity/ identity identity_c6002e44 system system false replicated false false map[] identity store c954c63a-8dfe-bf7d-a0e9-0eee5b9293bc n/a v1.20.4+builtin.vault n/a n/a
secret/ kv kv_59d38a94 system system false replicated false false map[version:2] n/a b281e40c-5ae1-f509-8945-dd58862ee310 n/a v0.24.0+builtin n/a supported
sys/ system system_a863f780 n/a n/a false replicated true false map[] system endpoints used for control, policy and debugging 7cf3d12d-ca06-0873-194f-4f787c994c8f n/a v1.20.4+builtin.vault n/a n/a
# Create a secret at path with a username and password
howoo@ttokkang-ui-MacBookAir ~/Desktop/work/Gasida_series/practice/cicd-labs main ± vault kv put secret/webapp/config username="static-user" password="
static-password"
====== Secret Path ======
secret/data/webapp/config
======= Metadata =======
Key Value
--- -----
created_time 2025-12-01T04:41:04.095047282Z
custom_metadata <nil>
deletion_time n/a
destroyed false
version 1
# verift that the secret
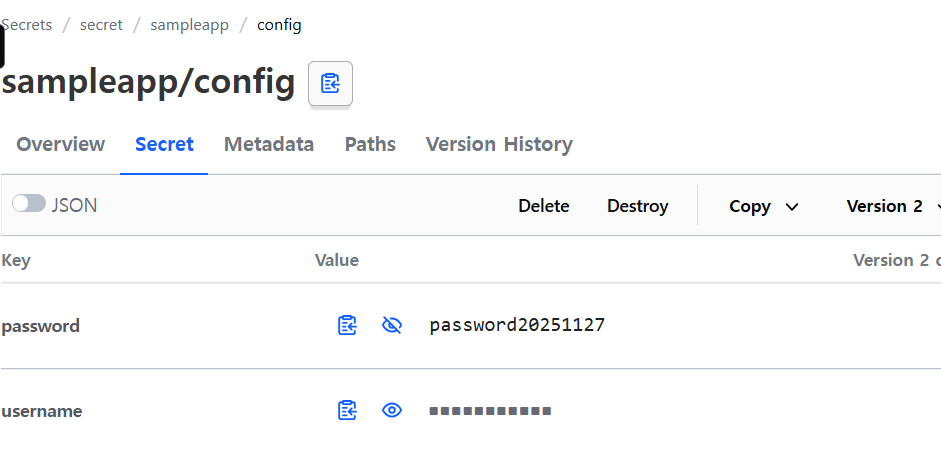
howoo@ttokkang-ui-MacBookAir ~/Desktop/work/Gasida_series/practice/cicd-labs main ± vault kv get secret/webapp/config
====== Secret Path ======
secret/data/webapp/config
======= Metadata =======
Key Value
--- -----
created_time 2025-12-01T04:41:04.095047282Z
custom_metadata <nil>
deletion_time n/a
destroyed false
version 1
====== Data ======
Key Value
--- -----
password static-password
username static-user
# Verify that the secret
howoo@ttokkang-ui-MacBookAir ~/Desktop/work/Gasida_series/practice/cicd-labs main ± curl -s --header "X-Vault-Token: $VAULT_ROOT_TOKEN" --request GET \
> http://127.0.0.1:30000/v1/secret/data/webapp/config | jq
{
"request_id": "81c2010e-2dca-9499-45b2-f62684d95473",
"lease_id": "",
"renewable": false,
"lease_duration": 0,
"data": {
"data": {
"password": "static-password",
"username": "static-user"
},
"metadata": {
"created_time": "2025-12-01T04:41:04.095047282Z",
"custom_metadata": null,
"deletion_time": "",
"destroyed": false,
"version": 1
}
},
"wrap_info": null,
"warnings": null,
"auth": null,
"mount_type": "kv"
}
Configure k8s authentication in Vault
howoo@ttokkang-ui-MacBookAir ~/Desktop/work/Gasida_series/practice/cicd-labs main ± kubectl rolesum vault -n vault
ServiceAccount: vault/vault
Secrets:
Policies:
• [CRB] */vault-server-binding ⟶ [CR] */system:auth-delegator
Resource Name Exclude Verbs G L W C U P D DC
subjectaccessreviews.authorization.k8s.io [*] [-] [-] ✖ ✖ ✖ ✔ ✖ ✖ ✖ ✖
tokenreviews.authentication.k8s.io [*] [-] [-] ✖ ✖ ✖ ✔ ✖ ✖ ✖ ✖
# Enable the k8s authentication method
howoo@ttokkang-ui-MacBookAir ~/Desktop/work/Gasida_series/practice/cicd-labs main ± vault auth enable kubernetes
Success! Enabled kubernetes auth method at: kubernetes/
howoo@ttokkang-ui-MacBookAir ~/Desktop/work/Gasida_series/practice/cicd-labs main ± vault auth list -detailed
Path Plugin Accessor Default TTL Max TTL Token Type Replication Seal Wrap External Entropy Access Options Description UUID Version Running Version Running SHA256 Deprecation Status
---- ------ -------- ----------- ------- ---------- ----------- --------- ----------------------- ------- ----------- ---- ------- --------------- -------------- ------------------
kubernetes/ kubernetes auth_kubernetes_73c97610 system system default-service replicated false false map[] n/a 34d8f9a9-55f9-ad16-ada8-4517347db31d n/a v0.22.2+builtin n/a supported
token/ token auth_token_6d5ee9da system system default-service replicated false false map[] token based credentials 6f024d78-cd9a-5af0-f3ff-63c12216d1ed n/a v1.20.4+builtin.vault n/a n/a
howoo@ttokkang-ui-MacBookAir ~/Desktop/work/Gasida_series/practice/cicd-labs main ± vault auth list
Path Type Accessor Description Version
---- ---- -------- ----------- -------
kubernetes/ kubernetes auth_kubernetes_73c97610 n/a n/a
token/ token auth_token_6d5ee9da token based credentials n/a
# 설정 정보 확인
howoo@ttokkang-ui-MacBookAir ~/Desktop/work/Gasida_series/practice/cicd-labs main ± vault read auth/kubernetes/config
Key Value
--- -----
disable_iss_validation true
disable_local_ca_jwt false
issuer n/a
kubernetes_ca_cert n/a
kubernetes_host https://kubernetes.default.svc
pem_keys []
token_reviewer_jwt_set false
use_annotations_as_alias_metadata false
# Policy write
howoo@ttokkang-ui-MacBookAir ~/Desktop/work/Gasida_series/practice/cicd-labs main ± vault policy write webapp - <<EOF
path "secret/data/webapp/config" {
capabilities = ["read"]
}
EOF
Success! Uploaded policy: webapp
# Create a kubernetes authentication role
howoo@ttokkang-ui-MacBookAir ~/Desktop/work/Gasida_series/practice/cicd-labs main ± vault write auth/kubernetes/role/webapp \
bound_service_account_names=vault \
bound_service_account_namespaces=default \
policies=webapp \
ttl=24h \
audience="https://kubernetes.default.svc.cluster.local"
Success! Data written to: auth/kubernetes/role/webapp
사전 지식
- ServiceAccount
- 파드에서 실행되는 애플리케이션 프로세스에 대한 식별자를 제공, 파드 내부의 애플리케이션 프로세스는 자신에게 부여된 서비스 어카운트의 식별자를 사용하여 클러스터의 API 서버에 인증 가능
- ServiceAccountToken
- kubele이 kube-apiserver로부터 취득한 토큰을 포함한다
- kubelet은 TokenRequest API를 통해 일정 시간 동안 사용할 수 있는 토큰을 발급
- 이렇게 취득한 토큰은 파드가 삭제되거나 지정된 수명 주기 이후에 만료 ( defults 1 hour )
- 이 토큰은 특정한 파드에 바인딩되며 kube-apiserver를 대상으로 한다
- Token Contoller
- Kube-contoller-manager의 일부로써 실행되고 비동기적으로 동작
- ServiceAccount에 대한 삭제를 감시
- ServiceAccountToken Secret에 대한 추가를 감시
- 참조된 서비스어카운트가 존재하는지 확인
- 필요한 경우 secret에 token을 추가
- Service Account Adminission Contolloer
- pod에 .spce.serviceAccountName 항목이 지정되지 않았다면 어드미션 컨트롤러는 실행하려는 파드의 서비스어카운트 이름을 default로 설정한다
- 어드미션 컨트롤러는 실행되는 파드가 참조하는 서비스어카운트가 존재하는 확인
- 만약 해당하는 이름의 서비스어카운트가 존재하지 않는 경우 어드미션 컨트롤러는 파드를 실행시키지 않음
- 이는 defult 서비스어카운트에 대해서도 동일하게 적용
- TokenReQuest API
- 서비스어카운트의 하위 리소스인 TokenRequest를 사용하여 ㅇ리정 시간 동안 해당 서비스어카운트에서 사용할 수 있는 토큰을 가져올 수 있다.
- 컨테이너 내에서 사용하고 위한 API토큰을 얻기위해 이 요청을 직접 호출할 필요는 없는데 kubeclet 프로젝티드 볼륨을 사용하여 이를 설정하기 때문
- 인증/인가 seriese
- JWT ( JsonWebToken )
- k8s에서는 Bearer 토큰을 전송할 떄 주로 JWT을 사용
- JSON 형태로 토큰 형식을 정의한 스펙
- OIDC ( OpenID Connect )
- OpenID 인증 + OAuth2.0 인가
- Json 포멧을 이용한 RESTful API 형식으로 인증
- iss : 토큰 발행자
- sub : 사용자를 구분하기 위한 유니크한 구분자
- iat : 토큰이 발행되는 시간을 Unix time으로 표기한 것
- exp : 토큰이 만료되는 시간을 Unix time으로 표기한 것
- aud : ID token이 어떤 client를 위해 발급된것인지
- JWT ( JsonWebToken )
Launch a web application
howoo@ttokkang-ui-MacBookAir ~/Desktop/work/Gasida_series/practice/cicd-labs main ± >....
env:
- name: VAULT_ADDR
value: 'http://vault.vault.svc:8200'
- name: JWT_PATH
value: '/var/run/secrets/kubernetes.io/serviceaccount/token'
- name: SERVICE_PORT
value: '8080'
volumeMounts:
- name: sa-token
mountPath: /var/run/secrets/kubernetes.io/serviceaccount
readOnly: true
volumes:
- name: sa-token
projected:
sources:
- serviceAccountToken:
path: token
expirationSeconds: 600 # 10분 만료 , It defaults to 1 hour and must be at least 10 minutes (600 seconds)
---
apiVersion: v1
kind: Service
metadata:
name: webapp
spec:
selector:
app: webapp
type: NodePort
ports:
- port: 80
targetPort: 8080
protocol: TCP
nodePort: 30001
EOF
deployment.apps/webapp created
service/webapp created
howoo@ttokkang-ui-MacBookAir ~/Desktop/work/Gasida_series/practice/cicd-labs main ± kubectl gtet pod -l app-webapp
error: unknown command "gtet" for "kubectl"
Did you mean this?
set
get
✘ howoo@ttokkang-ui-MacBookAir ~/Desktop/work/Gasida_series/practice/cicd-labs main ± kubectl get pod -l app=webapp
NAME READY STATUS RESTARTS AGE
webapp-9484c6fd7-8rp9m 1/1 Running 0 33s
howoo@ttokkang-ui-MacBookAir ~/Desktop/work/Gasida_series/practice/cicd-labs main ± kubectl exec -it deploy/webapp -- cat /app/main.go
package main
import (
"fmt"
"log"
"os"
"time"
"bytes"
"net/http"
"io/ioutil"
"encoding/json"
)
func main() {
vaultToken := "root"
port := os.Getenv("SERVICE_PORT")
if port == "" {
port = "8080"
log.Println("PORT environment variable not set, defaulting to", port)
}
vaultUrl := os.Getenv("VAULT_ADDR")
if vaultUrl == "" {
vaultUrl = "http://vault:8200"
}
http.HandleFunc("/", func(w http.ResponseWriter, r *http.Request) {
log.Println("Received Request - Port forwarding is working.")
// If the JWT path is setup then get the new token from Vault using the k8s Auth
jwtPath := os.Getenv("JWT_PATH")
if jwtPath != "" {
jwtFile, err := ioutil.ReadFile(jwtPath)
if err != nil {
fmt.Println("Error reading JWT file at", jwtPath, ": ", err)
return
}
jwt := string(jwtFile)
fmt.Println("Read JWT:", jwt)
authPath := "auth/kubernetes/login"
// Create the payload for Vault authentication
pl := VaultJWTPayload { Role: "webapp", JWT: jwt }
jwtPayload, err := json.Marshal(pl)
if err != nil {
fmt.Println("Error encoding Vault request JSON:", err)
return
}
// Send a request to Vault to retrieve a token
vaultLoginResponse := &VaultLoginResponse{}
err = SendRequest(vaultUrl + "/v1/" + authPath, "", "POST", jwtPayload, vaultLoginResponse)
if err != nil {
fmt.Println("Error getting response from Vault k8s login:", err)
return
}
vaultToken = vaultLoginResponse.Auth.ClientToken
fmt.Println("Retrieved token: ", vaultToken)
}
secretsPath := "secret/data/webapp/config"
// Send a request to Vault using the token to retrieve the secret
vaultSecretResponse := &VaultSecretResponse{}
err := SendRequest(vaultUrl + "/v1/" + secretsPath, vaultToken, "GET", nil, &vaultSecretResponse)
if err != nil {
fmt.Println("Error getting secret from Vault:", err)
return
}
secretResponseData, ok := vaultSecretResponse.Data.Data.(map[string]interface{})
if ok {
for key, value := range secretResponseData {
fmt.Fprintf(w, "%s:%s ", key, value)
}
} else {
fmt.Println("Error getting the secret from Vault, cannot convert Data to map[string]interface{}")
}
})
log.Println("Listening on port", port)
if err := http.ListenAndServe(":" + port, nil); err != nil {
log.Fatalf("Failed to start server:", err)
}
}
func SendRequest(url string, token string, requestType string, payload []byte, target interface{}) error {
req, err := http.NewRequest(requestType, url, bytes.NewBuffer(payload))
if err != nil {
fmt.Println("Error creating request:", err)
return err
}
req.Header.Set("Content-Type", "application/json")
if token != "" {
req.Header.Set("X-Vault-Token", token)
}
client := &http.Client{Timeout: 10 * time.Second}
res, err := client.Do(req)
if err != nil {
fmt.Println("Error sending request to Vault:", err)
return err
}
defer res.Body.Close()
return json.NewDecoder(res.Body).Decode(target)
}%
howoo@ttokkang-ui-MacBookAir ~/Desktop/work/Gasida_series/practice/cicd-labs main ± curl 127.0.0.1:30001
password:static-password username:static-user %
howoo@ttokkang-ui-MacBookAir ~/Desktop/work/Ga
Vault 에서 secret 업데이트 후 변경 반영 확인
howoo@ttokkang-ui-MacBookAir ~/Desktop/work/Gasida_series/practice/cicd-labs main ± vault kv put secret/webapp/config username="changed-user" password="c
hanged-password"
====== Secret Path ======
secret/data/webapp/config
======= Metadata =======
Key Value
--- -----
created_time 2025-12-02T03:14:59.597295438Z
custom_metadata <nil>
deletion_time n/a
destroyed false
version 2
howoo@ttokkang-ui-MacBookAir ~/Desktop/work/Gasida_series/practice/cicd-labs main ± vault kv get secret/webapp/config
====== Secret Path ======
secret/data/webapp/config
======= Metadata =======
Key Value
--- -----
created_time 2025-12-02T03:14:59.597295438Z
custom_metadata <nil>
deletion_time n/a
destroyed false
version 2
====== Data ======
Key Value
--- -----
password changed-password
username changed-user
howoo@ttokkang-ui-MacBookAir ~/Desktop/work/Gasida_series/practice/cicd-labs main ± curl 127.0.0.1:30001
password:changed-password username:changed-user %
Vault Secrets Operaor ( VSO )
실습 환경
# Cluster 생성 및 확인
howoo@ttokkang-ui-MacBookAir ~/Desktop/work/Gasida_series/practice/cicd-labs main ± docker ps
CONTAINER ID IMAGE COMMAND CREATED STATUS PORTS NAMES
bd636784c73a kindest/node:v1.32.8 "/usr/local/bin/entr…" 2 minutes ago Up 2 minutes 0.0.0.0:80->80/tcp, 0.0.0.0:443->443/tcp, 0.0.0.0:30000-30001->30000-30001/tcp, 127.0.0.1:50797->6443/tcp myk8s-control-plane
howoo@ttokkang-ui-MacBookAir ~/Desktop/work/Gasida_series/practice/cicd-labs main ± kubectl get node
NAME STATUS ROLES AGE VERSION
myk8s-control-plane Ready control-plane 2m56s v1.32.8
docker exec -it myk8s-control-plane sh -c 'apt update && apt install tree psmisc lsof wget net-tools dnsutils tcpdump ngrep iputils-ping git vim -y'
# vault 설치 : dev 모드 활성화 설치
howoo@ttokkang-ui-MacBookAir ~/Desktop/work/Gasida_series/practice/cicd-labs main ± git clone https://github.com/hashicorp-education/learn-vault-secrets-operator
Cloning into 'learn-vault-secrets-operator'...
remote: Enumerating objects: 208, done.
remote: Counting objects: 100% (93/93), done.
remote: Compressing objects: 100% (47/47), done.
remote: Total 208 (delta 49), reused 62 (delta 46), pack-reused 115 (from 1)
Receiving objects: 100% (208/208), 42.14 KiB | 770.00 KiB/s, done.
Resolving deltas: 100% (113/113), done.
howoo@ttokkang-ui-MacBookAir ~/Desktop/work/Gasida_series/practice/cicd-labs/learn-vault-secrets-operator main cat <<EOF > vault-values.yaml
server:
image:
repository: "hashicorp/vault"
tag: "1.19.0"
dev:
enabled: true
devRootToken: "root"
.
.
.
howoo@ttokkang-ui-MacBookAir ~/Desktop/work/Gasida_series/practice/cicd-labs/learn-vault-secrets-operator main helm install vault hashicorp/vault -n vault --create-namespace --values vault-values.yaml --version 0.30.0
NAME: vault
LAST DEPLOYED: Tue Dec 2 13:42:32 2025
NAMESPACE: vault
STATUS: deployed
REVISION: 1
NOTES:
Thank you for installing HashiCorp Vault!
howoo@ttokkang-ui-MacBookAir ~/Desktop/work/Gasida_series/practice/cicd-labs/learn-vault-secrets-operator main kubectl get pods -n vault
NAME READY STATUS RESTARTS AGE
vault-0 1/1 Running 0 2m55s
Vault 설정
# Vault 로그인 : token ( root )
howoo@ttokkang-ui-MacBookAir ~/Desktop/work/Gasida_series/practice/cicd-labs/learn-vault-secrets-operator main vault login
Token (will be hidden):
Success! You are now authenticated. The token information displayed below
is already stored in the token helper. You do NOT need to run "vault login"
again. Future Vault requests will automatically use this token.
Key Value
--- -----
token root
token_accessor 3uoZA3u6nYTe4Tcohlbo9KGE
token_duration ∞
token_renewable false
token_policies ["root"]
identity_policies []
policies ["root"]
# kubernetes 인증 활성화
howoo@ttokkang-ui-MacBookAir ~/Desktop/work/Gasida_series/practice/cicd-labs/learn-vault-secrets-operator main vault auth enable -path demo-auth-mount ku
bernetes
Success! Enabled kubernetes auth method at: demo-auth-mount/
howoo@ttokkang-ui-MacBookAir ~/Desktop/work/Gasida_series/practice/cicd-labs/learn-vault-secrets-operator main vault write auth/demo-auth-mount/config ku
bernetes_host="https://https://kubernetes.default.svc"
Success! Data written to: auth/demo-auth-mount/config
# secret ( engine_v2 ) 활성화
✘ howoo@ttokkang-ui-MacBookAir ~/Desktop/work/Gasida_series/practice/cicd-labs/learn-vault-secrets-operator main vault secrets enable -path=kvv2 kv-v2
Success! Enabled the kv-v2 secrets engine at: kvv2/
# Create a JSON file with a vault policy
howoo@ttokkang-ui-MacBookAir ~/Desktop/work/Gasida_series/practice/cicd-labs/learn-vault-secrets-operator main tee webapp.json <<EOF
path "kvv2/data/webapp/config" {
capabilities = ["read", "list"]
}
EOF
path "kvv2/data/webapp/config" {
capabilities = ["read", "list"]
}
howoo@ttokkang-ui-MacBookAir ~/Desktop/work/Gasida_series/practice/cicd-labs/learn-vault-secrets-operator main vault policy write webapp webapp.json
Success! Uploaded policy: webapp
howoo@ttokkang-ui-MacBookAir ~/Desktop/work/Gasida_series/practice/cicd-labs/learn-vault-secrets-operator main vault write auth/demo-auth-mount/role/role1 \
bound_service_account_names=demo-static-app \
bound_service_account_namespaces=app \
policies=webapp \
audience=vault \
ttl=24h
Success! Data written to: auth/demo-auth-mount/role/role1
howoo@ttokkang-ui-MacBookAir ~/Desktop/work/Gasida_series/practice/cicd-labs/learn-vault-secrets-operator main vault kv put kvv2/webapp/config username="
static-user" password="static-password"
===== Secret Path =====
kvv2/data/webapp/config
======= Metadata =======
Key Value
--- -----
created_time 2025-12-02T04:55:57.772444472Z
custom_metadata <nil>
deletion_time n/a
destroyed false
version 1
Vault Secrets Operator 설치
# Helm version 확인
howoo@ttokkang-ui-MacBookAir ~/Desktop/work/Gasida_series/practice/cicd-labs/learn-vault-secrets-operator main helm version
version.BuildInfo{Version:"v3.19.0", GitCommit:"3d8990f0836691f0229297773f3524598f46bda6", GitTreeState:"clean", GoVersion:"go1.25.1"}
# VSO 설치
howoo@ttokkang-ui-MacBookAir ~/Desktop/work/Gasida_series/practice/cicd-labs/learn-vault-secrets-operator main helm install vault-secrets-operator hashicorp/vault-secrets-operator -n vault-secrets-operator-system --create-namespace --values vault/vault-operator-values.yaml --version 0.7.1
NAME: vault-secrets-operator
LAST DEPLOYED: Tue Dec 2 14:48:25 2025
NAMESPACE: vault-secrets-operator-system
STATUS: deployed
REVISION: 1
# 설치 확인
howoo@ttokkang-ui-MacBookAir ~/Desktop/work/Gasida_series/practice/cicd-labs/learn-vault-secrets-operator main kubectl get-all -n vaul
t-secrets-operator-system
NAME NAMESPACE AGE
configmap/kube-root-ca.crt vault-secrets-operator-system 2m45s
configmap/vault-secrets-operator-manager-config vault-secrets-operator-system 2m45s
endpoints/vault-secrets-operator-metrics-service vault-secrets-operator-system 2m45s
pod/vault-secrets-operator-controller-manager-5b646c7766-66b87 vault-secrets-operator-system 2m45s
secret/sh.helm.release.v1.vault-secrets-operator.v1 vault-secrets-operator-system 2m45s
secret/vso-cc-storage-hmac-key vault-secrets-operator-system 2m25s
serviceaccount/default vault-secrets-operator-system 2m45s
serviceaccount/vault-secrets-operator-controller-manager vault-secrets-operator-system 2m45s
service/vault-secrets-operator-metrics-service vault-secrets-operator-system 2m45s
deployment.apps/vault-secrets-operator-controller-manager vault-secrets-operator-system 2m45s
replicaset.apps/vault-secrets-operator-controller-manager-5b646c7766 vault-secrets-operator-system 2m45s
lease.coordination.k8s.io/b0d477c0.hashicorp.com vault-secrets-operator-system 2m25s
endpointslice.discovery.k8s.io/vault-secrets-operator-metrics-service-7lk4j vault-secrets-operator-system 2m45s
rolebinding.rbac.authorization.k8s.io/vault-secrets-operator-leader-election-rolebinding vault-secrets-operator-system 2m45s
role.rbac.authorization.k8s.io/vault-secrets-operator-leader-election-role vault-secrets-operator-system 2m45s
vaultauth.secrets.hashicorp.com/vault-secrets-operator-default-transit-auth vault-secrets-operator-system 2m43s
vaultconnection.secrets.hashicorp.com/default vault-secrets-operator-system 2m43s
howoo@ttokkang-ui-MacBookAir ~/Desktop/work/Gasida_series/practice/cicd-labs/learn-vault-secrets-operator main kubectl get crd | grep se
crets.hashicorp.com
hcpauths.secrets.hashicorp.com 2025-12-02T05:48:25Z
hcpvaultsecretsapps.secrets.hashicorp.com 2025-12-02T05:48:25Z
secrettransformations.secrets.hashicorp.com 2025-12-02T05:48:25Z
vaultauths.secrets.hashicorp.com 2025-12-02T05:48:25Z
vaultconnections.secrets.hashicorp.com 2025-12-02T05:48:25Z
vaultdynamicsecrets.secrets.hashicorp.com 2025-12-02T05:48:25Z
vaultpkisecrets.secrets.hashicorp.com 2025-12-02T05:48:25Z
vaultstaticsecrets.secrets.hashicorp.com 2025-12-02T05:48:25Z
# vso pod 상세 정보 확인
howoo@ttokkang-ui-MacBookAir ~/Desktop/work/Gasida_series/practice/cicd-labs/learn-vault-secrets-operator main kubectl describe pod -n v
ault-secrets-operator-system
Name: vault-secrets-operator-controller-manager-5b646c7766-66b87
Namespace: vault-secrets-operator-system
.
.
.
Tolerations: node.kubernetes.io/not-ready:NoExecute op=Exists for 300s
node.kubernetes.io/unreachable:NoExecute op=Exists for 300s
Events:
Type Reason Age From Message
---- ------ ---- ---- -------
Normal Scheduled 4m51s default-scheduler Successfully assigned vault-secrets-operator-system/vault-secrets-operator-controller-manager-5b646c7766-66b87 to myk8s-control-plane
Normal Pulling 4m51s kubelet Pulling image "gcr.io/kubebuilder/kube-rbac-proxy:v0.15.0"
Normal Pulled 4m41s kubelet Successfully pulled image "gcr.io/kubebuilder/kube-rbac-proxy:v0.15.0" in 9.842s (9.842s including waiting). Image size: 23450421 bytes.
Normal Created 4m41s kubelet Created container: kube-rbac-proxy
Normal Started 4m41s kubelet Started container kube-rbac-proxy
Normal Pulling 4m41s kubelet Pulling image "hashicorp/vault-secrets-operator:0.7.1"
Normal Pulled 4m32s kubelet Successfully pulled image "hashicorp/vault-secrets-operator:0.7.1" in 9.451s (9.451s including waiting). Image size: 31493165 bytes.
Normal Created 4m32s kubelet Created container: manager
Normal Started 4m32s kubelet Started container manager
# CRD 확인
howoo@ttokkang-ui-MacBookAir ~/Desktop/work/Gasida_series/practice/cicd-labs/learn-vault-secrets-operator main kubectl get vaultconnecti
ons,vaultauths -n vault-secrets-operator-system
NAME AGE
vaultconnection.secrets.hashicorp.com/default 5m58s
NAME AGE
vaultauth.secrets.hashicorp.com/vault-secrets-operator-default-transit-auth 5m58s
# vaultauth CRD 확인
howoo@ttokkang-ui-MacBookAir ~/Desktop/work/Gasida_series/practice/cicd-labs/learn-vault-secrets-operator main kubectl get vaultauth -n vault-secrets-operator-system vault-secrets-operator-default-transit-auth -o jsonpath='{.spec}' | jq
{
"kubernetes": {
"audiences": [
"vault"
],
"role": "auth-role-operator",
"serviceAccount": "vault-secrets-operator-controller-manager",
"tokenExpirationSeconds": 600
},
"method": "kubernetes",
"mount": "demo-auth-mount",
"storageEncryption": {
"keyName": "vso-client-cache",
"mount": "demo-transit"
},
"vaultConnectionRef": "default"
}
# vaultconnection CRD 확인
howoo@ttokkang-ui-MacBookAir ~/Desktop/work/Gasida_series/practice/cicd-labs/learn-vault-secrets-operator main kubectl get vaultconnecti
on -n vault-secrets-operator-system default -o jsonpath='{.spec}' | jq
{
"address": "http://vault.vault.svc.cluster.local:8200",
"skipTLSVerify": false
}
Deploy and sync a secret 실습
# namespace 생성
howoo@ttokkang-ui-MacBookAir ~/Desktop/work/Gasida_series/practice/cicd-labs/learn-vault-secrets-operator main kubectl create ns app
namespace/app created
# CRD 확인 : vaultauths
howoo@ttokkang-ui-MacBookAir ~/Desktop/work/Gasida_series/practice/cicd-labs/learn-vault-secrets-operator main kubectl explain vaultauths
GROUP: secrets.hashicorp.com
KIND: VaultAuth
VERSION: v1beta1
.
.
.
# service account, vaultauth 생성
howoo@ttokkang-ui-MacBookAir ~/Desktop/work/Gasida_series/practice/cicd-labs/learn-vault-secrets-operator main kubectl apply -f vault/va
ult-auth-static.yaml
serviceaccount/demo-operator created
serviceaccount/demo-static-app created
vaultauth.secrets.hashicorp.com/static-auth created
# 생성 확인
howoo@ttokkang-ui-MacBookAir ~/Desktop/work/Gasida_series/practice/cicd-labs/learn-vault-secrets-operator main kubectl get sa,vaultauth -n app
NAME SECRETS AGE
serviceaccount/default 0 20m
serviceaccount/demo-static-app 0 52s
NAME AGE
vaultauth.secrets.hashicorp.com/static-auth 52s
# CRD 생성
howoo@ttokkang-ui-MacBookAir ~/Desktop/work/Gasida_series/practice/cicd-labs/learn-vault-secrets-operator main kubectl apply -f vault/st
atic-secret.yaml
vaultstaticsecret.secrets.hashicorp.com/vault-kv-app created
# CRD 생성 확인
howoo@ttokkang-ui-MacBookAir ~/Desktop/work/Gasida_series/practice/cicd-labs/learn-vault-secrets-operator main kubectl get vaultstaticse
cret -n app
NAME AGE
vault-kv-app 50s
rotate the static secret
howoo@ttokkang-ui-MacBookAir ~/Desktop/work/Gasida_series/practice/cicd-labs/learn-vault-secrets-operator/vault main kubectl get-all -
n app
NAME NAMESPACE AGE
configmap/kube-root-ca.crt app 32m
serviceaccount/default app 32m
serviceaccount/demo-static-app app 11m
vaultauth.secrets.hashicorp.com/static-auth app 11m
vaultstaticsecret.secrets.hashicorp.com/vault-kv-app app 8m49s
howoo@ttokkang-ui-MacBookAir ~/Desktop/work/Gasida_series/practice/cicd-labs/learn-vault-secrets-operator/vault main kubectl krew instal
l view-secret
Updated the local copy of plugin index.
New plugins available:
* commatrix
* kfilt
Installing plugin: view-secret
Installed plugin: view-secret
\
| Use this plugin:
| kubectl view-secret
| Documentation:
| https://github.com/elsesiy/kubectl-view-secret
/
WARNING: You installed plugin "view-secret" from the krew-index plugin repository.
These plugins are not audited for security by the Krew maintainers.
Run them at your own risk.
# 실패 next mission
Dynamic secret
PostgreSQL pod 배포 및 Vault Database Secret Engine 설정
# namespace 생성
kubectl create ns postgres
# Add the Bitnami
howoo@ttokkang-ui-MacBookAir ~/Desktop/work/Gasida_series/practice/cicd-labs main ± helm repo add bitnami https://charts.bitnami.com/bitnami
"bitnami" already exists with the same configuration, skipping
# PostgreSQL 설치
helm upgrade --install postgres bitnami/postgresql --namespace postgres --set auth.audit.logConnections=true --set auth.postgresPassword=secret-pass
Release "postgres" does not exist. Installing it now.
NAME: postgres
LAST DEPLOYED: Tue Dec 2 16:11:18 2025
NAMESPACE: postgres
.
.
.
# 확인
howoo@ttokkang-ui-MacBookAir ~/Desktop/work/Gasida_series/practice/cicd-labs main ± kubectl get sts,pod,svc,ep,pvc,secret -n postgres
NAME READY AGE
statefulset.apps/postgres-postgresql 1/1 78s
NAME READY STATUS RESTARTS AGE
pod/postgres-postgresql-0 1/1 Running 0 78s
NAME TYPE CLUSTER-IP EXTERNAL-IP PORT(S) AGE
service/postgres-postgresql ClusterIP 10.96.82.91 <none> 5432/TCP 78s
service/postgres-postgresql-hl ClusterIP None <none> 5432/TCP 78s
NAME ENDPOINTS AGE
endpoints/postgres-postgresql 10.244.0.8:5432 78s
endpoints/postgres-postgresql-hl 10.244.0.8:5432 78s
NAME STATUS VOLUME CAPACITY ACCESS MODES STORAGECLASS VOLUMEATTRIBUTESCLASS AGE
persistentvolumeclaim/data-postgres-postgresql-0 Bound pvc-915b058b-2b82-4933-b51e-46db3810b0c3 8Gi RWO standard <unset> 78s
NAME TYPE DATA AGE
secret/postgres-postgresql Opaque 1 78s
secret/sh.helm.release.v1.postgres.v1 helm.sh/release.v1 1 78s
howoo@ttokkang-ui-MacBookAir ~/Desktop/work/Gasida_series/practice/cicd-labs main ± kubectl view-secret -n postgres postgres-postgresql --all
secret-pass
# postgreSQL 로그인 확인
kubectl exec -it -n postgres postgres-postgresql-0 -- sh -c "PGPASSWORD=secret-pass psql -U postgres -h localhost -c '\l'"
List of databases
Name | Owner | Encoding | Locale Provider | Collate | Ctype | Locale | ICU Rules | Access privileges
-----------+----------+----------+-----------------+-------------+-------------+--------+-----------+-----------------------
postgres | postgres | UTF8 | libc | en_US.UTF-8 | en_US.UTF-8 | | |
template0 | postgres | UTF8 | libc | en_US.UTF-8 | en_US.UTF-8 | | | =c/postgres +
| | | | | | | | postgres=CTc/postgres
template1 | postgres | UTF8 | libc | en_US.UTF-8 | en_US.UTF-8 | | | =c/postgres +
| | | | | | | | postgres=CTc/postgres
(3 rows)
Vault 설정
# Enable an instance of the DB secrets Engine
howoo@ttokkang-ui-MacBookAir ~/Desktop/work/Gasida_series/practice/cicd-labs main ± vault secrets enable -path=demo-db database
Success! Enabled the database secrets engine at: demo-db/
# configure the DB secrets Engine
howoo@ttokkang-ui-MacBookAir ~/Desktop/work/Gasida_series/practice/cicd-labs main ± vault write demo-db/config/demo-db \
plugin_name=postgresql-database-plugin \
allowed_roles="dev-postgres" \
connection_url="postgresql://{{username}}:{{password}}@postgres-postgresql.postgres.svc.cluster.local:5432/postgres?sslmode=disable" \
username="postgres" \
password="secret-pass"
Success! Data written to: demo-db/config/demo-db
# 확인
howoo@ttokkang-ui-MacBookAir ~/Desktop/work/Gasida_series/practice/cicd-labs main ± vault read demo-db/config/demo-db
Key Value
--- -----
allowed_roles [dev-postgres]
connection_details map[connection_url:postgresql://{{username}}:{{password}}@postgres-postgresql.postgres.svc.cluster.local:5432/postgres?sslmode=disable username:postgres]
disable_automated_rotation false
password_policy n/a
plugin_name postgresql-database-plugin
plugin_version n/a
root_credentials_rotate_statements []
rotation_period 0s
rotation_schedule n/a
rotation_window 0
skip_static_role_import_rotation false
verify_connection true
# DB user 동적 생성 Role 등록
howoo@ttokkang-ui-MacBookAir ~/Desktop/work/Gasida_series/practice/cicd-labs main ± vault write demo-db/roles/dev-postgres \
db_name=demo-db \
creation_statements="CREATE ROLE \"{{name}}\" WITH LOGIN PASSWORD '{{password}}' VALID UNTIL '{{expiration}}'; \
GRANT ALL PRIVILEGES ON DATABASE postgres TO \"{{name}}\";" \
revocation_statements="REVOKE ALL ON DATABASE postgres FROM \"{{name}}\";" \
backend=demo-db \
name=dev-postgres \
default_ttl="10m" \
max_ttl="20m"
Success! Data written to: demo-db/roles/dev-postgres
# 확인
howoo@ttokkang-ui-MacBookAir ~/Desktop/work/Gasida_series/practice/cicd-labs main ± vault read demo-db/roles/dev-postgres
Key Value
--- -----
creation_statements [CREATE ROLE "{{name}}" WITH LOGIN PASSWORD '{{password}}' VALID UNTIL '{{expiration}}'; GRANT ALL PRIVILEGES ON DATABASE postgres TO "{{name}}";]
credential_type password
db_name demo-db
default_ttl 10m
max_ttl 20m
renew_statements []
revocation_statements [REVOKE ALL ON DATABASE postgres FROM "{{name}}";]
rollback_statements []
# Create the demo-auth-policy-db policy
howoo@ttokkang-ui-MacBookAir ~/Desktop/work/Gasida_series/practice/cicd-labs main ± vault policy write demo-auth-policy-db - <<EOF
path "demo-db/creds/dev-postgres" {
capabilities = ["read"]
}
EOF
Success! Uploaded policy: demo-auth-policy-db
# postgreSQL 확인
howoo@ttokkang-ui-MacBookAir ~/Desktop/work/Gasida_series/practice/cicd-labs main ± kubectl exec -it -n postgres postgres-postgresql-0 -- sh -c "PGPASSWORD=secret-pass psql -U postgres -h localhost -c '\du'"
List of roles
Role name | Attributes
-----------+------------------------------------------------------------
postgres | Superuser, Create role, Create DB, Replication, Bypass RLS
Setup dynamic secrets
# Create a new role for the dynamic secret
howoo@ttokkang-ui-MacBookAir ~/Desktop/work/Gasida_series/practice/cicd-labs main ± vault write auth/demo-auth-mount/role/auth-role \
bound_service_account_names=demo-dynamic-app \
bound_service_account_namespaces=demo-ns \
token_ttl=0 \
token_period=120 \
token_policies=demo-auth-policy-db \
audience=vault
Success! Data written to: auth/demo-auth-mount/role/auth-role
# 확인
howoo@ttokkang-ui-MacBookAir ~/Desktop/work/Gasida_series/practice/cicd-labs main ± vault read auth/demo-auth-mount/role/auth-role
Key Value
--- -----
alias_name_source serviceaccount_uid
audience vault
bound_service_account_names [demo-dynamic-app]
bound_service_account_namespace_selector n/a
bound_service_account_namespaces [demo-ns]
token_bound_cidrs []
token_explicit_max_ttl 0s
token_max_ttl 0s
token_no_default_policy false
token_num_uses 0
token_period 2m
token_policies [demo-auth-policy-db]
token_ttl 0s
token_type default
Create the application : demo-ns , namespace에 vso-db-demo pod가 동적 암호를 사용할 수 있게 해보기
# namespace 생성
howoo@ttokkang-ui-MacBookAir ~/Desktop/work/Gasida_series/practice/cicd-labs main ± kubectl create ns demo-ns
namespace/demo-ns created
# deployment, secret, serviceaccount, crd 생성
howoo@ttokkang-ui-MacBookAir ~/Desktop/work/Gasida_series/practice/cicd-labs/learn-vault-secrets-operator main kubectl apply -f dynamic-secrets/.
deployment.apps/vso-db-demo created
secret/vso-db-demo created
serviceaccount/demo-dynamic-app created
vaultauth.secrets.hashicorp.com/dynamic-auth created
vaultdynamicsecret.secrets.hashicorp.com/vso-db-demo-create created
vaultdynamicsecret.secrets.hashicorp.com/vso-db-demo created
serviceaccount/demo-operator unchanged
# 실습 실패
howoo@ttokkang-ui-MacBookAir ~/Desktop/work/Gasida_series/practice/cicd-labs/learn-vault-secrets-operator/dynamic-secrets main ± kubectl get pods -n demo-ns
NAME READY STATUS RESTARTS AGE
vso-db-demo-66d65747cc-hgv69 0/1 CreateContainerConfigError 0 5m33s
vso-db-demo-66d65747cc-phjnf 0/1 CreateContainerConfigError 0 5m33s
vso-db-demo-67f877bbc5-jtrlb 0/1 CreateContainerConfigError 0 13s
vso-db-demo-67f877bbc5-zvdvp 0/1 CreateContainerConfigError 0 13s
# default vault url은 아래가 맞음
http://vault.vault.svc.cluster.local:8200
# pod내부에서는 로그인 되지만 pod 외부에서는 로그인이 안됨
export VAULT_ADDR='http://vault.vault.svc.cluster.local:8200'
howoo@ttokkang-ui-MacBookAir ~/Desktop/work/Gasida_series/practice/cicd-labs/learn-vault-secrets-operator/dynamic-secrets main ± vault login
Token (will be hidden):
Error authenticating: error looking up token: Get "http://vault.vault.svc.cluster.local:8200/v1/auth/token/lookup-self": dial tcp: lookup vault.vault.svc.cluster.local: no such host
# yaml 수정 후 재배포
kubectl -n <vault-operator-namespace> get vaultconnection vault-connection -o yaml
# 다시 확인해보니 내 local에 listening 돼 있는 vault TCP는 30000
# vaultconnection.yaml file 수정 후 재배포
meta.helm.sh/release-name: vault-secrets-operator
meta.helm.sh/release-namespace: vault-secrets-operator-system
creationTimestamp: "2025-12-02T05:48:28Z"
finalizers:
- vaultconnection.secrets.hashicorp.com/finalizer
generation: 3
labels:
app.kubernetes.io/component: controller-manager
app.kubernetes.io/instance: vault-secrets-operator
app.kubernetes.io/managed-by: Helm
app.kubernetes.io/name: vault-secrets-operator
app.kubernetes.io/version: 0.7.1
component: controller-manager
control-plane: controller-manager
helm.sh/chart: vault-secrets-operator-0.7.1
name: default
namespace: vault-secrets-operator-system
resourceVersion: "19623"
uid: 3f176bb3-a5f3-4388-9081-a85699cdddb9
spec:
address: http://http://vault.vault.svc.cluster.local:30000
skipTLSVerify: false
status:
valid: false
kind: List
metadata:
resourceVersion: ""
# vault login 확인
# pod 재실행
kubectl -n demo-ns rollout restart deploy/vso-db-demo
# 실패 , 제자리
PKI secret
# Enable the PKI secrets
howoo@ttokkang-ui-MacBookAir ~/Desktop/work/Gasida_series/practice/cicd-labs/learn-vault-secrets-operator/dynamic-secrets main ± vault secrets enable pki
Success! Enabled the pki secrets engine at: pki/
# configure the max lease time-to-live to 8769h
vault secrets tune -max-lease-ttl=8760h pki
Success! Tuned the secrets engine at: pki/
# Generate a self-signed certificate valid for 8760h
howoo@ttokkang-ui-MacBookAir ~/Desktop/work/Gasida_series/practice/cicd-labs/learn-vault-secrets-operator/dynamic-secrets main ± vault w
rite pki/root/generate/internal \
> common_name=example.com \
> ttl=8760h
WARNING! The following warnings were returned from Vault:
* This mount hasn't configured any authority information access (AIA)
fields; this may make it harder for systems to find missing certificates
in the chain or to validate revocation status of certificates. Consider
updating /config/urls or the newly generated issuer with this information.
Key Value
--- -----
certificate -----BEGIN CERTIFICATE-----
MIIDNTCCAh2gAwIBAgIURBx2IgGhlHuoC5IbIfoO1RzG+rgwDQYJKoZIhvcNAQEL
BQAwFjEUMBIGA1UEAxMLZXhhbXBsZS5jb20wHhcNMjUxMjAzMDEyNDA4WhcNMjYx
MjAzMDEyNDM4WjAWMRQwEgYDVQQDEwtleGFtcGxlLmNvbTCCASIwDQYJKoZIhvcN
AQEBBQADggEPADCCAQoCggEBAL5E3iVGXnnbtYINtUP2h3qL2BYWngEialK2vvMb
2Zn23IqM+8ZmRFxJ4MWZVJEEPqf1G6if7sBLxaXFiAKFyrhWbmNGtyV1PmuPzA/c
WzdlnXaL4sqFknh3forhj4yLW1JpBk4yFBOpoheM0xf4KSHmiTEuV47taRGkD2IB
wj3R22wDSK93vPFKjzYqL4XrzaBF3hvqQdIs4zxvJ/Yu9gRUY0HOrWPsnsSmyk8T
1EHaaQkcRlczNAFS8hxrPxs5ZSH347XSps4DCIJ4iua/1XkvEkmZjeCyi5k9IKNA
+cfMuE2oL93Zy+s44VIjMLBvqSgPk7mXt6JpNBGXgLZWm1sCAwEAAaN7MHkwDgYD
VR0PAQH/BAQDAgEGMA8GA1UdEwEB/wQFMAMBAf8wHQYDVR0OBBYEFPiWE3AlTpWd
t+PXFBEzEtWxTc2UMB8GA1UdIwQYMBaAFPiWE3AlTpWdt+PXFBEzEtWxTc2UMBYG
A1UdEQQPMA2CC2V4YW1wbGUuY29tMA0GCSqGSIb3DQEBCwUAA4IBAQBvRjFL9Nhp
1ZJ9U7D5UFcFJeAi5GXyu/T3yX8+xV52f+FTdscTkcl323pgHryIYDzz6Uu7Y18m
5xJI7l1C6lPopVea+V8OsxAJyRplm8Y97ze6+tp06jYrlOn+kz9v4xXj2g19JAbG
glxVZ0vOcF3JjC/TRHWkW4aKAp9hiGVDvKgq3bVHcoyFror8BwGZVwwrAmnEIb5b
Z6rtkVkgN3eATHU9+bRTOEzzaXYYBAqRrxJP2sRXtqpmRBPHjtaPDPC2r8ZW7KnA
nOyukp9NJtQa+IbFqZ+54IIFADxq3uEa9axn5Fk8LPYd2p2kp1M62uBWdMGE4/+8
Vy0HhIY7Cclx
-----END CERTIFICATE-----
expiration 1796261078
issuer_id 136fda50-440f-6f4d-6cff-c88979ae6839
issuer_name n/a
issuing_ca -----BEGIN CERTIFICATE-----
MIIDNTCCAh2gAwIBAgIURBx2IgGhlHuoC5IbIfoO1RzG+rgwDQYJKoZIhvcNAQEL
BQAwFjEUMBIGA1UEAxMLZXhhbXBsZS5jb20wHhcNMjUxMjAzMDEyNDA4WhcNMjYx
MjAzMDEyNDM4WjAWMRQwEgYDVQQDEwtleGFtcGxlLmNvbTCCASIwDQYJKoZIhvcN
AQEBBQADggEPADCCAQoCggEBAL5E3iVGXnnbtYINtUP2h3qL2BYWngEialK2vvMb
2Zn23IqM+8ZmRFxJ4MWZVJEEPqf1G6if7sBLxaXFiAKFyrhWbmNGtyV1PmuPzA/c
WzdlnXaL4sqFknh3forhj4yLW1JpBk4yFBOpoheM0xf4KSHmiTEuV47taRGkD2IB
wj3R22wDSK93vPFKjzYqL4XrzaBF3hvqQdIs4zxvJ/Yu9gRUY0HOrWPsnsSmyk8T
1EHaaQkcRlczNAFS8hxrPxs5ZSH347XSps4DCIJ4iua/1XkvEkmZjeCyi5k9IKNA
+cfMuE2oL93Zy+s44VIjMLBvqSgPk7mXt6JpNBGXgLZWm1sCAwEAAaN7MHkwDgYD
VR0PAQH/BAQDAgEGMA8GA1UdEwEB/wQFMAMBAf8wHQYDVR0OBBYEFPiWE3AlTpWd
t+PXFBEzEtWxTc2UMB8GA1UdIwQYMBaAFPiWE3AlTpWdt+PXFBEzEtWxTc2UMBYG
A1UdEQQPMA2CC2V4YW1wbGUuY29tMA0GCSqGSIb3DQEBCwUAA4IBAQBvRjFL9Nhp
1ZJ9U7D5UFcFJeAi5GXyu/T3yX8+xV52f+FTdscTkcl323pgHryIYDzz6Uu7Y18m
5xJI7l1C6lPopVea+V8OsxAJyRplm8Y97ze6+tp06jYrlOn+kz9v4xXj2g19JAbG
glxVZ0vOcF3JjC/TRHWkW4aKAp9hiGVDvKgq3bVHcoyFror8BwGZVwwrAmnEIb5b
Z6rtkVkgN3eATHU9+bRTOEzzaXYYBAqRrxJP2sRXtqpmRBPHjtaPDPC2r8ZW7KnA
nOyukp9NJtQa+IbFqZ+54IIFADxq3uEa9axn5Fk8LPYd2p2kp1M62uBWdMGE4/+8
Vy0HhIY7Cclx
-----END CERTIFICATE-----
key_id 967b02fe-8fbe-f2e6-1963-548dd88285be
key_name n/a
serial_number 44:1c:76:22:01:a1:94:7b:a8:0b:92:1b:21:fa:0e:d5:1c:c6:fa:b8
howoo@ttokkang-ui-MacBookAir ~/Desktop/work/Gasida_series/practice/cicd-labs/learn-vault-secrets-operator/dynamic-secrets main ± vault write pki/config/urls \
issuing_certificates="http://vault.vault.svc:8200/v1/pki/ca" \
crl_distribution_points="http://vault.vault.svc:8200/v1/pki/crl"
Key Value
--- -----
crl_distribution_points [http://vault.vault.svc:8200/v1/pki/crl]
enable_templating false
issuing_certificates [http://vault.vault.svc:8200/v1/pki/ca]
ocsp_servers []
howoo@ttokkang-ui-MacBookAir ~/Desktop/work/Gasida_series/practice/cicd-labs/learn-vault-secrets-operator/dynamic-secrets main ± vault r
ead pki/config/urls
Key Value
--- -----
crl_distribution_points [http://vault.vault.svc:8200/v1/pki/crl]
enable_templating false
issuing_certificates [http://vault.vault.svc:8200/v1/pki/ca]
ocsp_servers []
howoo@ttokkang-ui-MacBookAir ~/Desktop/work/Gasida_series/practice/cicd-labs/learn-vault-secrets-operator/dynamic-secrets main ± vault write pki/roles/example-dot-com \
allowed_domains=example.com \
allow_subdomains=true \
max_ttl=72h
WARNING! The following warnings were returned from Vault:
* Issuing Certificate was set to default, but no default issuing certificate
(configurable at /config/issuers) is currently set
Key Value
--- -----
allow_any_name false
allow_bare_domains false
allow_glob_domains false
allow_ip_sans true
allow_localhost true
allow_subdomains true
allow_token_displayname false
allow_wildcard_certificates true
allowed_domains [example.com]
allowed_domains_template false
allowed_other_sans []
allowed_serial_numbers []
allowed_uri_sans []
allowed_uri_sans_template false
allowed_user_ids []
basic_constraints_valid_for_non_ca false
client_flag true
cn_validations [email hostname]
code_signing_flag false
country []
email_protection_flag false
enforce_hostnames true
ext_key_usage []
ext_key_usage_oids []
generate_lease false
issuer_ref default
key_bits 2048
key_type rsa
key_usage [DigitalSignature KeyAgreement KeyEncipherment]
locality []
max_ttl 72h
no_store false
not_after n/a
not_before_duration 30s
organization []
ou []
policy_identifiers []
postal_code []
province []
require_cn true
serial_number_source json-csr
server_flag true
signature_bits 256
street_address []
ttl 0s
use_csr_common_name true
use_csr_sans true
use_pss false
howoo@ttokkang-ui-MacBookAir ~/Desktop/work/Gasida_series/practice/cicd-labs/learn-vault-secrets-operator/dynamic-secrets main ± vault policy write pki - <<EOF
path "pki*" { capabilities = ["read", "list"] }
path "pki/sign/example-dot-com" { capabilities = ["create", "update"] }
path "pki/issue/example-dot-com" { capabilities = ["create"] }
EOF
동적 설정 및 확인 : Cert Manager 활용
# kubernetes 인증 활성화
howoo@ttokkang-ui-MacBookAir ~/Desktop/work/Gasida_series/practice/cicd-labs/learn-vault-secrets-operator/dynamic-secrets main ± vault
auth enable kubernetes
Success! Enabled kubernetes auth method at: kubernetes/
howoo@ttokkang-ui-MacBookAir ~/Desktop/work/Gasida_series/practice/cicd-labs/learn-vault-secrets-operator/dynamic-secrets main ± vault
write auth/kubernetes/config kubernetes_host="https://kubernetes.default.svc"
Success! Data written to: auth/kubernetes/config
howoo@ttokkang-ui-MacBookAir ~/Desktop/work/Gasida_series/practice/cicd-labs/learn-vault-secrets-operator/dynamic-secrets main ± vault write auth/kubernetes/role/issuer \
bound_service_account_names=issuer \
bound_service_account_namespaces=default \
policies=pki \
ttl=20m
Success! Data written to: auth/kubernetes/role/issuer
# Deploy Cert Manager
howoo@ttokkang-ui-MacBookAir ~/Desktop/work/Gasida_series/practice/cicd-labs/learn-vault-secrets-operator/dynamic-secrets main ± kubec
tl apply --validate=false -f https://github.com/jetstack/cert-manager/releases/download/v1.12.3/cert-manager.crds.yaml
customresourcedefinition.apiextensions.k8s.io/certificaterequests.cert-manager.io created
customresourcedefinition.apiextensions.k8s.io/certificates.cert-manager.io created
customresourcedefinition.apiextensions.k8s.io/challenges.acme.cert-manager.io created
customresourcedefinition.apiextensions.k8s.io/clusterissuers.cert-manager.io created
customresourcedefinition.apiextensions.k8s.io/issuers.cert-manager.io created
customresourcedefinition.apiextensions.k8s.io/orders.acme.cert-manager.io created
howoo@ttokkang-ui-MacBookAir ~/Desktop/work/Gasida_series/practice/cicd-labs/learn-vault-secrets-operator/dynamic-secrets main ± kubectl
get crd | grep cert-manager
certificaterequests.cert-manager.io 2025-12-04T00:21:59Z
certificates.cert-manager.io 2025-12-04T00:21:59Z
challenges.acme.cert-manager.io 2025-12-04T00:21:59Z
clusterissuers.cert-manager.io 2025-12-04T00:21:59Z
issuers.cert-manager.io 2025-12-04T00:21:59Z
orders.acme.cert-manager.io 2025-12-04T00:21:59Z
howoo@ttokkang-ui-MacBookAir ~/Desktop/work/Gasida_series/practice/cicd-labs/learn-vault-secrets-operator/dynamic-secrets main ± helm re
po add jetstack https://charts.jetstack.io
"jetstack" has been added to your repositories
howoo@ttokkang-ui-MacBookAir ~/Desktop/work/Gasida_series/practice/cicd-labs/learn-vault-secrets-operator/dynamic-secrets main ± helm re
po update
Hang tight while we grab the latest from your chart repositories...
...Successfully got an update from the "jetstack" chart repository
...Successfully got an update from the "hashicorp" chart repository
...Successfully got an update from the "grgo" chart repository
...Successfully got an update from the "argo" chart repository
...Successfully got an update from the "agrgo" chart repository
...Successfully got an update from the "geek-cookbook" chart repository
...Successfully got an update from the "prometheus-community" chart repository
...Successfully got an update from the "bitnami" chart repository
Update Complete. ⎈Happy Helming!⎈
howoo@ttokkang-ui-MacBookAir ~/Desktop/work/Gasida_series/practice/cicd-labs/learn-vault-secrets-operator/dynamic-secrets main ± helm install cert-manager --namespace cert-manager --version v1.12.3 jetstack/cert-manager
NAME: cert-manager
LAST DEPLOYED: Thu Dec 4 09:26:02 2025
NAMESPACE: cert-manager
STATUS: deployed
REVISION: 1
TEST SUITE: None
NOTES:
cert-manager v1.12.3 has been deployed successfully!
In order to begin issuing certificates, you will need to set up a ClusterIssuer
or Issuer resource (for example, by creating a 'letsencrypt-staging' issuer).
More information on the different types of issuers and how to configure them
can be found in our documentation:
https://cert-manager.io/docs/configuration/
For information on how to configure cert-manager to automatically provision
Certificates for Ingress resources, take a look at the `ingress-shim`
documentation:
https://cert-manager.io/docs/usage/ingress/
howoo@ttokkang-ui-MacBookAir ~/Desktop/work/Gasida_series/practice/cicd-labs/learn-vault-secrets-operator/dynamic-secrets main ± kubec
tl get pods --namespace cert-manager
NAME READY STATUS RESTARTS AGE
cert-manager-cainjector-74bf899bd6-npblv 1/1 Running 0 86s
cert-manager-fb6f6945f-prpq6 1/1 Running 0 86s
cert-manager-webhook-8fc69bc68-vk7k4 1/1 Running 0 86s
# serviceaccount 생성
howoo@ttokkang-ui-MacBookAir ~/Desktop/work/Gasida_series/practice/cicd-labs/learn-vault-secrets-operator/dynamic-secrets main ± kubectl
create serviceaccount issuer
serviceaccount/issuer created
# secrets 생성
howoo@ttokkang-ui-MacBookAir ~/Desktop/work/Gasida_series/practice/cicd-labs/learn-vault-secrets-operator/dynamic-secrets main ± kubectl apply -f issuer-secret.yaml
secret/issuer-token-lmzpj created
howoo@ttokkang-ui-MacBookAir ~/Desktop/work/Gasida_series/practice/cicd-labs/learn-vault-secrets-operator/dynamic-secrets main ± kubectl
get secrets
NAME TYPE DATA AGE
issuer-token-lmzpj kubernetes.io/service-account-token 3 8s
# 환경 변수 설정
howoo@ttokkang-ui-MacBookAir ~/Desktop/work/Gasida_series/practice/cicd-labs/learn-vault-secrets-operator/dynamic-secrets main ± ISSUER_SECRET_REF=$(kubectl get secrets --output=json | jq -r '.items[].metadata | select(.name|startswith("issuer-token-")).name')
# 확인
howoo@ttokkang-ui-MacBookAir ~/Desktop/work/Gasida_series/practice/cicd-labs/learn-vault-secrets-operator/dynamic-secrets main ± kubectl view-secret $ISSUER_SECRET_REF --all
ca.crt='-----BEGIN CERTIFICATE-----
MIIDBTCCAe2gAwIBAgIIBGBCa4ElSZYwDQYJKoZIhvcNAQELBQAwFTETMBEGA1UE
AxMKa3ViZXJuZXRlczAeFw0yNTEyMDIwMzIxMTJaFw0zNTExMzAwMzI2MTJaMBUx
EzARBgNVBAMTCmt1YmVybmV0ZXMwggEiMA0GCSqGSIb3DQEBAQUAA4IBDwAwggEK
AoIBAQCt8P/TRwcjx5BAGh6zBufgnwb0CGFe8RlygUoxlUAa31LrpvRUMhevVHOT
dEhqzruyOModh9X6eirot7TnIhNgf6pkPyt72pfphTFH3BJ5N2j8wxznGQTnMvrd
jJNS+ZhmIofCyhCUynGcKXWI1OaIWXSmJ4m5cz9FyibD+aNOIcCXsoDl/FgPHgGh
1h1aapcAcg/jXo3/mzrO3jBq/LZ21Gr5I2gqrKDUSG+HbbiXDeN7mZdTf2J4H/5Z
e4M+Lmcd6Qn8nOtMudaGraUKqHBfAsEyEYr/EoiHlbWHXEcF9MAtfo+yJ/gnQOHc
m1vft6wAeqZ4NO0z+GS2n/IMl1xPAgMBAAGjWTBXMA4GA1UdDwEB/wQEAwICpDAP
BgNVHRMBAf8EBTADAQH/MB0GA1UdDgQWBBQN5cEWls/UUFNslTImIhSVDtnbfTAV
BgNVHREEDjAMggprdWJlcm5ldGVzMA0GCSqGSIb3DQEBCwUAA4IBAQBcPXY27VhX
wyxgan4VHrcJIlJApiWdB+Z6RofhFHdKPpWQ/WluL1pVUeRm3GAhdGMeyxtQqU0p
alGEjMtI7EqBeN7zmjhMyuu4WfCvpztt6vhqKszAhz0+NEafh0Qo1R99K8lu6Exf
+IDeN8ugnTAn1LQzc68Sw2n2DOLZbRYdd+CjUZWSw/1TM7BL7fwLxIco2KYLE3wW
DsMmbi9UqRnPYdSSXt6qJeVaAzi1crokPlpUDhM2WPv5dNOYPNsWKx3alHYbo+ws
U5i60Qj0/lRtmPl/2te+iwWJKfiISIk1RtZe1lK4Zw4+FsVHJKhRZVzlocrFN163
CAGB9KrujgFG
-----END CERTIFICATE-----
'
namespace='default'
token='eyJhbGciOiJSUzI1NiIsImtpZCI6IjI2N3V1SUNja3ZYWG55X0lsdG9wLVc2dHc2OHI4WVFMTjQ1ZzVFUklrT1kifQ.eyJpc3MiOiJrdWJlcm5ldGVzL3NlcnZpY2VhY2NvdW50Iiwia3ViZXJuZXRlcy5pby9zZXJ2aWNlYWNjb3VudC9uYW1lc3BhY2UiOiJkZWZhdWx0Iiwia3ViZXJuZXRlcy5pby9zZXJ2aWNlYWNjb3VudC9zZWNyZXQubmFtZSI6Imlzc3Vlci10b2tlbi1sbXpwaiIsImt1YmVybmV0ZXMuaW8vc2VydmljZWFjY291bnQvc2VydmljZS1hY2NvdW50Lm5hbWUiOiJpc3N1ZXIiLCJrdWJlcm5ldGVzLmlvL3NlcnZpY2VhY2NvdW50L3NlcnZpY2UtYWNjb3VudC51aWQiOiI4NDQ1YTAyZC05ZDllLTRhMDItODU2Ni0yYjJmNDY5YTVjYTciLCJzdWIiOiJzeXN0ZW06c2VydmljZWFjY291bnQ6ZGVmYXVsdDppc3N1ZXIifQ.gdtv9Ug-LxNTi2hX0Pi3BSY1qdecDXR2RwoZYZyPUXJNm-9rGEH5CUTYSLpzbqp7sUCuuQIMxZOK5KsHIfj8G2Ru7ySeCDAFWZJuH4DsR-ftX1_TZxrMxQ4k6ujPP8tyn9DR5Ea-BO2cpxYt8mZVe1RCk_u2mpXFD7ncB3NmdYgIFZI6p06DdvUAFZPH89a5lxFYrn6bJFXDbHdIXEk05phDK1lLfO40HAQYwhHuO-pSqONFs4fVJytKuffYMGRTu6hp3qaMH-h20hQiQwye6lGteO6bBzlQrOkyYajkWY1fBYJsBhbYHQ0dAH37BxvS4XAAvx018vLTBYrASlk61w'
# vault-issuer 생성
howoo@ttokkang-ui-MacBookAir ~/Desktop/work/Gasida_series/practice/cicd-labs/learn-vault-secrets-operator/dynamic-secrets main ± kubectl
apply --filename vault-issuer.yaml
issuer.cert-manager.io/vault-issuer created
howoo@ttokkang-ui-MacBookAir ~/Desktop/work/Gasida_series/practice/cicd-labs/learn-vault-secrets-operator/dynamic-secrets main ± kubectl
get issuer.cert-manager.io/vault-issuer
NAME READY AGE
vault-issuer True 18s
howoo@ttokkang-ui-MacBookAir ~/Desktop/work/Gasida_series/practice/cicd-labs/learn-vault-secrets-operator/dynamic-secrets main ± kubectl apply --filename example-com-cert.yaml # Create the example-com certificate.
certificate.cert-manager.io/example-com created
howoo@ttokkang-ui-MacBookAir ~/Desktop/work/Gasida_series/practice/cicd-labs/learn-vault-secrets-operator/dynamic-secrets main ± kubectl get certificate.cert-manager.io/example-com -owide
NAME READY SECRET ISSUER STATUS AGE
example-com False issuer-token-lmzpj vault-issuer Issuing certificate as Secret does not contain a private key 38s
Vault Production
Vault HA
실습 환경 구성
# Cluster 생성
howoo@ttokkang-ui-MacBookAir ~/Desktop/work/Gasida_series/practice/cicd-labs main ± docker ps
CONTAINER ID IMAGE COMMAND CREATED STATUS PORTS NAMES
805e26bd6471 kindest/node:v1.32.8 "/usr/local/bin/entr…" 26 seconds ago Up 24 seconds myk8s-worker3
8cd60227b4a5 kindest/node:v1.32.8 "/usr/local/bin/entr…" 26 seconds ago Up 24 seconds 0.0.0.0:80->80/tcp, 0.0.0.0:443->443/tcp, 0.0.0.0:30000-30001->30000-30001/tcp, 127.0.0.1:56436->6443/tcp myk8s-control-plane
845663e6f68c kindest/node:v1.32.8 "/usr/local/bin/entr…" 26 seconds ago Up 24 seconds myk8s-worker
9d0af534219f kindest/node:v1.32.8 "/usr/local/bin/entr…" 26 seconds ago Up 24 seconds myk8s-worker2
# Nginx ingress 생성
howoo@ttokkang-ui-MacBookAir ~/Desktop/work/Gasida_series/practice/cicd-labs main ± kubectl apply -f https://raw.githubusercontent.com/kubernetes/ingress-nginx/main/deploy/static/provider/kind/deploy.yaml
namespace/ingress-nginx created
serviceaccount/ingress-nginx created
serviceaccount/ingress-nginx-admission created
role.rbac.authorization.k8s.io/ingress-nginx created
role.rbac.authorization.k8s.io/ingress-nginx-admission created
clusterrole.rbac.authorization.k8s.io/ingress-nginx created
clusterrole.rbac.authorization.k8s.io/ingress-nginx-admission created
rolebinding.rbac.authorization.k8s.io/ingress-nginx created
rolebinding.rbac.authorization.k8s.io/ingress-nginx-admission created
clusterrolebinding.rbac.authorization.k8s.io/ingress-nginx created
clusterrolebinding.rbac.authorization.k8s.io/ingress-nginx-admission created
configmap/ingress-nginx-controller created
service/ingress-nginx-controller created
service/ingress-nginx-controller-admission created
deployment.apps/ingress-nginx-controller created
job.batch/ingress-nginx-admission-create created
job.batch/ingress-nginx-admission-patch created
ingressclass.networking.k8s.io/nginx created
validatingwebhookconfiguration.admissionregistration.k8s.io/ingress-nginx-admission created
# node selector 지정
howoo@ttokkang-ui-MacBookAir ~/Desktop/work/Gasida_series/practice/cicd-labs main ± kubectl patch deployment ingress-nginx-controller -n ingress-nginx \
--type='merge' \
-p='{
"spec": {
"template": {
"spec": {
"nodeSelector": {
"ingress-ready": "true"
}
}
}
}
}'
deployment.apps/ingress-nginx-controller patched
# SSL passthrough flag 활성화
howoo@ttokkang-ui-MacBookAir ~/Desktop/work/Gasida_series/practice/cicd-labs main ± kubectl get deployment ingress-nginx-controller -n ingress-nginx -o yaml \
| sed '/- --publish-status-address=localhost/a\
- --enable-ssl-passthrough' | kubectl apply -f -
deployment.apps/ingress-nginx-controller configured
vault HA
# nsmaspace 생성
howoo@ttokkang-ui-MacBookAir ~/Desktop/work/Gasida_series/practice/cicd-labs main ± kubectl create ns vault
namespace/vault created
# helm 을 이용하여 vault 설치
howoo@ttokkang-ui-MacBookAir ~/Desktop/work/Gasida_series/practice/cicd-labs main ± helm install vault hashicorp/vault -n vault -f values-ha.yaml --version 0.31.0
NAME: vault
LAST DEPLOYED: Thu Dec 4 17:43:56 2025
NAMESPACE: vault
STATUS: deployed
REVISION: 1
NOTES:
Thank you for installing HashiCorp Vault!
Now that you have deployed Vault, you should look over the docs on using
Vault with Kubernetes available here:
https://developer.hashicorp.com/vault/docs
Your release is named vault. To learn more about the release, try:
$ helm status vault
$ helm get manifest vault
# 확인
howoo@ttokkang-ui-MacBookAir ~/Desktop/work/Gasida_series/practice/cicd-labs main ± kubectl get pods --selector='app.kubernetes.io/name=
vault' -n vault
NAME READY STATUS RESTARTS AGE
vault-0 0/1 Running 0 53s
vault-1 0/1 Running 0 53s
vault-2 0/1 Running 0 53s
# 초기화 ( initialize a new vault cluster )
/ $ vault operator init
Unseal Key 1: In/6fO1SgFfi1eTZ4LO5HmfRzb2nnYM30RWPE6BKmCrL
Unseal Key 2: 3yaQ2a1/EkCLcD5ZXaNZFAvOa3/jv2DwdkqrDtsWTZxF
Unseal Key 3: gXah7g2w53BaixTV4ZVKY3cDtBrNFQJ96uifjlZ70kgX
Unseal Key 4: bwrlkRwBUwzOg9fJvdq6iFLK6H70C0u4FwAq2kLiM32a
Unseal Key 5: aRAQ9uwDb8pqUSXMeN3ZyxH9WRxtqnoZVqsNtIWiiwOI
Initial Root Token: hvs.WjGmkhWFqalXi8IMEultvlf6
Vault initialized with 5 key shares and a key threshold of 3. Please securely
distribute the key shares printed above. When the Vault is re-sealed,
restarted, or stopped, you must supply at least 3 of these keys to unseal it
before it can start servicing requests.
Vault does not store the generated root key. Without at least 3 keys to
reconstruct the root key, Vault will remain permanently sealed!
It is possible to generate new unseal keys, provided you have a quorum of
existing unseal keys shares. See "vault operator rekey" for more information.
$ vault operator init
Unseal Key 1: In/6fO1SgFfi1eTZ4LO5HmfRzb2nnYM30RWPE6BKmCrL
Unseal Key 2: 3yaQ2a1/EkCLcD5ZXaNZFAvOa3/jv2DwdkqrDtsWTZxF
Unseal Key 3: gXah7g2w53BaixTV4ZVKY3cDtBrNFQJ96uifjlZ70kgX
Unseal Key 4: bwrlkRwBUwzOg9fJvdq6iFLK6H70C0u4FwAq2kLiM32a
Unseal Key 5: aRAQ9uwDb8pqUSXMeN3ZyxH9WRxtqnoZVqsNtIWiiwOI
Initial Root Token: hvs.WjGmkhWFqalXi8IMEultvlf6
# 특정 label pods 확인
howoo@ttokkang-ui-MacBookAir ~/Desktop/work/Gasida_series/practice/cicd-labs main ± kubectl get pods --selector='app.kubernetes.io/nam
e=vault' -n vault
NAME READY STATUS RESTARTS AGE
vault-0 1/1 Running 0 15h
vault-1 0/1 Running 0 15h
vault-2 0/1 Running 0 15h
# vault join
howoo@ttokkang-ui-MacBookAir ~/Desktop/work/Gasida_series/practice/cicd-labs main ± kubectl exec -n vault -it vault-1 -- vault operator raft join http://vault-0.vault-internal:8200
Key Value
--- -----
Joined true
howoo@ttokkang-ui-MacBookAir ~/Desktop/work/Gasida_series/practice/cicd-labs main ± kubectl exec -n vault -it vault-2 -- vault operator raft join http://vault-0.vault-internal:8200
Key Value
--- -----
Joined true
/ $ vault login
Token (will be hidden):
Success! You are now authenticated. The token information displayed below
is already stored in the token helper. You do NOT need to run "vault login"
again. Future Vault requests will automatically use this token.
Key Value
--- -----
token hvs.WjGmkhWFqalXi8IMEultvlf6
token_accessor 1jDdg9olwzSLWoiIbl9O2trV
token_duration ∞
token_renewable false
token_policies ["root"]
identity_policies []
policies ["root"]
/ $ vault status
Key Value
--- -----
Seal Type shamir
Initialized true
Sealed false
Total Shares 5
Threshold 3
Version 1.20.4
Build Date 2025-09-23T13:22:38Z
Storage Type raft
Cluster Name vault-cluster-acc7d8a4
Cluster ID c013bc9c-163b-344b-e21b-b7a7dbabcb35
Removed From Cluster false
HA Enabled true
HA Cluster https://vault-0.vault-internal:8201
HA Mode active
Active Since 2025-12-04T08:50:00.94034933Z
Raft Committed Index 39
Raft Applied Index 39
# vault operator unseal
/ $ vault operator unseal
Unseal Key (will be hidden):
Key Value
--- -----
Seal Type shamir
Initialized true
Sealed false
Total Shares 5
Threshold 3
Version 1.20.4
Build Date 2025-09-23T13:22:38Z
Storage Type raft
Cluster Name vault-cluster-acc7d8a4
Cluster ID c013bc9c-163b-344b-e21b-b7a7dbabcb35
Removed From Cluster false
HA Enabled true
HA Cluster https://vault-0.vault-internal:8201
HA Mode active
Active Since 2025-12-04T08:50:00.94034933Z
Raft Committed Index 39
Raft Applied Index 39
/ $
/ $ vault operator raft list-peers
Node Address State Voter
---- ------- ----- -----
d6de4d70-9b76-80d8-51b7-e45e49b28800 vault-0.vault-internal:8201 leader true
# "vault-0" ~ "vault-2" operator unseal 후
howoo@ttokkang-ui-MacBookAir ~/Desktop/work/Gasida_series/practice/cicd-labs main ± kubectl get pods --selector='app.kubernetes.io/name=
vault' -n vault
NAME READY STATUS RESTARTS AGE
vault-0 1/1 Running 0 15h
vault-1 1/1 Running 0 15h
vault-2 1/1 Running 0 15h
# 확인
howoo@ttokkang-ui-MacBookAir ~/Desktop/work/Gasida_series/practice/cicd-labs main ± export VAULT_ROOT_TOKEN=hvs.WjGmkhWFqalXi8IMEultvlf6
howoo@ttokkang-ui-MacBookAir ~/Desktop/work/Gasida_series/practice/cicd-labs main ± export VAULT_ADDR='http://localhost:30000'
howoo@ttokkang-ui-MacBookAir ~/Desktop/work/Gasida_series/practice/cicd-labs main ± vault login
Token (will be hidden):
Success! You are now authenticated. The token information displayed below
is already stored in the token helper. You do NOT need to run "vault login"
again. Future Vault requests will automatically use this token.
Key Value
--- -----
token hvs.WjGmkhWFqalXi8IMEultvlf6
token_accessor 1jDdg9olwzSLWoiIbl9O2trV
token_duration ∞
token_renewable false
token_policies ["root"]
identity_policies []
policies ["root"]
howoo@ttokkang-ui-MacBookAir ~/Desktop/work/Gasida_series/practice/cicd-labs main ± vault operator raft list-peers
Node Address State Voter
---- ------- ----- -----
d6de4d70-9b76-80d8-51b7-e45e49b28800 vault-0.vault-internal:8201 leader true
e90ba614-399d-5ee4-bdb7-836f86546829 vault-1.vault-internal:8201 follower true
b627e941-14c7-0f63-d21c-a753809ef043 vault-2.vault-internal:8201 follower true
secret into Vault
# 비밀 입력
howoo@ttokkang-ui-MacBookAir ~/Desktop/work/Gasida_series/practice/cicd-labs main ± vault secrets enable -path=mysecret kv-v2
Success! Enabled the kv-v2 secrets engine at: mysecret/
howoo@ttokkang-ui-MacBookAir ~/Desktop/work/Gasida_series/practice/cicd-labs main ± vault kv put mysecret/logins/studey \
> username="demo" \
> password="p@ssw0rd"
======= Secret Path =======
mysecret/data/logins/studey
======= Metadata =======
Key Value
--- -----
created_time 2025-12-05T02:43:56.70141103Z
custom_metadata <nil>
deletion_time n/a
destroyed false
version 1
# 확인
howoo@ttokkang-ui-MacBookAir ~/Desktop/work/Gasida_series/practice/cicd-labs main ± vault kv get mysecret/logins/studey
======= Secret Path =======
mysecret/data/logins/studey
======= Metadata =======
Key Value
--- -----
created_time 2025-12-05T02:43:56.70141103Z
custom_metadata <nil>
deletion_time n/a
destroyed false
version 1
====== Data ======
Key Value
--- -----
password p@ssw0rd
username demo
howoo@ttokkang-ui-MacBookAir ~/Desktop/work/Gasida_series/practice/cicd-labs main ± vault kv list mysecret
Keys
----
logins/
howoo@ttokkang-ui-MacBookAir ~/Desktop/work/Gasida_series/practice/cicd-labs main ± vault kv list mysecret/logins
Keys
----
studey
# 정책 생성
vault API
howoo@ttokkang-ui-MacBookAir ~/Desktop/work/Gasida_series/practice/cicd-labs main ± export VAULT_ROOT_TOKEN=hvs.WjGmkhWFqalXi8IMEultvlf6
howoo@ttokkang-ui-MacBookAir ~/Desktop/work/Gasida_series/practice/cicd-labs main ± curl -s --header "X-Vault-Token: $VAULT_ROOT_TOKEN" http://localhost:30000/v1/mysecret/data/logins/study | jq
{
"request_id": "b4b27a89-426b-bb29-6900-6359011b78ac",
"lease_id": "",
"renewable": false,
"lease_duration": 0,
"data": {
"data": {
"password": "p@ssw0rd",
"username": "demo"
},
"metadata": {
"created_time": "2025-12-05T02:48:08.155329918Z",
"custom_metadata": null,
"deletion_time": "",
"destroyed": false,
"version": 1
}
},
"wrap_info": null,
"warnings": null,
"auth": null,
"mount_type": "kv"
howoo@ttokkang-ui-MacBookAir ~/Desktop/work/Gasida_series/practice/cicd-labs main ± curl -s --header "X-Vault-Token: $VAULT_ROOT_TOKEN" http://localhost:30000/v1/mysecret/data/logins/study \
| jq -r .data.data.username
demo
howoo@ttokkang-ui-MacBookAir ~/Desktop/work/Gasida_series/practice/cicd-labs main ± curl -s --header "X-Vault-Token: $VAULT_ROOT_TOKEN" http://localhost:30000/v1/mysecret/data/logins/study \
| jq -r .data.data.password
p@ssw0rd
Vault Auth with LDAP
실습 환경
# OpenLDAP server 배포
howoo@ttokkang-ui-MacBookAir ~/Desktop/work/Gasida_series/practice/cicd-labs main ± >....
value: "admin"
- name: phpldapadmin
image: osixia/phpldapadmin:0.9.0
ports:
- containerPort: 80
name: phpldapadmin
env:
- name: PHPLDAPADMIN_HTTPS
value: "false"
- name: PHPLDAPADMIN_LDAP_HOSTS
value: "openldap" # LDAP hostname inside cluster
---
apiVersion: v1
kind: Service
metadata:
name: openldap
namespace: openldap
spec:
selector:
app: openldap
ports:
- name: phpldapadmin
port: 80
targetPort: 80
nodePort: 30001
- name: ldap
port: 389
targetPort: 389
- name: ldaps
port: 636
targetPort: 636
type: NodePort
EOF
namespace/openldap created
deployment.apps/openldap created
service/openldap created
# 확인
howoo@ttokkang-ui-MacBookAir ~/Desktop/work/Gasida_series/practice/cicd-labs main ± kubectl get deploy,pod,svc,ep -n openldap
NAME READY UP-TO-DATE AVAILABLE AGE
deployment.apps/openldap 1/1 1 1 31s
NAME READY STATUS RESTARTS AGE
pod/openldap-54857b746c-wv78f 2/2 Running 0 31s
NAME TYPE CLUSTER-IP EXTERNAL-IP PORT(S) AGE
service/openldap NodePort 10.96.139.107 <none> 80:30001/TCP,389:30573/TCP,636:31817/TCP 31s
NAME ENDPOINTS AGE
endpoints/openldap 10.244.3.5:80,10.244.3.5:389,10.244.3.5:636 30s
OepnLDAP 조직 구성 : 사용, 그룹
#
howoo@ttokkang-ui-MacBookAir ~/Desktop/work/Gasida_series/practice/cicd-labs main ± kubectl -n openldap exec -it deploy/openldap -c op
enldap -- bash
root@openldap-54857b746c-wv78f:/#
# LDAPadd로 OU 추가
root@openldap-54857b746c-wv78f:/# cat <<EOF | ldapadd -x -D "cn=admin,dc=example,dc=org" -w admin
> dn: ou=people,dc=example,dc=org
> objectClass: organizationalUnit
> ou: people
>
> dn: ou=groups,dc=example,dc=org
> objectClass: organizationalUnit
> ou: groups
> EOF
adding new entry "ou=people,dc=example,dc=org"
# LDAPadd로 user추가
root@openldap-54857b746c-wv78f:/# cat <<EOF | ldapadd -x -D "cn=admin,dc=example,dc=org" -w admin
> dn: uid=alice,ou=people,dc=example,dc=org
> objectClass: inetOrgPerson
> cn: Alice
> sn: Kim
> uid: alice
> mail: alice@example.org
> userPassword: alice123
>
> dn: uid=bob,ou=people,dc=example,dc=org
> objectClass: inetOrgPerson
> cn: Bob
> sn: Lee
> uid: bob
> mail: bob@example.org
> userPassword: bob123
> EOF
adding new entry "uid=alice,ou=people,dc=example,dc=org"
adding new entry "uid=bob,ou=people,dc=example,dc=org"
# LDAPadd로 groups추가
root@openldap-54857b746c-wv78f:/# cat <<EOF | ldapadd -x -D "cn=admin,dc=example,dc=org" -w admin
> dn: cn=devs,ou=groups,dc=example,dc=org
> objectClass: groupOfNames
> cn: devs
> member: uid=bob,ou=people,dc=example,dc=org
>
> dn: cn=admins,ou=groups,dc=example,dc=org
> objectClass: groupOfNames
> cn: admins
> member: uid=alice,ou=people,dc=example,dc=org
> EOF
adding new entry "cn=devs,ou=groups,dc=example,dc=org"
adding new entry "cn=admins,ou=groups,dc=example,dc=org"
LDAP 인증 활성화
# ldap 활성화
howoo@ttokkang-ui-MacBookAir ~/Desktop/work/Gasida_series/practice/cicd-labs main ± vault auth enable ldap
Success! Enabled ldap auth method at: ldap/
# 확인
howoo@ttokkang-ui-MacBookAir ~/Desktop/work/Gasida_series/practice/cicd-labs main ± vault auth list
Path Type Accessor Description Version
---- ---- -------- ----------- -------
ldap/ ldap auth_ldap_33d9400c n/a n/a
token/ token auth_token_7bb86c6a token based credentials n/a
howoo@ttokkang-ui-MacBookAir ~/Desktop/work/Gasida_series/practice/cicd-labs main ± vault auth list -detailed
Path Plugin Accessor Default TTL Max TTL Token Type Replication Seal Wrap External Entropy Access Options Description UUID Version Running Version Running SHA256 Deprecation Status
---- ------ -------- ----------- ------- ---------- ----------- --------- ----------------------- ------- ----------- ---- ------- --------------- -------------- ------------------
ldap/ ldap auth_ldap_33d9400c system system default-service replicated false false map[] n/a cf38555c-0cc9-723e-2bfc-400913c568eb n/a v1.20.4+builtin.vault n/a supported
token/ token auth_token_7bb86c6a system system default-service replicated false false map[] token based credentials 7f5a23d9-3594-9088-66a4-c346d9611be4 n/a v1.20.4+builtin.vault n/a n/a
# ldap config
howoo@ttokkang-ui-MacBookAir ~/Desktop/work/Gasida_series/practice/cicd-labs main ± vault write auth/ldap/config \
url="ldap://openldap.openldap.svc:389" \
starttls=false \
insecure_tls=true \
binddn="cn=admin,dc=example,dc=org" \
bindpass="admin" \
userdn="ou=people,dc=example,dc=org" \
groupdn="ou=groups,dc=example,dc=org" \
groupfilter="(member=uid={{.Username}},ou=people,dc=example,dc=org)" \
groupattr="cn"
Success! Data written to: auth/ldap/config
# LDAP 인증 테스트
howoo@ttokkang-ui-MacBookAir ~/Desktop/work/Gasida_series/practice/cicd-labs main ± vault login -method=ldap username=alice
Password (will be hidden):
Success! You are now authenticated. The token information displayed below
is already stored in the token helper. You do NOT need to run "vault login"
again. Future Vault requests will automatically use this token.
Key Value
--- -----
token hvs.CAESIFCHvfqwEJPxk8HLTnJl-6kav2t0hdoaDpRXfVmDdZKIGh4KHGh2cy5uRGpkSlhTNzExbElyeHVVWUs1M1dDbGg
token_accessor qc74mkxhLQRBMmsO8YiplvCd
token_duration 768h
token_renewable true
token_policies ["default"]
identity_policies []
policies ["default"]
token_meta_username alice
# token 정보 확인
howoo@ttokkang-ui-MacBookAir ~/Desktop/work/Gasida_series/practice/cicd-labs main ± vault token lookup -format=json | jq .data.policies
[
"default"
]
# bob 계정도 LDAP 인증 확인
howoo@ttokkang-ui-MacBookAir ~/Desktop/work/Gasida_series/practice/cicd-labs main ± vault login -method=ldap username=bob password=bob12
3
Success! You are now authenticated. The token information displayed below
is already stored in the token helper. You do NOT need to run "vault login"
again. Future Vault requests will automatically use this token.
Key Value
--- -----
token hvs.CAESIN04-9HYzd_mCWrlVfsElNmnUGcCCX-Zx5Xz69J2pMdCGh4KHGh2cy5nYmpnSUhXY1lmV28zTVVJSTVIQUVCSm0
token_accessor fxIgPrDrcN9IXJ8hjQI19LEK
token_duration 768h
token_renewable true
token_policies ["default"]
identity_policies []
policies ["default"]
token_meta_username bob
Mapping LDAP group to Vault policy
# 정책 생성
howoo@ttokkang-ui-MacBookAir ~/Desktop/work/Gasida_series/practice/cicd-labs main ± vault policy write admin - <<EOF
path "*" {
capabilities = ["create", "read", "update", "delete", "list", "sudo"]
}
EOF
Success! Uploaded policy: admin
howoo@ttokkang-ui-MacBookAir ~/Desktop/work/Gasida_series/practice/cicd-labs main ± vault token lookup
Key Value
--- -----
accessor 1jDdg9olwzSLWoiIbl9O2trV
creation_time 1764838082
creation_ttl 0s
display_name root
entity_id n/a
expire_time <nil>
explicit_max_ttl 0s
id hvs.WjGmkhWFqalXi8IMEultvlf6
meta <nil>
num_uses 0
orphan true
path auth/token/root
policies [root]
ttl 0s
type service
howoo@ttokkang-ui-MacBookAir ~/Desktop/work/Gasida_series/practice/cicd-labs main ± vault policy read admin
path "*" {
capabilities = ["create", "read", "update", "delete", "list", "sudo"]
}
# LDAP admins 그룹에 admin 정책 지정
howoo@ttokkang-ui-MacBookAir ~/Desktop/work/Gasida_series/practice/cicd-labs main ± vault write auth/ldap/groups/admins policies=admin
Success! Data written to: auth/ldap/groups/admins
# alice 로그인
howoo@ttokkang-ui-MacBookAir ~/Desktop/work/Gasida_series/practice/cicd-labs main ± vault login -method=ldap username=alice
Password (will be hidden):
Success! You are now authenticated. The token information displayed below
is already stored in the token helper. You do NOT need to run "vault login"
again. Future Vault requests will automatically use this token.
Key Value
--- -----
token hvs.CAESIFdYHNzc0G4Ifo3uyid8m0zjrpQ7nUzEk97SzBobdzYrGh4KHGh2cy51dWE2dUlFVGluNzRIYXFwVHZzTEVLcW8
token_accessor uYkO8wNLwiBnq7yFwxSrfcIV
token_duration 768h
token_renewable true
token_policies ["admin" "default"]
identity_policies []
policies ["admin" "default"]
token_meta_username alice
howoo@ttokkang-ui-MacBookAir ~/Desktop/work/Gasida_series/practice/cicd-labs main ± vault policy read admin
path "*" {
capabilities = ["create", "read", "update", "delete", "list", "sudo"]
}
Vault Server TLS
실습 환경 설정
# clsuter 생성
Creating cluster "myk8s" ...
✓ Ensuring node image (kindest/node:v1.32.8) 🖼
✓ Preparing nodes 📦
✓ Writing configuration 📜
✓ Starting control-plane 🕹️
✓ Installing CNI 🔌
✓ Installing StorageClass 💾
Set kubectl context to "kind-myk8s"
You can now use your cluster with:
kubectl cluster-info --context kind-myk8s
Thanks for using kind! 😊
howoo@ttokkang-ui-MacBookAir ~/Desktop/work/Gasida_series/practice/cicd-labs main ± docker ps
CONTAINER ID IMAGE COMMAND CREATED STATUS PORTS NAMES
69bc6dc55907 kindest/node:v1.32.8 "/usr/local/bin/entr…" 18 seconds ago Up 16 seconds 0.0.0.0:80->80/tcp, 0.0.0.0:443->443/tcp, 0.0.0.0:30000->30000/tcp, 127.0.0.1:64215->6443/tcp myk8s-control-plane
# Nginx ingress 배포
howoo@ttokkang-ui-MacBookAir ~/Desktop/work/Gasida_series/practice/cicd-labs main ± kubectl apply -f https://raw.githubusercontent.com/kubernetes/ingress-nginx/main/deploy/static/provider/kind/deploy.yaml
namespace/ingress-nginx created
serviceaccount/ingress-nginx created
serviceaccount/ingress-nginx-admission created
role.rbac.authorization.k8s.io/ingress-nginx created
role.rbac.authorization.k8s.io/ingress-nginx-admission created
clusterrole.rbac.authorization.k8s.io/ingress-nginx created
clusterrole.rbac.authorization.k8s.io/ingress-nginx-admission created
rolebinding.rbac.authorization.k8s.io/ingress-nginx created
rolebinding.rbac.authorization.k8s.io/ingress-nginx-admission created
clusterrolebinding.rbac.authorization.k8s.io/ingress-nginx created
clusterrolebinding.rbac.authorization.k8s.io/ingress-nginx-admission created
configmap/ingress-nginx-controller created
service/ingress-nginx-controller created
service/ingress-nginx-controller-admission created
deployment.apps/ingress-nginx-controller created
job.batch/ingress-nginx-admission-create created
job.batch/ingress-nginx-admission-patch created
ingressclass.networking.k8s.io/nginx created
validatingwebhookconfiguration.admissionregistration.k8s.io/ingress-nginx-admission created
# SSL Passthrough flag 활성화
howoo@ttokkang-ui-MacBookAir ~/Desktop/work/Gasida_series/practice/cicd-labs main ± kubectl get deployment ingress-nginx-controller -n i
ngress-nginx -o yaml \
| sed '/- --publish-status-address=localhost/a\
- --enable-ssl-passthrough' | kubectl apply -f -
deployment.apps/ingress-nginx-controller configured
# nodeselector 지정
howoo@ttokkang-ui-MacBookAir ~/Desktop/work/Gasida_series/practice/cicd-labs main ± kubectl patch deployment ingress-nginx-controller
-n ingress-nginx \
> --type='merge' \
-p='{
"spec": {
"template": {
"spec": {
"nodeSelector": {
"ingress-ready": "true"
}
}
}
}
}'
Vault tls 설치
# Helm v3 으로 설치
howoo@ttokkang-ui-MacBookAir ~/Desktop/work/Gasida_series/practice/cicd-labs main ± docker exec -it myk8s-control-plane bash
root@myk8s-control-plane:/# curl https://raw.githubusercontent.com/helm/helm/main/scripts/get-helm-3 | bash
% Total % Received % Xferd Average Speed Time Time Time Current
Dload Upload Total Spent Left Speed
100 11929 100 11929 0 0 60920 0 --:--:-- --:--:-- --:--:-- 61174
[WARNING] Could not find git. It is required for plugin installation.
Downloading https://get.helm.sh/helm-v3.19.2-linux-arm64.tar.gz
Verifying checksum... Done.
Preparing to install helm into /usr/local/bin
helm installed into /usr/local/bin/helm
root@myk8s-control-plane:/# helm version
version.BuildInfo{Version:"v3.19.2", GitCommit:"8766e718a0119851f10ddbe4577593a45fadf544", GitTreeState:"clean", GoVersion:"go1.24.9"}
root@myk8s-control-plane:/# helm repo add hashicorp https://helm.releases.hashicorp.com
"hashicorp" has been added to your repositories
root@myk8s-control-plane:/# helm repo update
Hang tight while we grab the latest from your chart repositories...
...Successfully got an update from the "hashicorp" chart repository
Update Complete. ⎈Happy Helming!⎈
# CA 생성
root@myk8s-control-plane:/tls# openssl genrsa -out ca.key 2048
root@myk8s-control-plane:/tls# openssl req -x509 -new -nodes \
> -key ca.key \
-subj "/CN=Vault-CA" \
-days 3650 \
-out ca.crt
root@myk8s-control-plane:/tls# ls
ca.crt ca.key
# vault server 인증서 생성
root@myk8s-control-plane:/tls# openssl genrsa -out vault.key 2048
root@myk8s-control-plane:/tls# openssl req -new -key vault.key \
-subj "/CN=vault.example.com" \
-out vault.csr
root@myk8s-control-plane:/tls# ls
ca.crt ca.key vault.csr vault.key
# 인증서 서명
root@myk8s-control-plane:/tls# openssl x509 -req \
-in vault.csr \
-CA ca.crt \
-CAkey ca.key \
-CAcreateserial \
-out vault.crt \
-days 3650 \
-extensions v3_req \
-extfile <(cat <<EOF
[v3_req]
subjectAltName = @alt_names
[alt_names]
DNS.1 = vault.example.com
DNS.2 = vault
DNS.3 = localhost
DNS.4 = vault.vault.svc.cluster.local
DNS.5 = vault.vault-internal
DNS.6 = vault-0.vault-internal
DNS.7 = vault-1.vault-internal
DNS.8 = vault-2.vault-internal
DNS.9 = 127.0.0.1
EOF
)
Certificate request self-signature ok
subject=CN = vault.example.com
# kubernetes TLS secret 등록
root@myk8s-control-plane:/tls# kubectl -n vault create secret tls vault-tls \
--cert=vault.crt \
--key=vault.key
secret/vault-tls created
# CA도 저장
root@myk8s-control-plane:/tls# kubectl -n vault create secret generic vault-ca \
--from-file=ca.crt=ca.crt
secret/vault-ca created
#
root@myk8s-control-plane:/tls# helm install vault hashicorp/vault -n vault -f values-tls.yaml --version 0.29.0
NAME: vault
LAST DEPLOYED: Fri Dec 5 06:46:27 2025
NAMESPACE: vault
STATUS: deployed
REVISION: 1
NOTES:
Thank you for installing HashiCorp Vault!
Now that you have deployed Vault, you should look over the docs on using
Vault with Kubernetes available here:
https://developer.hashicorp.com/vault/docs
Your release is named vault. To learn more about the release, try:
$ helm status vault
$ helm get manifest vault
root@myk8s-control-plane:/tls# #
root@myk8s-control-plane:/tls# ^C
root@myk8s-control-plane:/tls# helm list -A
NAME NAMESPACE REVISION UPDATED STATUS CHART APP VERSION
vault vault 1 2025-12-05 06:46:27.792999203 +0000 UTC deployed vault-0.29.0 1.18.1
howoo@ttokkang-ui-MacBookAir ~/Desktop/work/Gasida_series/practice/cicd-labs main ± kubectl exec -ti vault-0 -n vault -- vault status -tls-skip-verify
Key Value
--- -----
Seal Type shamir
Initialized false
Sealed true
Total Shares 0
Threshold 0
Unseal Progress 0/0
Unseal Nonce n/a
Version 1.18.1
Build Date 2024-10-29T14:21:31Z
Storage Type file
HA Enabled false
howoo@ttokkang-ui-MacBookAir ~/Desktop/work/Gasida_series/practice/cicd-labs main ± kubectl exec vault-0 -n vault -- vault operator init -tls-skip-verify \
-key-shares=1 \
-key-threshold=1 \
-format=json > cluster-keys.json
howoo@ttokkang-ui-MacBookAir ~/Desktop/work/Gasida_series/practice/cicd-labs main ± cat cluster-keys.json| jq
{
"unseal_keys_b64": [
"xhTxieC+SIQi3AGBqdAWz9rf+EuI0DxqkSwY1z6AF/4="
],
"unseal_keys_hex": [
"c614f189e0be488422dc0181a9d016cfdadff84b88d03c6a912c18d73e8017fe"
],
"unseal_shares": 1,
"unseal_threshold": 1,
"recovery_keys_b64": [],
"recovery_keys_hex": [],
"recovery_keys_shares": 0,
"recovery_keys_threshold": 0,
"root_token": "hvs.4BpnLGCXWikDPS1rftcePBHy"
}
howoo@ttokkang-ui-MacBookAir ~/Desktop/work/Gasida_series/practice/cicd-labs main ± VAULT_UNSEAL_KEY=$(jq -r ".unseal_keys_b64[]" cluster-keys.json)
howoo@ttokkang-ui-MacBookAir ~/Desktop/work/Gasida_series/practice/cicd-labs main ± kubectl exec vault-0 -n vault -- vault operator unseal -tls-skip-verify $VAULT_UNSEAL_KEY
Key Value
--- -----
Seal Type shamir
Initialized true
Sealed false
Total Shares 1
Threshold 1
Version 1.18.1
Build Date 2024-10-29T14:21:31Z
Storage Type file
Cluster Name vault-cluster-e579bdfe
Cluster ID 2d66d3f6-6de6-1c4b-bd5a-247335e1b9f1
HA Enabled false
howoo@ttokkang-ui-MacBookAir ~/Desktop/work/Gasida_series/practice/cicd-labs main ± kubectl get pod -n vault
NAME READY STATUS RESTARTS AGE
vault-0 1/1 Running 0 43m
howoo@ttokkang-ui-MacBookAir ~/Desktop/work/Gasida_series/practice/cicd-labs main ± jq -r ".root_token" cluster-keys.json
hvs.4BpnLGCXWikDPS1rftcePBHy
howoo@ttokkang-ui-MacBookAir ~/Desktop/work/Gasida_series/practice/cicd-labs main ± kubectl patch svc -n vault vault -p '{"spec":{"type":"NodePort","ports":[{"port":8200,"targetPort":8200,"nodePort":30000}]}}'
service/vault patched
howoo@ttokkang-ui-MacBookAir ~/Desktop/work/Gasida_series/practice/cicd-labs main ± export VAULT_ADDR=https://127.0.0.1:30000
howoo@ttokkang-ui-MacBookAir ~/Desktop/work/Gasida_series/practice/cicd-labs main ± vault status -tls-skip-verify
Key Value
--- -----
Seal Type shamir
Initialized true
Sealed false
Total Shares 1
Threshold 1
Version 1.18.1
Build Date 2024-10-29T14:21:31Z
Storage Type file
Cluster Name vault-cluster-e579bdfe
Cluster ID 2d66d3f6-6de6-1c4b-bd5a-247335e1b9f1
HA Enabled false
# vault 상태 확인
howoo@ttokkang-ui-MacBookAir ~/Desktop/work/Gasida_series/practice/cicd-labs main ± vault status -tls-skip-verify
Key Value
--- -----
Seal Type shamir
Initialized true
Sealed false
Total Shares 1
Threshold 1
Version 1.18.1
Build Date 2024-10-29T14:21:31Z
Storage Type file
Cluster Name vault-cluster-e579bdfe
Cluster ID 2d66d3f6-6de6-1c4b-bd5a-247335e1b9f1
HA Enabled false
# vault root token 로그인
howoo@ttokkang-ui-MacBookAir ~/Desktop/work/Gasida_series/practice/cicd-labs main ± vault login -tls-skip-verify
Token (will be hidden):
Success! You are now authenticated. The token information displayed below
is already stored in the token helper. You do NOT need to run "vault login"
again. Future Vault requests will automatically use this token.
Key Value
--- -----
token hvs.4BpnLGCXWikDPS1rftcePBHy
token_accessor lnb41LP3m1hFCuXmSmkSX1P6
token_duration ∞
token_renewable false
token_policies ["root"]
identity_policies []
policies ["root"]
ingress-nginx ssl-passthrough 설정
# host file 설정
echo "127.0.01 vault.example.com" | sudo tee -a /etc/hosts
# pod 확인
howoo@ttokkang-ui-MacBookAir ~/Desktop/work/Gasida_series/practice/cicd-labs main ± kubectl describe pod -n vault vault-0 | grep -i port
s
Ports: 8200/TCP, 8201/TCP, 8202/TCP
Host Ports: 0/TCP, 0/TCP, 0/TCP
# Ingress 생성
howoo@ttokkang-ui-MacBookAir ~/Desktop/work/Gasida_series/practice/cicd-labs main ± cat <<EOF | kubectl apply -f -
apiVersion: networking.k8s.io/v1
kind: Ingress
metadata:
name: vault-https
namespace: vault
annotations:
nginx.ingress.kubernetes.io/ssl-passthrough: "true"
nginx.ingress.kubernetes.io/backend-protocol: "HTTPS"
nginx.ingress.kubernetes.io/force-ssl-redirect: "true"
spec:
ingressClassName: "nginx"
rules:
- host: vault.example.com
http:
paths:
- path: /
pathType: Prefix
backend:
service:
name: vault
port:
number: 8200
tls:
- hosts:
- vault.example.com
secretName: vault-tls
EOF
ingress.networking.k8s.io/vault-https created