kubectl get applications -n argocd guestbook
NAME SYNC STATUS HEALTH STATUS
guestbook Synced Progressing
howoo@ttokkang-ui-MacBookAir ~/Desktop/work/Gasida_series/practice kubectl get applications -n argocd guestbook -o yaml | kubectl neat | yq
apiVersion: argoproj.io/v1alpha1
kind: Application
metadata:
name: guestbook
namespace: argocd
spec:
destination:
namespace: guestbook
server: https://kubernetes.default.svc
project: default
source:
helm:
valueFiles:
- values.yaml
path: helm-guestbook
repoURL: https://github.com/argoproj/argocd-example-apps
targetRevision: HEAD
syncPolicy:
automated:
enabled: true
prune: true
selfHeal: true
syncOptions:
- CreateNamespace=true
howoo@ttokkang-ui-MacBookAir ~/Desktop/work/Gasida_series/practice kubectl get pod,svc,ep -n guestbook
NAME READY STATUS RESTARTS AGE
pod/guestbook-helm-guestbook-6585c766d6-k6kqg 1/1 Running 0 68s
NAME TYPE CLUSTER-IP EXTERNAL-IP PORT(S) AGE
service/guestbook-helm-guestbook ClusterIP 10.96.61.64 <none> 80/TCP 68s
NAME ENDPOINTS AGE
endpoints/guestbook-helm-guestbook 10.244.0.14:80 68s실습 환경 배포
## 각 구성 요소 확인
howoo@ttokkang-ui-MacBookAir ~/Desktop/work/Gasida_series/practice kubectl get-all -n argocd
NAME NAMESPACE AGE
configmap/argocd-cm argocd 17h
configmap/argocd-cmd-params-cm argocd 17h
configmap/argocd-gpg-keys-cm argocd 17h
configmap/argocd-notifications-cm argocd 17h
configmap/argocd-rbac-cm 확인 argocd 17h 확인configmap/argocd-redis-health-configmap 확인 argocd 17h
configmap/argocd-ssh-known-hosts-cm argocd 17h
configmap/argocd-tls-certs-cm argocd 17h
configmap/kube-root-ca.crt argocd 17h
.
.
.
howoo@ttokkang-ui-MacBookAir ~/Desktop/work/Gasida_series/practice kubectl get pod,ingress,svc,ep,secret,cm -n argocd
NAME READY STATUS RESTARTS AGE
pod/argocd-application-controller-0 1/1 Running 1 (65m ago) 17h
pod/argocd-applicationset-controller-bbff79c6f-62gvg 1/1 Running 1 (65m ago) 17h
pod/argocd-dex-server-6877ddf4f8-vtq5p 1/1 Running 1 (65m ago) 17h
pod/argocd-notifications-controller-7b5658fc47-v6c2f 1/1 Running 1 (65m ago) 17h
pod/argocd-redis-7d948674-rzs9v 1/1 Running 1 (65m ago) 17h
pod/argocd-repo-server-7679dc55f5-qzcvl 1/1 Running 1 (65m ago) 17h
pod/argocd-server-7d769b6f48-dfgxn 1/1 Running 1 (65m ago) 17h
NAME CLASS HOSTS ADDRESS PORTS AGE
ingress.networking.k8s.io/argocd-server nginx argocd.example.com localhost 80, 443 17h
NAME TYPE CLUSTER-IP EXTERNAL-IP PORT(S) AGE
service/argocd-applicationset-controller ClusterIP 10.96.245.178 <none> 7000/TCP 17h
service/argocd-dex-server ClusterIP 10.96.23.36 <none> 5556/TCP,5557/TCP 17h
service/argocd-redis ClusterIP 10.96.51.255 <none> 6379/TCP 17h
service/argocd-repo-server ClusterIP 10.96.98.210 <none> 8081/TCP 17h
service/argocd-server ClusterIP 10.96.133.230 <none> 80/TCP,443/TCP 17h
NAME ENDPOINTS AGE
endpoints/argocd-applicationset-controller 10.244.0.11:7000 17h
endpoints/argocd-dex-server 10.244.0.12:5557,10.244.0.12:5556 17h
endpoints/argocd-redis 10.244.0.5:6379 17h
endpoints/argocd-repo-server 10.244.0.13:8081 17h
endpoints/argocd-server 10.244.0.9:8080,10.244.0.9:8080 17h
NAME TYPE DATA AGE
secret/argocd-initial-admin-secret Opaque 1 17h
secret/argocd-notifications-secret Opaque 0 17h
secret/argocd-redis Opaque 1 17h
secret/argocd-secret Opaque 3 17h
secret/argocd-server-tls kubernetes.io/tls 2 17h
secret/sh.helm.release.v1.argocd.v1 helm.sh/release.v1 1 17h
NAME DATA AGE
configmap/argocd-cm 18 17h
configmap/argocd-cmd-params-cm 20 17h
configmap/argocd-gpg-keys-cm 0 17h
configmap/argocd-notifications-cm 1 17h
configmap/argocd-rbac-cm 4 17h
configmap/argocd-redis-health-configmap 2 17h
configmap/argocd-ssh-known-hosts-cm 1 17h
configmap/argocd-tls-certs-cm 0 17h
configmap/kube-root-ca.crt 1 17h
howoo@ttokkang-ui-MacBookAir ~/Desktop/work/Gasida_series/practice kubectl get ingress -n argocd argocd-server
NAME CLASS HOSTS ADDRESS PORTS AGE
argocd-server nginx argocd.example.com localhost 80, 443 17h
1. 브라우저 인증서 확인 ( argocd.example.com )

2. Argocd server cli 로그인
howoo@ttokkang-ui-MacBookAir ~/Desktop/work/Gasida_series/practice argocd login argocd.example.com --insecure
Username: admin
Password:
'admin:login' logged in successfully
Context 'argocd.example.com' updated
howoo@ttokkang-ui-MacBookAir ~/Desktop/work/Gasida_series/practice argocd account list
NAME ENABLED CAPABILITIES
admin true login
howoo@ttokkang-ui-MacBookAir ~/Desktop/work/Gasida_series/practice argocd proj list
NAME DESCRIPTION DESTINATIONS SOURCES CLUSTER-RESOURCE-WHITELIST NAMESPACE-RESOURCE-BLACKLIST SIGNATURE-KEYS ORPHANED-RESOURCES DESTINATION-SERVICE-ACCOUNTS
default *,* * */* <none> <none> disabled <none>
howoo@ttokkang-ui-MacBookAir ~/Desktop/work/Gasida_series/practice argocd repo list
TYPE NAME REPO INSECURE OCI LFS CREDS STATUS MESSAGE PROJECT
howoo@ttokkang-ui-MacBookAir ~/Desktop/work/Gasida_series/practice argocd cluster list
SERVER NAME VERSION STATUS MESSAGE PROJECT
https://kubernetes.default.svc in-cluster Unknown Cluster has no applications and is not being monitored.
howoo@ttokkang-ui-MacBookAir ~/Desktop/work/Gasida_series/practice argocd app list
NAME CLUSTER NAMESPACE PROJECT STATUS HEALTH SYNCPOLICY CONDITIONS REPO PATH TARGET
접근 제어
1. “admin” password 변경
## argocd "admin" password 변경
howoo@ttokkang-ui-MacBookAir ~/Desktop/work/Gasida_series/practice argocd account update-password
*** Enter password of currently logged in user (admin):
*** Enter new password for user admin:
*** Confirm new password for user admin:
Password updated
Context 'argocd.example.com' updated
2. argocd-cm configmap 구성
## configMap에 아래의 내용 추가
data:
# add an additional local user with apiKey and login capabilities
# apiKey - allows generating API keys
# login - allows to login using UI
accounts.alice: apiKey, login
# disables user. User is enabled by default
# accounts.alice.enabled: "false"
howoo@ttokkang-ui-MacBookAir ~/Desktop/work/Gasida_series/practice kubectl apply -f argocd-cm_new.yaml -n argocd
Warning: resource configmaps/argocd-cm is missing the kubectl.kubernetes.io/last-applied-configuration annotation which is required by kubectl apply. kubectl apply should only be used on resources created declaratively by either kubectl create --save-config or kubectl apply. The missing annotation will be patched automatically.
configmap/argocd-cm configured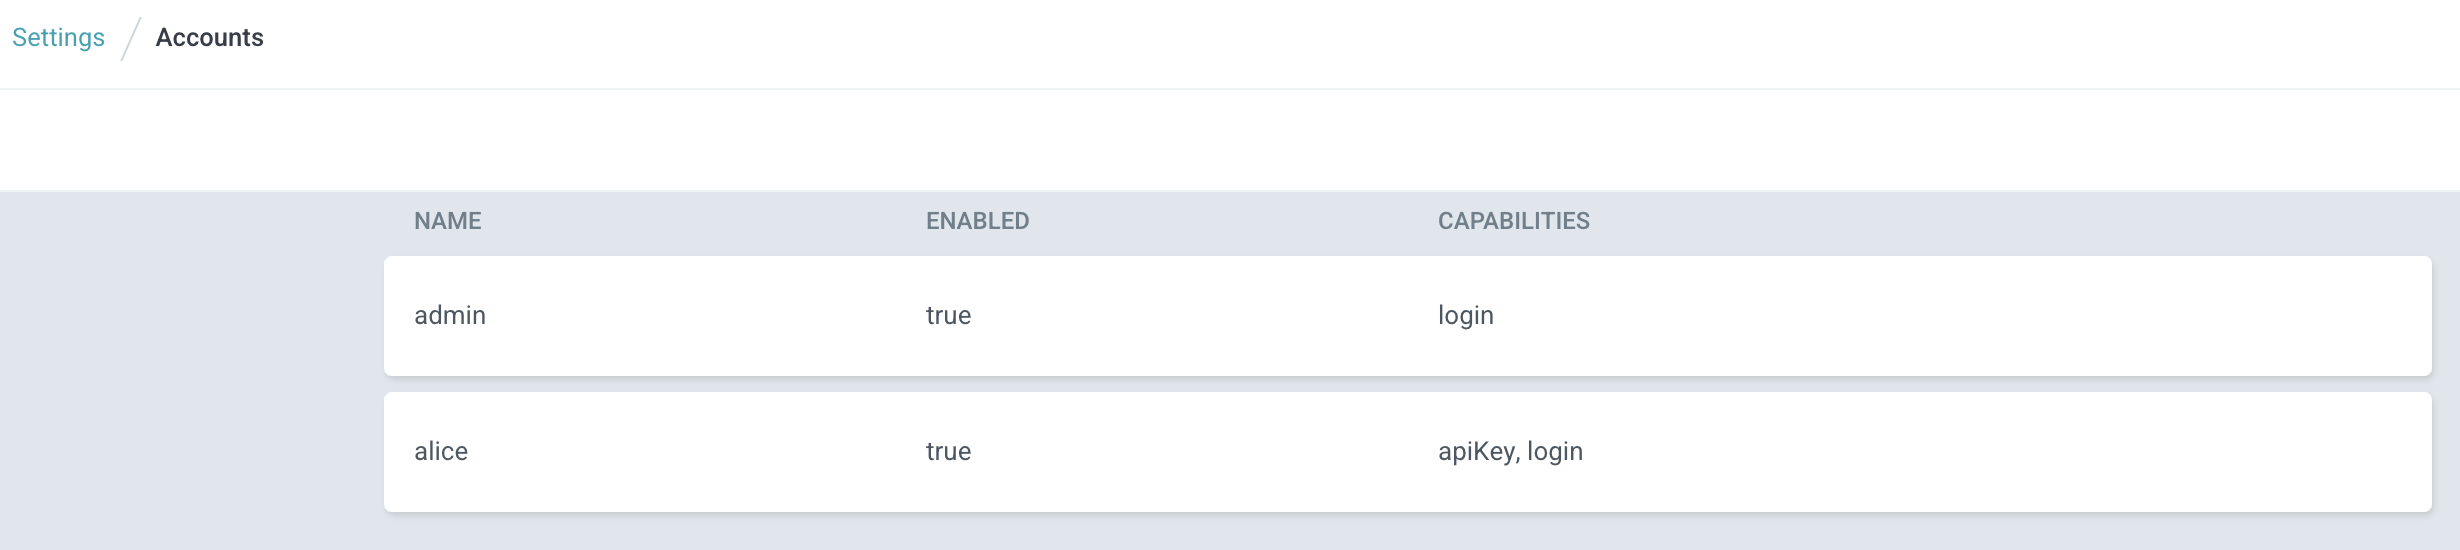
# 사용자 확인
argocd account list
NAME ENABLED CAPABILITIES
admin true login
alice true apiKey, login
# password 변경
howoo@ttokkang-ui-MacBookAir ~/Desktop/work/Gasida_series/practice argocd account update-password \
> --account alice \
> --current-password qwe12345 \
> --new-password alice12345
Password updated
# 변경된 내용 확인
howoo@ttokkang-ui-MacBookAir ~/Desktop/work/Gasida_series/practice kubectl get secret -n argocd argocd-secret -o jsonpath='{.data}' | jq
{
"accounts.alice.password": "JDJhJDEwJFE2OTIwMjJFTDJDSG1oMWhKSU96T2U4R3ROWEVGOXQzNGV5dWZPZm1DQlZTODNtUVByTXEu",
"accounts.alice.passwordMtime": "MjAyNS0xMS0xMVQwMTo1NDowMFo=",
"accounts.alice.tokens": "bnVsbA==",
"admin.password": "JDJhJDEwJFRkcEdERkhTWlp0SVZCMVZFejZ1Y2VSdTBOWjk2Q2ZXWHZFOXVTMmxzZjJuRFlpUzhwRVQu",
"admin.passwordMtime": "MjAyNS0xMS0xMVQwMToyMzo1OFo=",
"server.secretkey": "ckJsZ25OZnFCUzlKYWxJYkRjZDMzMWQ1TC9pRWFNRHlaNVg3YjNsLzVKOD0="
}
3. Sample application 배포
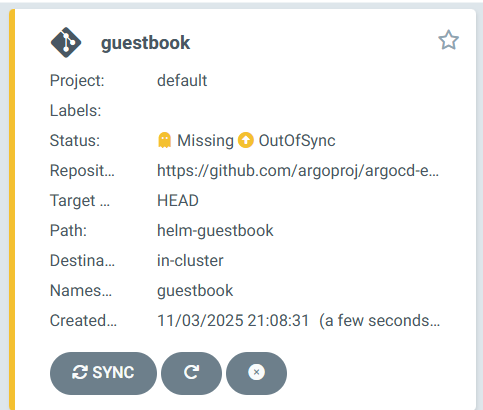
kubectl get applications -n argocd guestbook
NAME SYNC STATUS HEALTH STATUS
guestbook Synced Progressing
howoo@ttokkang-ui-MacBookAir ~/Desktop/work/Gasida_series/practice kubectl get applications -n argocd guestbook -o yaml | kubectl neat | yq
apiVersion: argoproj.io/v1alpha1
kind: Application
metadata:
name: guestbook
namespace: argocd
spec:
destination:
namespace: guestbook
server: https://kubernetes.default.svc
project: default
source:
helm:
valueFiles:
- values.yaml
path: helm-guestbook
repoURL: https://github.com/argoproj/argocd-example-apps
targetRevision: HEAD
syncPolicy:
automated:
enabled: true
prune: true
selfHeal: true
syncOptions:
- CreateNamespace=true
howoo@ttokkang-ui-MacBookAir ~/Desktop/work/Gasida_series/practice kubectl get pod,svc,ep -n guestbook
NAME READY STATUS RESTARTS AGE
pod/guestbook-helm-guestbook-6585c766d6-k6kqg 1/1 Running 0 68s
NAME TYPE CLUSTER-IP EXTERNAL-IP PORT(S) AGE
service/guestbook-helm-guestbook ClusterIP 10.96.61.64 <none> 80/TCP 68s
NAME ENDPOINTS AGE
endpoints/guestbook-helm-guestbook 10.244.0.14:80 68s
4. Argo UI alice 로그인 후 확인 : 권한 없음 ( application , Cluster 정보 안보임 )

5. 권한 부여 RBAC
# argocd-rbac-cm 권한 수정 후 확인
howoo@ttokkang-ui-MacBookAir ~/Desktop/work/Gasida_series/practice kubectl get -n argocd cm argocd-rbac-cm -o yaml > argocd-rbac-cm.yaml
howoo@ttokkang-ui-MacBookAir ~/Desktop/work/Gasida_series/practice kubectl apply -f argocd-rbac-cm.yaml -n argocd
Warning: resource configmaps/argocd-rbac-cm is missing the kubectl.kubernetes.io/last-applied-configuration annotation which is required by kubectl apply. kubectl apply should only be used on resources created declaratively by either kubectl create --save-config or kubectl apply. The missing annotation will be patched automatically.
configmap/argocd-rbac-cm configured


## CLI 확인
howoo@ttokkang-ui-MacBookAir ~/Desktop/work/Gasida_series/practice argocd login argocd.example.com --insecure --username alice
Password:
'alice:login' logged in successfully
Context 'argocd.example.com' updated
howoo@ttokkang-ui-MacBookAir ~/Desktop/work/Gasida_series/practice argocd cluster list
SERVER NAME VERSION STATUS MESSAGE PROJECT
https://kubernetes.default.svc in-cluster 1.32 Successful
howoo@ttokkang-ui-MacBookAir ~/Desktop/work/Gasida_series/practice argocd app list
NAME CLUSTER NAMESPACE PROJECT STATUS HEALTH SYNCPOLICY CONDITIONS REPO PATH TARGET
argocd/guestbook https://kubernetes.default.svc guestbook default Synced Healthy Auto-Prune <none> https://github.com/argoproj/argocd-example-apps helm-guestbook HEAD
## admin 계정 비활성화
howoo@ttokkang-ui-MacBookAir ~/Desktop/work/Gasida_series/practice kubectl get -n argocd cm argocd-cm -o yaml > argocd-cm.yaml
✘ howoo@ttokkang-ui-MacBookAir ~/Desktop/work/Gasida_series/practice kubectl apply -f argocd-cm.yaml -n argocd
configmap/argocd-cm configured
Run 'argocd --help' for usage.
✘ howoo@ttokkang-ui-MacBookAir ~/Desktop/work/Gasida_series/practice argocd account list
NAME ENABLED CAPABILITIES
admin false login
alice true apiKey, login
Service Account
1. 서비스어카운트란 : CI/CD 파이프라인과 같은 자동화를 시스템에 인증하는데 사용하는 계정
2. ArgoCD에서 서비스 어카운트를 생성하는 방법은 크게 두가지
- login 기능을 제거하고 API 키만을 사용하는 로컬 사용자
- 프로젝트 역할을 사용하고 그 역할에 토큰을 할당
3. [ 2-a ] 로컬 서비스 어카운트 RBAC
## apikey만 활성화된 별도의 로컬 계정 생성
kubectl apply -f argocd-cm-account.yaml -n argocd
configmap/argocd-cm configured
howoo@ttokkang-ui-MacBookAir ~/Desktop/work/Gasida_series/practice argocd account list
NAME ENABLED CAPABILITIES
admin false login
alice true apiKey, login
gitops-ci true apiKey
howoo@ttokkang-ui-MacBookAir ~/Desktop/work/Gasida_series/practice argocd account generate-token -a gitops-ci
{"level":"fatal","msg":"rpc error: code = PermissionDenied desc = permission denied: accounts, update, gitops-ci, sub: alice, iat: 2025-11-11T02:22:33Z","time":"2025-11-11T12:17:22+09:00"}
alice 사용자에게 계정 업데이트 권한을 할당 : user-update 새 역할을 생성하고 사용자에게 이 역할을 할당
# argocd-rbac-cm , configmap 수정
howoo@ttokkang-ui-MacBookAir ~/Desktop/work/Gasida_series/practice kubectl apply -f argocd-rbac-cm-role.yaml -n argocd
configmap/argocd-rbac-cm configured
# token 발생
howoo@ttokkang-ui-MacBookAir ~/Desktop/work/Gasida_series/practice argocd account generate-token -a gitops-ci
eyJhbGciOiJIUzI1NiIsInR5cCI6IkpXVCJ9.eyJpc3MiOiJhcmdvY2QiLCJzdWIiOiJnaXRvcHMtY2k6YXBpS2V5IiwibmJmIjoxNzYyODMxNDEzLCJpYXQiOjE3NjI4MzE0MTMsImp0aSI6IjkyMWY4Nzk4LTAzZmEtNGI1YS04MWFhLWUyMDMyYTIyMjdkOSJ9.fO-3dFBt_DNQ63hs_zg8p2fc3eOcYmD1CcuHcHKn5K8
# token 작동 확인
howoo@ttokkang-ui-MacBookAir ~/Desktop/work/Gasida_series/practice argocd account get-user-info --auth-token eyJhbGciOiJIUzI1NiIsInR5cCI6IkpXVCJ9.eyJpc3MiOiJhcmdvY2QiLCJzdWIiOiJnaXRvcHMtY2k6YXBpS2V5IiwibmJmIjoxNzYyODMxNDEzLCJpYXQiOjE3NjI4MzE0MTMsImp0aSI6IjkyMWY4Nzk4LTAzZmEtNGI1YS04MWFhLWUyMDMyYTIyMjdkOSJ9.fO-3dFBt_DNQ63hs_zg8p2fc3eOcYmD1CcuHcHKn5K8
Logged In: true
Username: gitops-ci
Issuer: argocd
Groups:
# 포인트는 로컬 계정을 RBAC 그룹에 포함시킬 수 없고 Role을 로컬 사용자에게 할당할 수만 있다
4. [ 2-b ] 프로젝트 역할과 토큰
- Application 프로젝트는 역할을 통해 application 정의에 일부 제약 조건을 적용하는 방식
- 예를 들어 상태를 가져오는 리포지터리, 대상 클러스터 배포할 수 있는 네임스페이스를 지정할 수 있고 설치 할 수 있는 리소스 유형을 피터링 할 수 있다
- 위와 같은 이유로 실무에서는 이 방식을 훨씬 많이 쓸것같다
- ArgoCD가 설치되면 default라는 기본 프로젝트가 제공되는데 이 기본 프로젝트는 Application에 대한 제한 사항이 설정 돼 있지 않다
## 모든것에 대한 허용 확인
howoo@ttokkang-ui-MacBookAir ~/Desktop/work/Gasida_series/practice kubectl get appprojects.argoproj.io -n argocd default -o yaml | k neat | yq
apiVersion: argoproj.io/v1alpha1
kind: AppProject
metadata:
name: default
namespace: argocd
spec:
clusterResourceWhitelist:
- group: '*'
kind: '*'
destinations:
- namespace: '*'
server: '*'
sourceRepos:
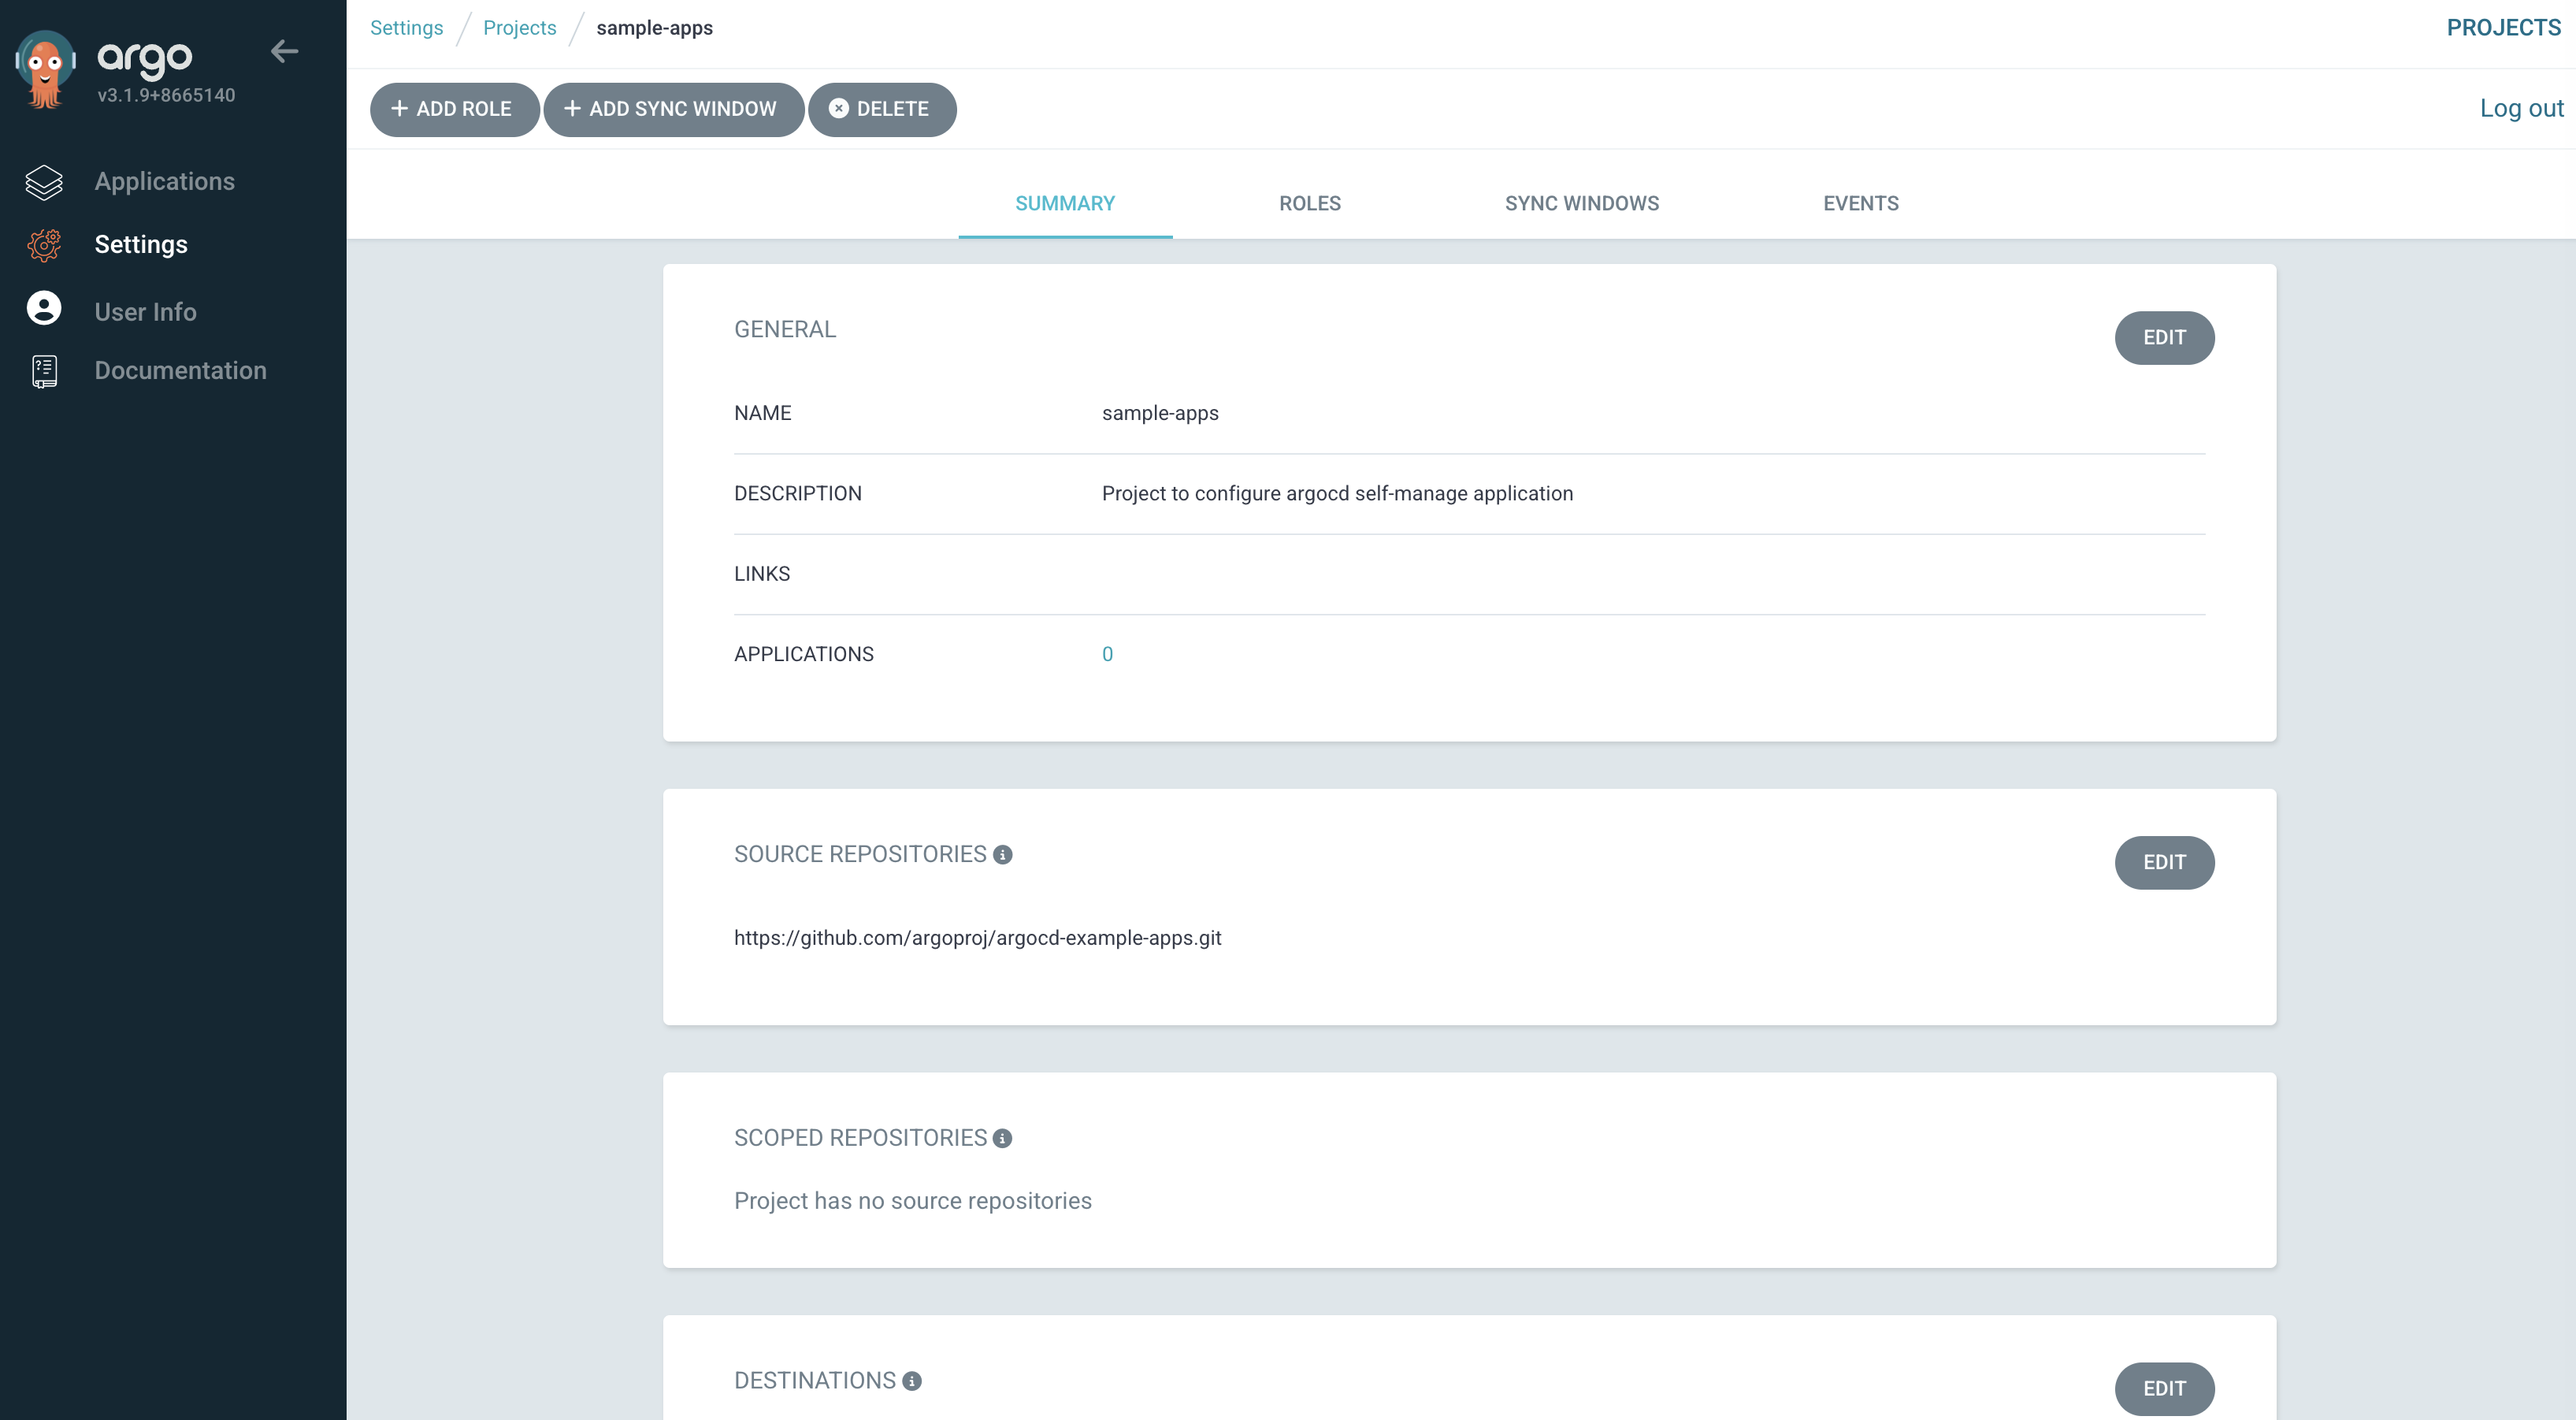
- '*'5. AppProject 신규 생성
cat <<EOF | kubectl apply -f -
apiVersion: argoproj.io/v1alpha1
kind: AppProject
metadata:
name: sample-apps
namespace: argocd
spec:
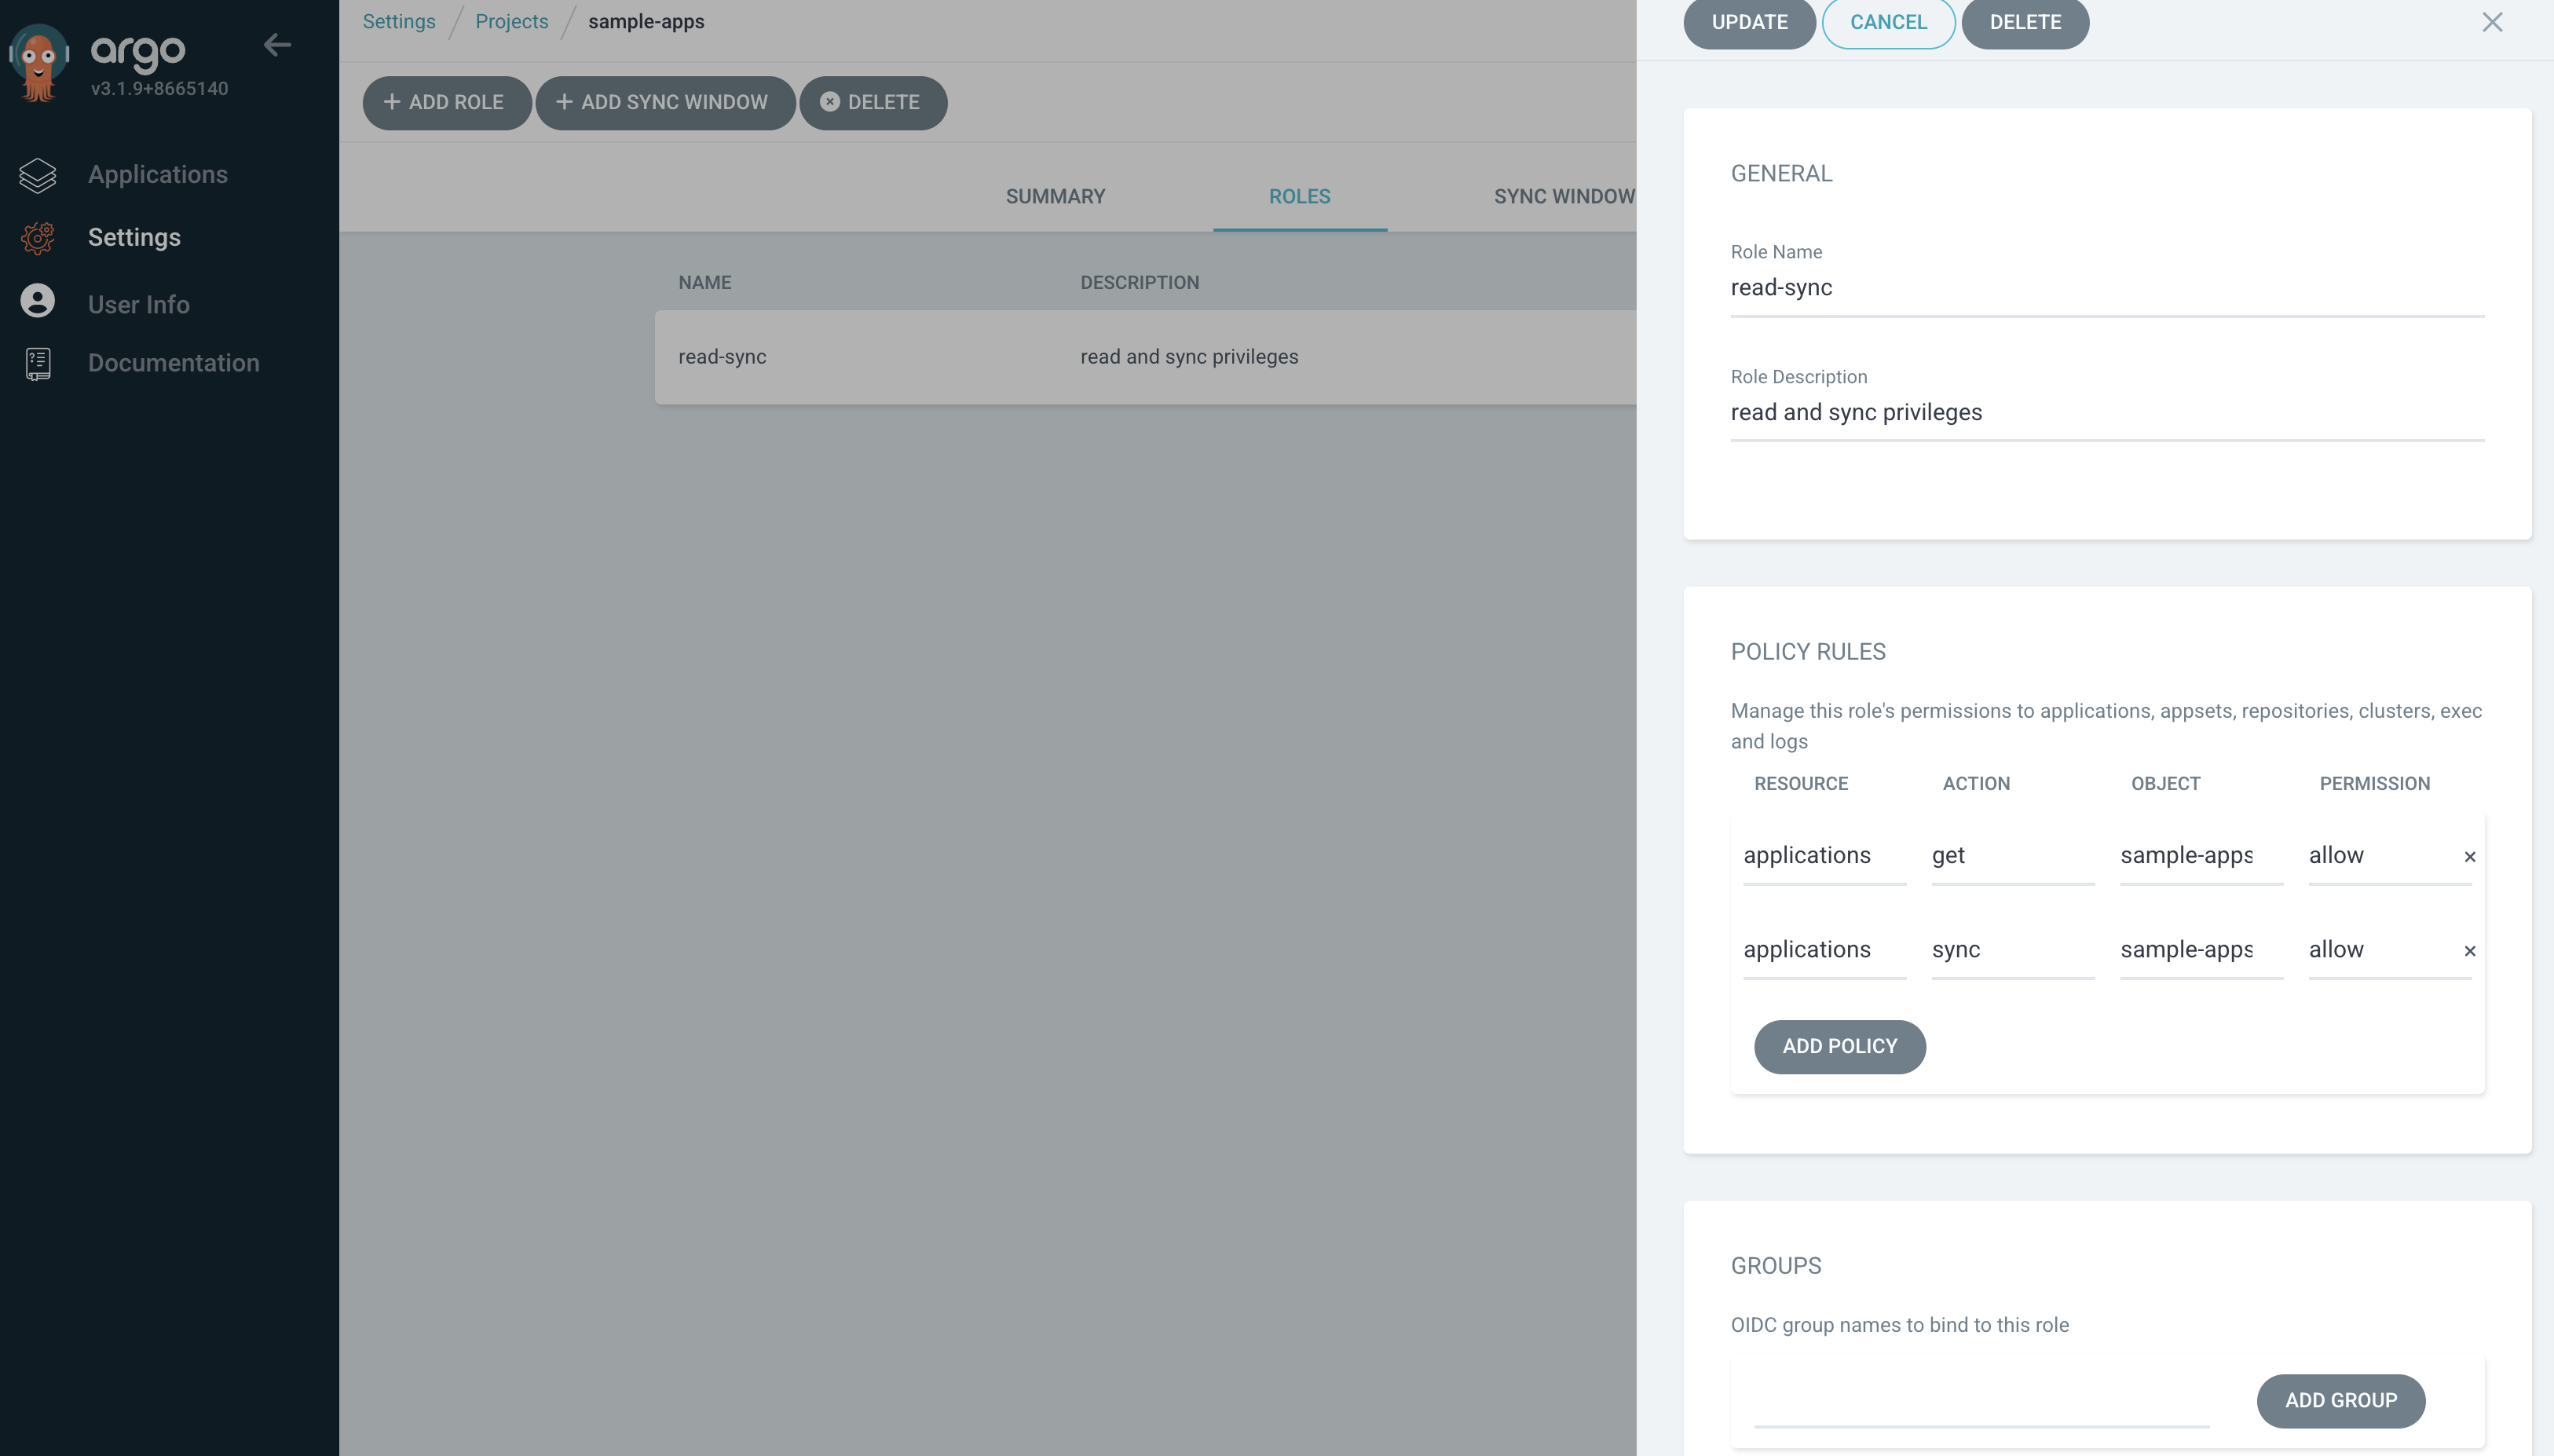
roles:
- name: read-sync
description: read and sync privileges
policies:
- p, proj:sample-apps:read-sync, applications, get, sample-apps/*, allow
- p, proj:sample-apps:read-sync, applications, sync, sample-apps/*, allow
clusterResourceWhitelist:
- group: '*'
kind: '*'
description: Project to configure argocd self-manage application
destinations:
- namespace: test
server: https://kubernetes.default.svc
sourceRepos:
- https://github.com/argoproj/argocd-example-apps.git
EOF
## 생성 확인
howoo@ttokkang-ui-MacBookAir ~/Desktop/work/Gasida_series/practice kubectl get appproject -n argocd
NAME AGE
default 21h
sample-apps 19s
6. 대상 네임스페이스와 클러스터를 제한하고 정해진 리포지터리로부터 상태 파일을 가져옴
7. Read and sync라는 역할을 생성하고 AppProject 내의 모든 application에 대한 가져오기, 동기화 작업만 허용
8. 해당 프로젝트에 app 배포
howoo@ttokkang-ui-MacBookAir ~/Desktop/work/Gasida_series/practice cat <<EOF | kubectl apply -f -
apiVersion: argoproj.io/v1alpha1
kind: Application
metadata:
name: pre-post-sync
namespace: argocd
finalizers:
- resources-finalizer.argocd.argoproj.io
spec:
project: sample-apps
source:
path: pre-post-sync
repoURL: https://github.com/argoproj/argocd-example-apps
targetRevision: master
destination:
namespace: test
server: https://kubernetes.default.svc
syncPolicy:
automated:
enabled: false
syncOptions:
- CreateNamespace=true
EOF
# 동기화 실행시 실패 !
howoo@ttokkang-ui-MacBookAir ~/Desktop/work/Gasida_series/practice argocd app sync argocd/pre-post-sync
{"level":"fatal","msg":"rpc error: code = PermissionDenied desc = permission denied: applications, sync, sample-apps/pre-post-sync, sub: alice, iat: 2025-11-12T12:30:21Z","time":"2025-11-12T21:31:11+09:00"}
9. 읽기 및 동기화 역할에 대한 토큰을 통해 수행
# RBAC 수정 , 필요한 권한 추가
howoo@ttokkang-ui-MacBookAir ~/Desktop/work/Gasida_series/practice kubectl get -n argocd cm argocd-rbac-cm -o yaml > argocd-rbac-cm-token.ya
ml
howoo@ttokkang-ui-MacBookAir ~/Desktop/work/Gasida_series/practice vim argocd-rbac-cm-token.yaml
howoo@ttokkang-ui-MacBookAir ~/Desktop/work/Gasida_series/practice kubectl apply -f argocd-rbac-cm-token.yaml
configmap/argocd-rbac-cm configured
# 역할에 대한 토큰 생성
howoo@ttokkang-ui-MacBookAir ~/Desktop/work/Gasida_series/practice argocd proj role create-token sample-apps read-sync
Create token succeeded for proj:sample-apps:read-sync.
ID: 4787a5b9-e809-4428-bf85-ff11e3ee65d8
Issued At: 2025-11-12T21:37:18+09:00
Expires At: Never
Token: eyJhbGciOiJIUzI1NiIsInR5cCI6IkpXVCJ9.eyJpc3MiOiJhcmdvY2QiLCJzdWIiOiJwcm9qOnNhbXBsZS1hcHBzOnJlYWQtc3luYyIsIm5iZiI6MTc2Mjk1MTAzOCwiaWF0IjoxNzYyOTUxMDM4LCJqdGkiOiI0Nzg3YTViOS1lODA5LTQ0MjgtYmY4NS1mZjExZTNlZTY1ZDgifQ.uXnO30u-n_NKwMm4V7ozSbo4Ryy0vw60wYRvcZkitog
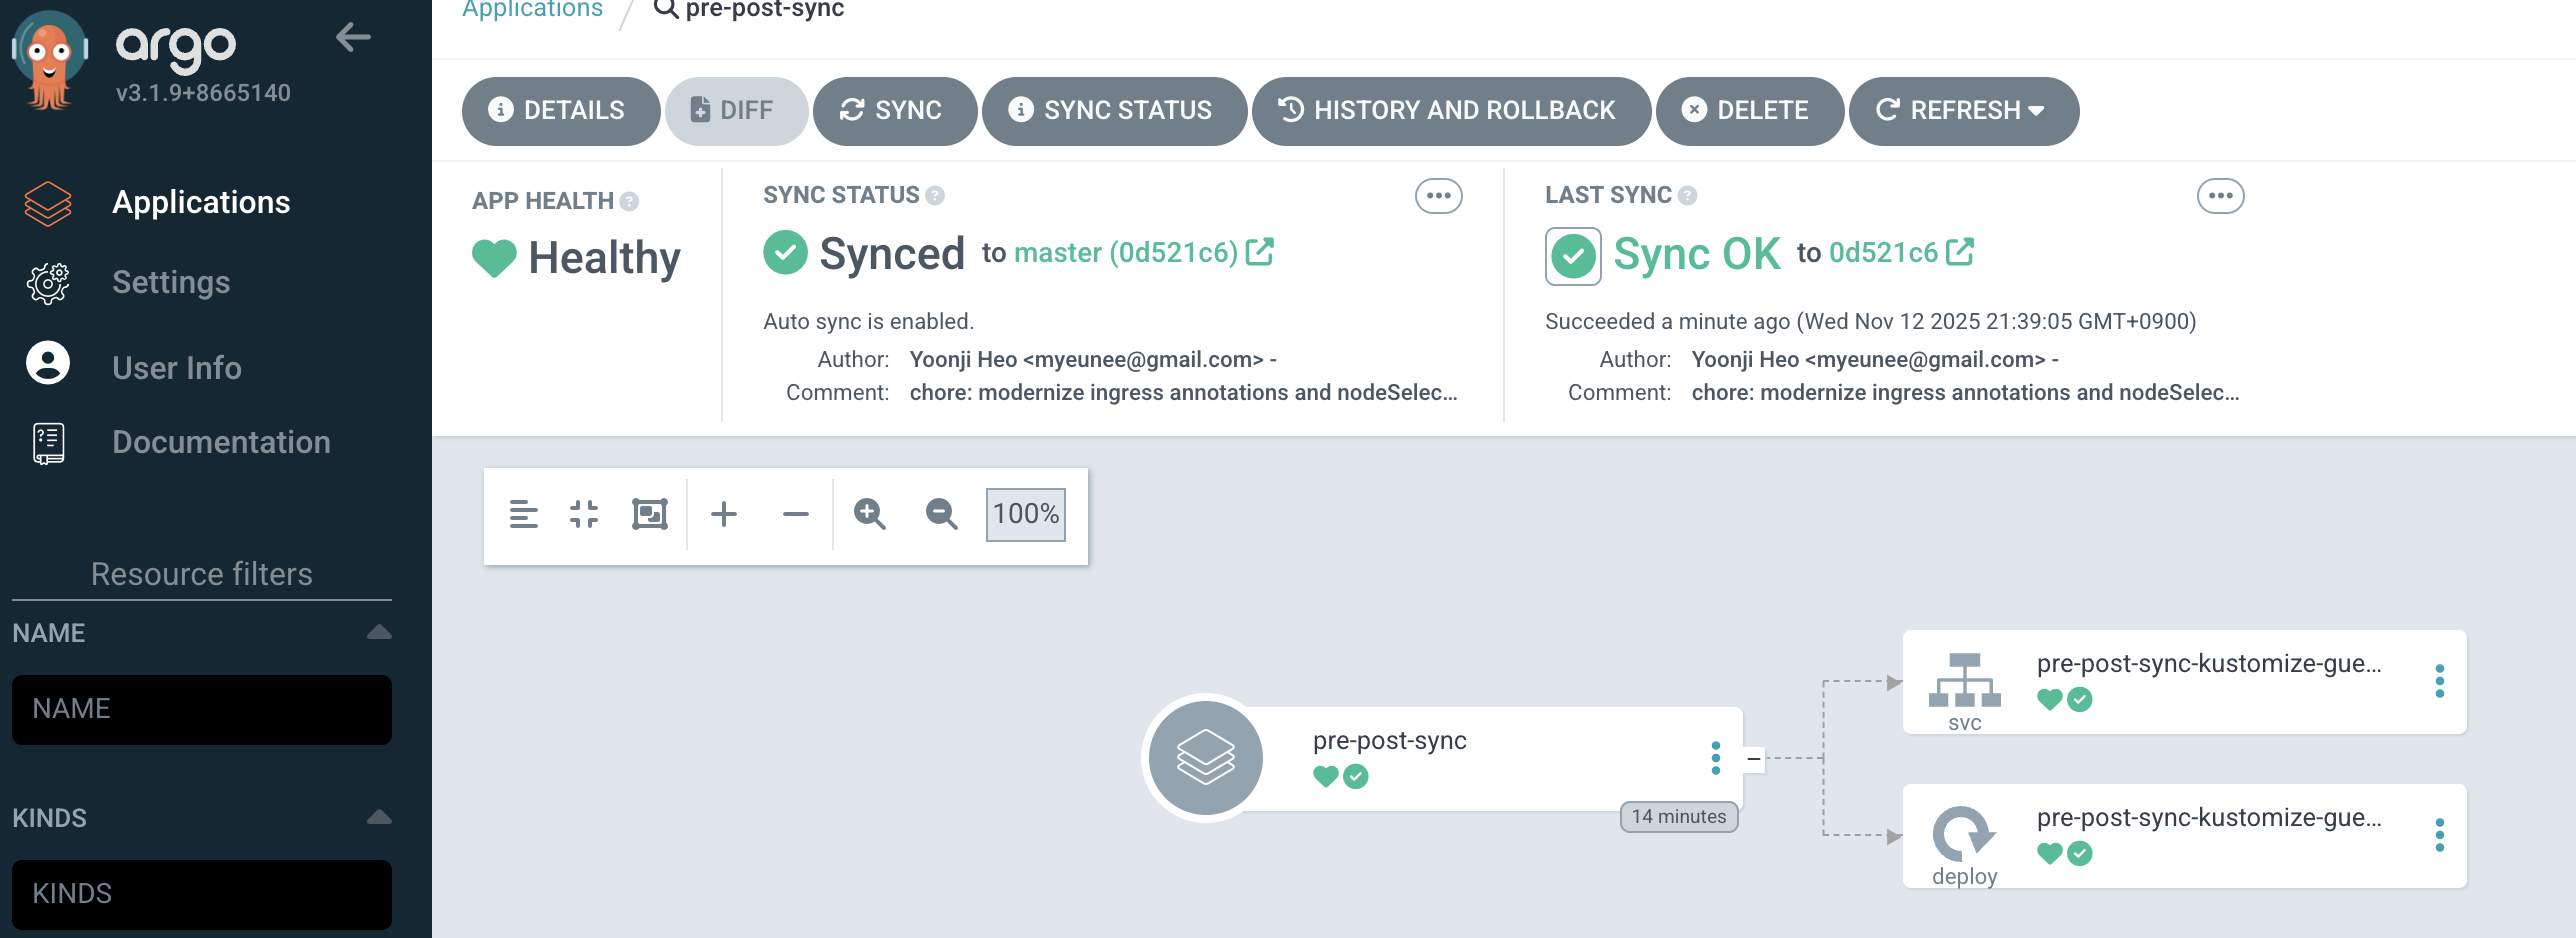
# 위의 토큰으로 application을 수동으로 동기화할 수 있다
howoo@ttokkang-ui-MacBookAir ~/Desktop/work/Gasida_series/practice argocd app sync argocd/pre-post-sync --auth-token $TOKEN
TIMESTAMP GROUP KIND NAMESPACE NAME STATUS HEALTH HOOK MESSAGE
2025-11-12T21:38:21+09:00 Service test pre-post-sync-kustomize-guestbook-ui OutOfSync Missing
2025-11-12T21:38:21+09:00 apps Deployment test pre-post-sync-kustomize-guestbook-ui OutOfSync Missing
2025-11-12T21:38:21+09:00 Namespace test Running Synced namespace/test created
2025-11-12T21:38:21+09:00 batch Job test pre-post-sync-before Progressing
2025-11-12T21:38:23+09:00 batch Job test pre-post-sync-before Running Synced PreSync job.batch/pre-post-sync-before created
2025-11-12T21:38:47+09:00 apps Deployment test pre-post-sync-kustomize-guestbook-ui Synced Progressing
2025-11-12T21:38:47+09:00 Service test pre-post-sync-kustomize-guestbook-ui Synced Healthy
2025-11-12T21:38:48+09:00 apps Deployment test pre-post-sync-kustomize-guestbook-ui Synced Healthy
2025-11-12T21:38:49+09:00 batch Job test pre-post-sync-before Succeeded Synced PreSync Reached expected number of succeeded pods
2025-11-12T21:38:49+09:00 Service test pre-post-sync-kustomize-guestbook-ui Synced Healthy service/pre-post-sync-kustomize-guestbook-ui created
2025-11-12T21:38:49+09:00 apps Deployment test pre-post-sync-kustomize-guestbook-ui Synced Healthy deployment.apps/pre-post-sync-kustomize-guestbook-ui created
2025-11-12T21:38:49+09:00 batch Job test pre-post-sync-after Running Synced PostSync job.batch/pre-post-sync-after created
2025-11-12T21:39:05+09:00 batch Job test pre-post-sync-after Succeeded Synced PostSync Reached expected number of succeeded pods
Name: argocd/pre-post-sync
Project: sample-apps
Server: https://kubernetes.default.svc
Namespace: test
URL: https://argocd.example.com/applications/argocd/pre-post-sync
Source:
- Repo: https://github.com/argoproj/argocd-example-apps
Target: master
Path: pre-post-sync
SyncWindow: Sync Allowed
Sync Policy: Manual
Sync Status: Synced to master (0d521c6)
Health Status: Healthy
Operation: Sync
Sync Revision: 0d521c6e049889134f3122eb32d7ed342f43ca0d
Phase: Succeeded
Start: 2025-11-12 21:38:21 +0900 KST
Finished: 2025-11-12 21:39:05 +0900 KST
Duration: 44s
Message: successfully synced (no more tasks)
GROUP KIND NAMESPACE NAME STATUS HEALTH HOOK MESSAGE
Namespace test Running Synced namespace/test created
batch Job test pre-post-sync-before Succeeded PreSync Reached expected number of succeeded pods
Service test pre-post-sync-kustomize-guestbook-ui Synced Healthy service/pre-post-sync-kustomize-guestbook-ui created
apps Deployment test pre-post-sync-kustomize-guestbook-ui Synced Healthy deployment.apps/pre-post-sync-kustomize-guestbook-ui created
batch Job test pre-post-sync-after Succeeded PostSync Reached expected number of succeeded pods
SSO
- ArgoCD는 UI 및 CLI에서 SSO 로그인을 제공
- ArgoCD는 두가지 방법으로 SSO 기능을 제공
- 설치되는 Dex OIDC 공급자를 사용하
- dex 설치 없이 다른 OIDC 공급자를 통해 Argo CD를 직접 사용]
1. Admin 계정 다시 활성화
howoo@ttokkang-ui-MacBookAir ~/Desktop/work/Gasida_series/practice kubectl get -n argocd cm argocd-cm -o yaml > argocd-cm-admin.yaml
howoo@ttokkang-ui-MacBookAir ~/Desktop/work/Gasida_series/practice vim argocd-cm-admin.yaml
howoo@ttokkang-ui-MacBookAir ~/Desktop/work/Gasida_series/practice kubectl apply -f argocd-cm-admin.yaml
configmap/argocd-cm configured
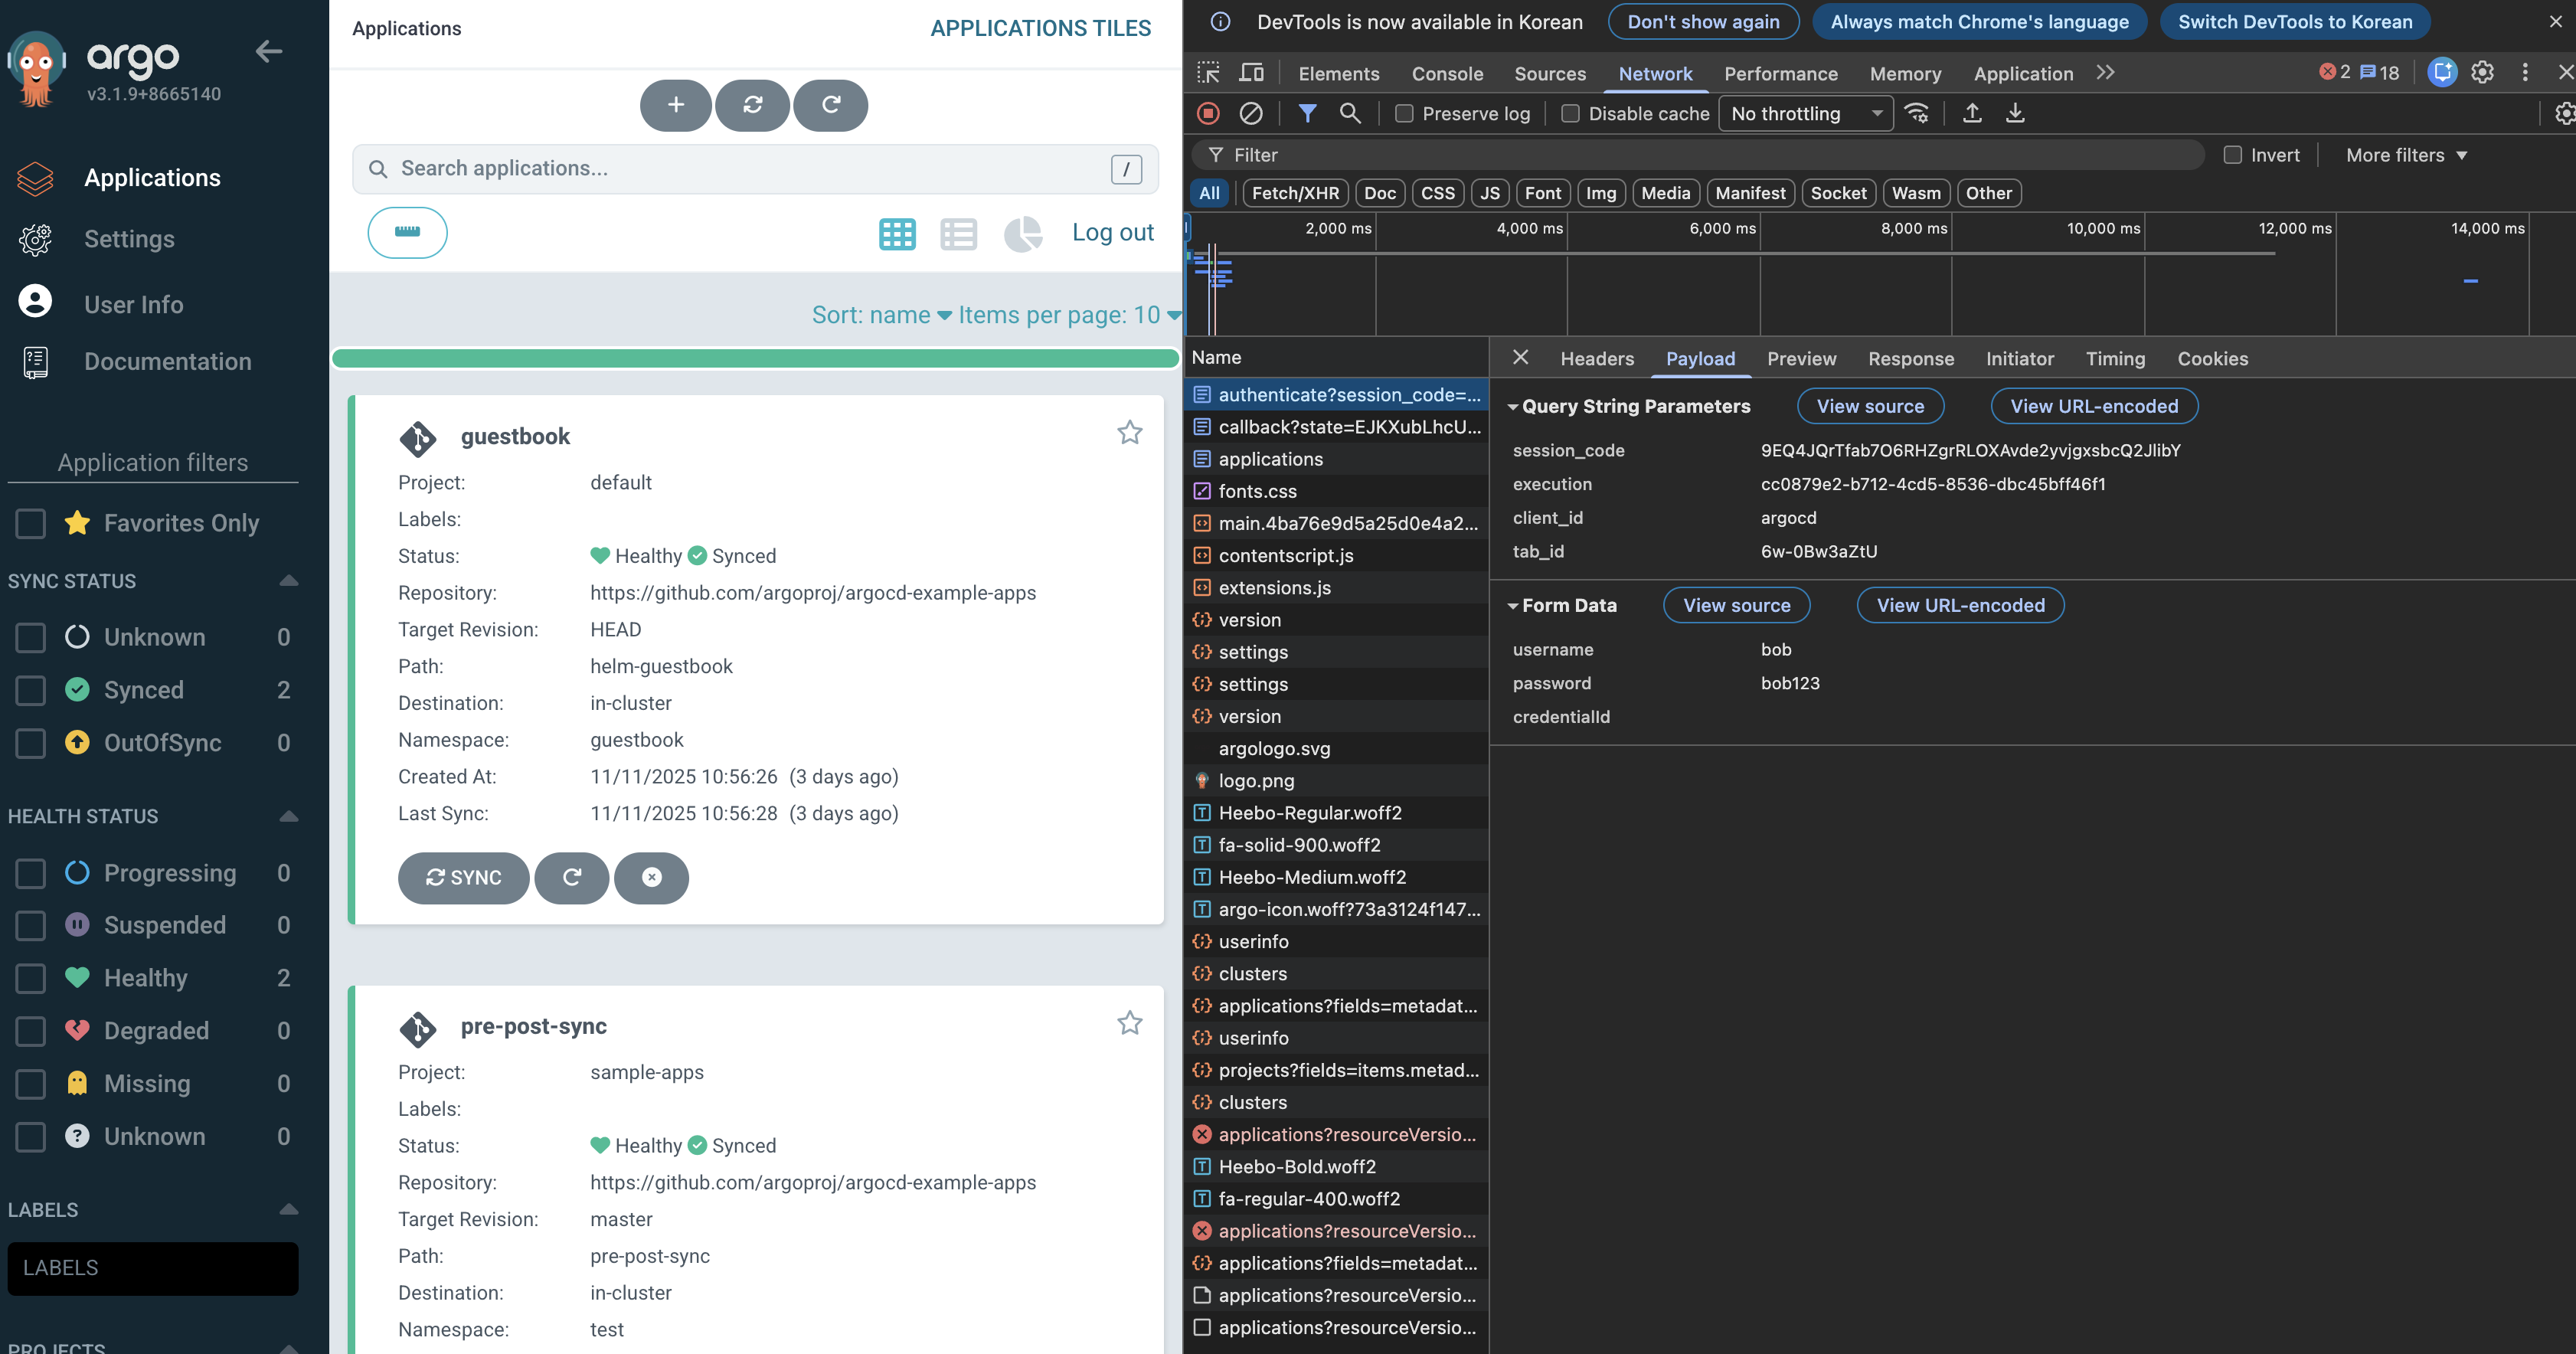
howoo@ttokkang-ui-MacBookAir ~/Desktop/work/Gasida_series/practice argocd login argocd.example.com --username admin --password qwe12345 --insecure
'admin:login' logged in successfully
Context 'argocd.example.com' updated
howoo@ttokkang-ui-MacBookAir ~/Desktop/work/Gasida_series/practice argocd app list
NAME CLUSTER NAMESPACE PROJECT STATUS HEALTH SYNCPOLICY CONDITIONS REPO PATH TARGET
argocd/guestbook https://kubernetes.default.svc guestbook default Synced Healthy Auto-Prune <none> https://github.com/argoproj/argocd-example-apps helm-guestbook HEAD
argocd/pre-post-sync https://kubernetes.default.svc test sample-apps Synced Healthy Manual <none> https://github.com/argoproj/argocd-example-apps pre-post-sync master
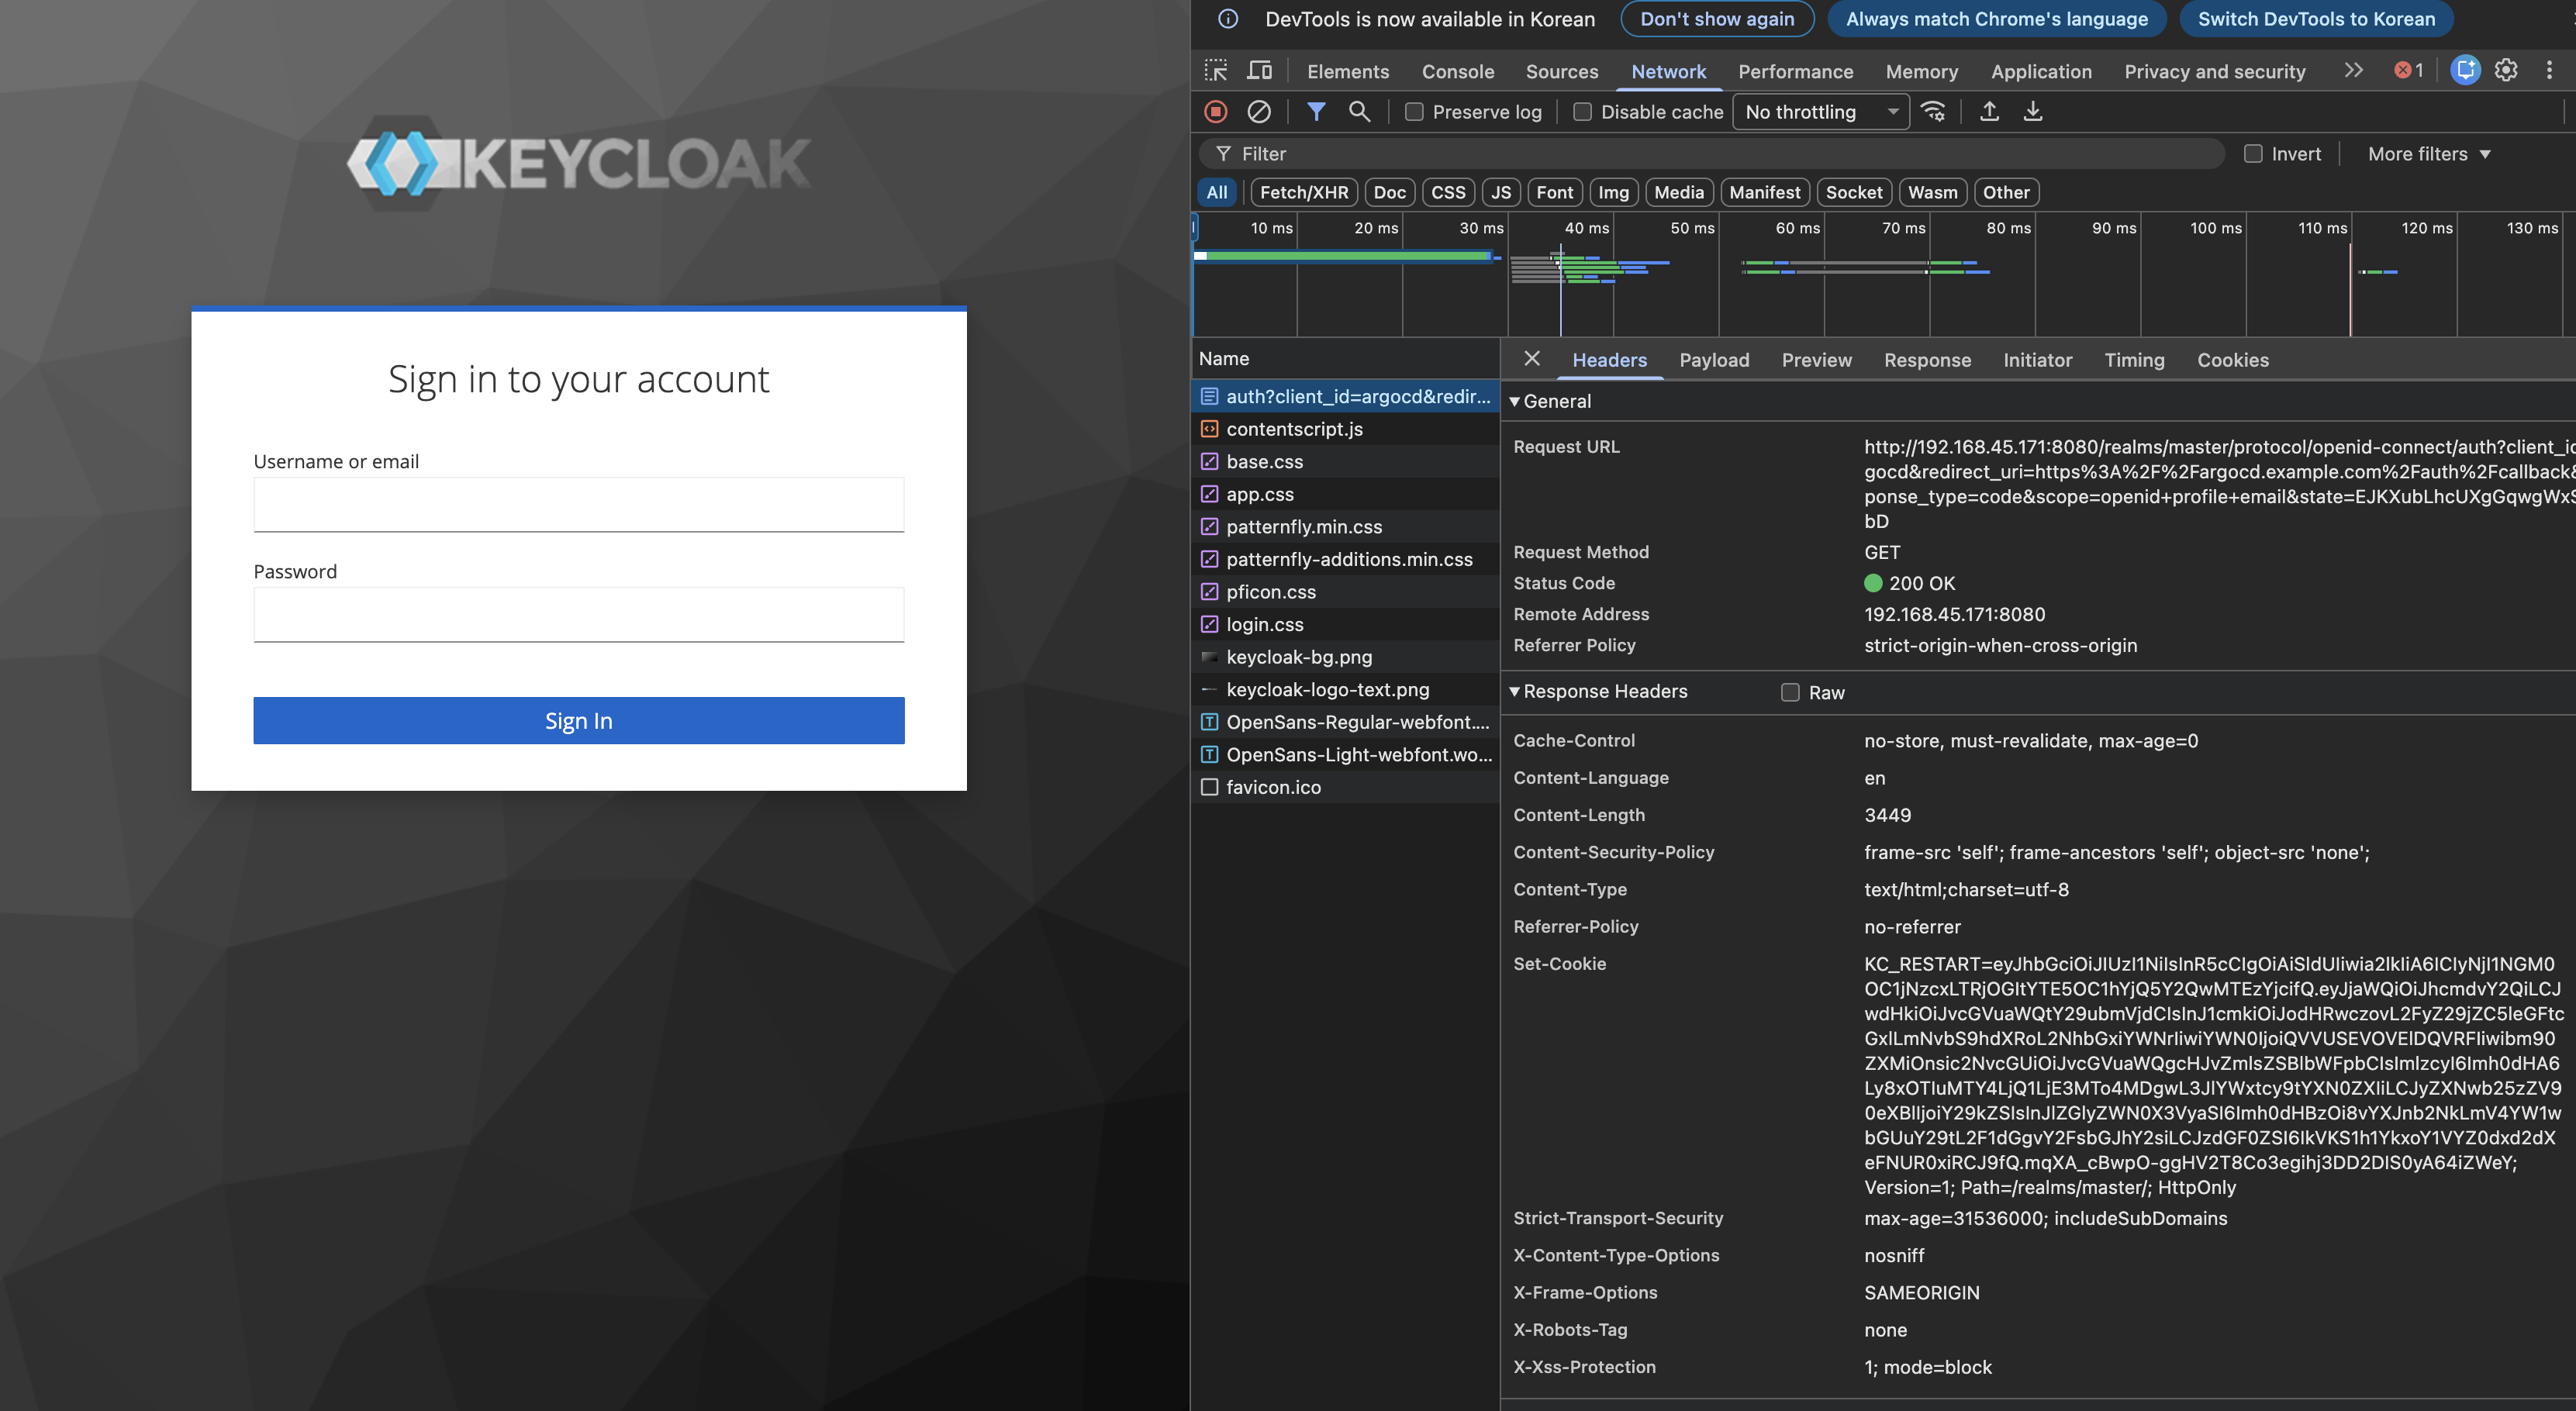
2. Keycloak 소개 : 애플리케이션에 초점을 맞춘 오픈소스 ID 및 접근 관리 도구
- keycloak은 강력한 인증을 포함해 완전히 사용자의 입맛에 맞게 설정할 수 있는 로그인 페이지를 제공하며 암호 복구, 주기적인 암호 업데이트 설정, 이용 약관 동의 등과 같은 다양한 기능을 제공
- Keycloak은 SSO 기능을 제공
- Keycloak은 OAuth2.0, OIDC, SAML2.0을 지원하는 업계 표준 프로토콜을 기반으로 한다
- 클러스터링 기능을 통해 고가용성을 제공
3. keycloak 배포 및 기본 설정
# keycloak docker 실행
howoo@ttokkang-ui-MacBookAir ~/Desktop/work/Gasida_series/practice docker run -d -e KEYCLOAK_ADMIN=admin -e KEYCLOAK_ADMIN_PASSWORD=admin --net host --name dev-keycloak quay.io/keycloak/keycloak:22.0.0 start-dev
Unable to find image 'quay.io/keycloak/keycloak:22.0.0' locally
22.0.0: Pulling from keycloak/keycloak
d1da3ca59af4: Pull complete
96e5bd002817: Pull complete
e465405d73d9: Pull complete
9ff76128529c: Pull complete
Digest: sha256:1882e5b5b881ec9370a5b2048b4c9e8b877d98eabad5d7a82af12efc697c59da
Status: Downloaded newer image for quay.io/keycloak/keycloak:22.0.0
e8a3caa02ccfb1c834e19b7442c6cd37e85bfd99850e75266ba0830de823df38
# 실행 확인
howoo@ttokkang-ui-MacBookAir ~/Desktop/work/Gasida_series/practice docker ps
CONTAINER ID IMAGE COMMAND CREATED STATUS PORTS NAMES
e8a3caa02ccf quay.io/keycloak/keycloak:22.0.0 "/opt/keycloak/bin/k…" 3 minutes ago Up 3 minutes dev-keycloak
7427143efa38 kindest/node:v1.32.8 "/usr/local/bin/entr…" 2 days ago Up 7 minutes 0.0.0.0:80->80/tcp, 0.0.0.0:443->443/tcp, 0.0.0.0:30000-30003->30000-30003/tcp, 127.0.0.1:52632->6443/tcp myk8s-control-plane
docker exec -it dev-keycloak java --version
openjdk 17.0.8 2023-07-18 LTS
OpenJDK Runtime Environment (Red_Hat-17.0.8.0.7-1) (build 17.0.8+7-LTS)
OpenJDK 64-Bit Server VM (Red_Hat-17.0.8.0.7-1) (build 17.0.8+7-LTS, mixed mode)
howoo@ttokkang-ui-MacBookAir ~/Desktop/work/Gasida_series/practice docker images
REPOSITORY TAG IMAGE ID CREATED SIZE
jenkins/jenkins latest 03113ccbc877 2 weeks ago 518MB
gogs/gogs latest df3dc5f1f1b6 5 weeks ago 131MB
quay.io/argoprojlabs/argocd-autopilot latest 9bbd32c76e1e 2 months ago 364MB
kindest/node <none> b1b6ffc307b4 2 months ago 1.02GB
kindest/node v1.32.8 10dcd90e1d59 2 months ago 1.06GB
quay.io/keycloak/keycloak 22.0.0 456b66461f4b 2 years ago 457MB
# keycloak web 접속
howoo@ttokkang-ui-MacBookAir ~/Desktop/work/Gasida_series/practice open http://localhost:8080/admin

4. keycloak에 argoCD를 위한 client 생성
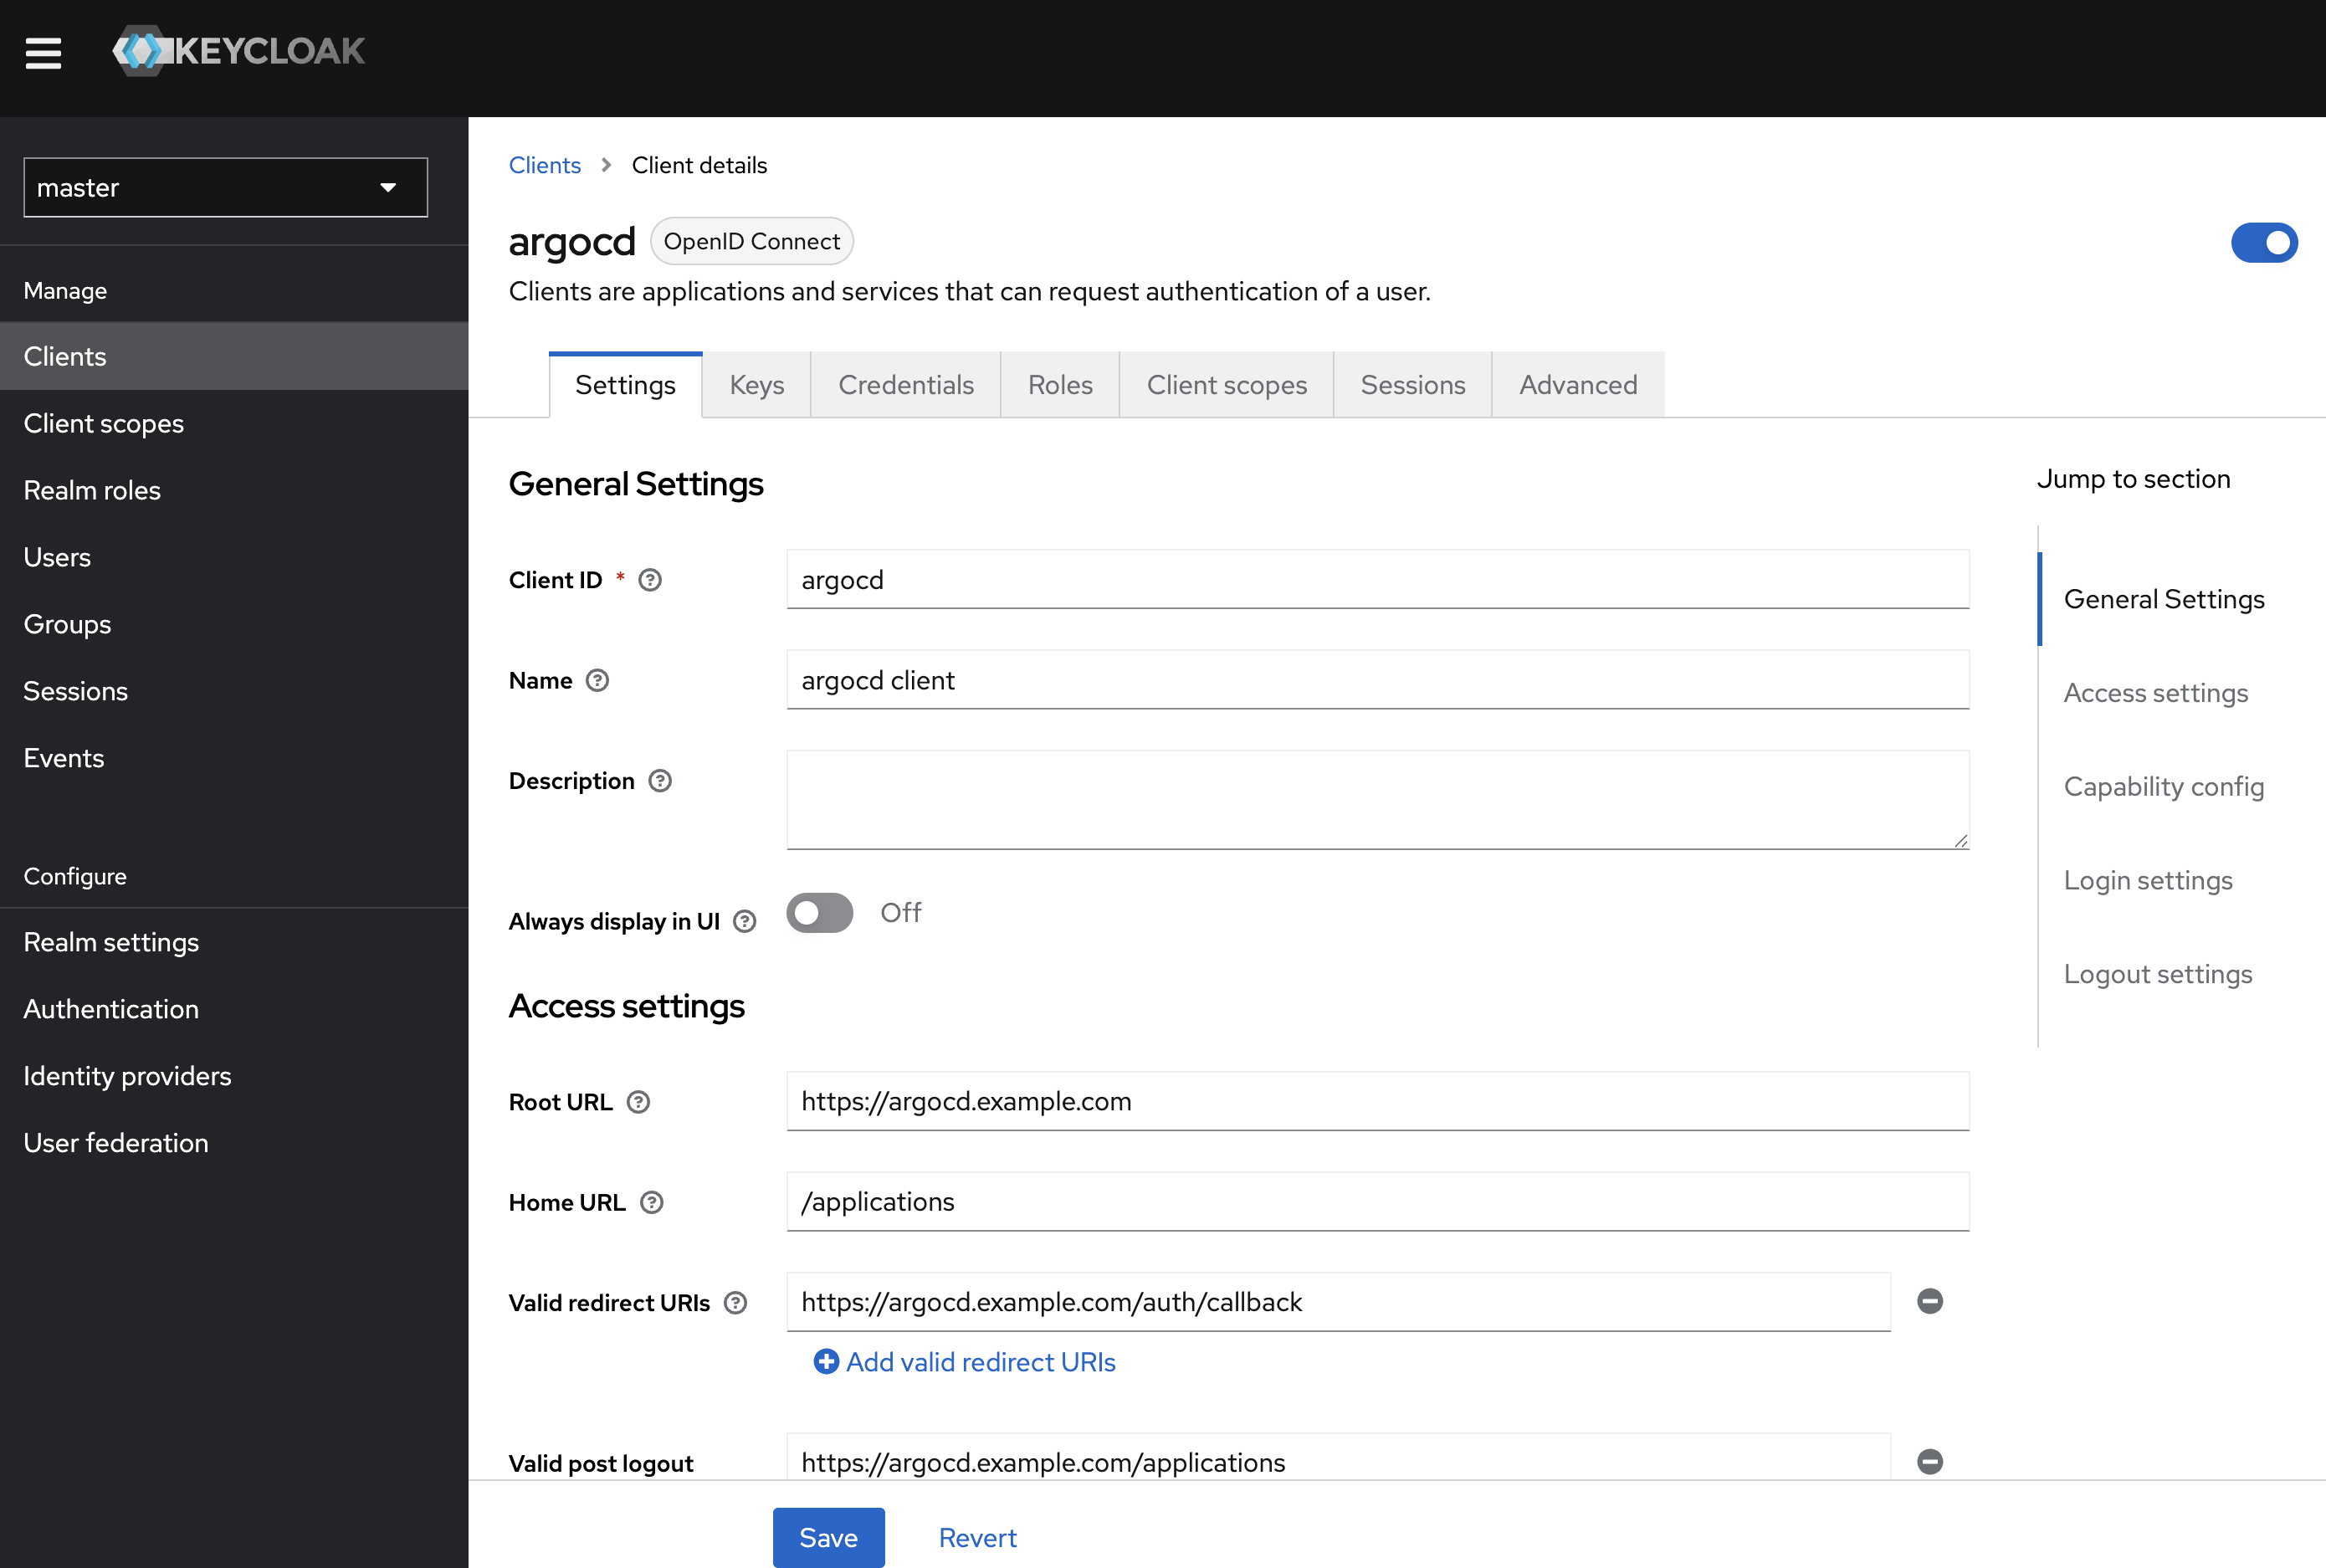
5. configuring ArgoCD OIDC
howoo@ttokkang-ui-MacBookAir ~/Desktop/work/Gasida_series/practice kubectl -n argocd patch secret argocd-secret --patch='{"stringData": { "oidc.keycloak.clientSecret": "9vsqPxcl0szshqy30jrKGgqQi69FGpKc" }}'
secret/argocd-secret patched
howoo@ttokkang-ui-MacBookAir ~/Desktop/work/Gasida_series/practice kubectl get secret -n argocd argocd-secret -o jsonpath='{.data}' | jq
{
"accounts.alice.password": "JDJhJDEwJDBFN0EycWJKRXVIdFo1aHRFUEk3SC5wU0NGU0x1c1J3UHY0S0lzcWpuVkpxT3F1SU1NdDYy",
"accounts.alice.passwordMtime": "MjAyNS0xMS0xMVQwMjoxNzo0OVo=",
"accounts.alice.tokens": "W3siaWQiOiI2MGExOTYxYi1kOWQzLTQ4NWEtYWIzZi01NTZhZTcxZjRkMDUiLCJpYXQiOjE3NjI4MzA3NjF9XQ==",
"accounts.gitops-ci.tokens": "W3siaWQiOiI5MjFmODc5OC0wM2ZhLTRiNWEtODFhYS1lMjAzMmEyMjI3ZDkiLCJpYXQiOjE3NjI4MzE0MTN9LHsiaWQiOiI0OWNlODE5MC0yNjUwLTQwNWUtYjhhMS05Mjk0NTI1ZTE3NjQiLCJpYXQiOjE3NjI5NTA2MzZ9XQ==",
"admin.password": "JDJhJDEwJFRkcEdERkhTWlp0SVZCMVZFejZ1Y2VSdTBOWjk2Q2ZXWHZFOXVTMmxzZjJuRFlpUzhwRVQu",
"admin.passwordMtime": "MjAyNS0xMS0xMVQwMToyMzo1OFo=",
"oidc.keycloak.clientSecret": "OXZzcVB4Y2wwc3pzaHF5MzBqcktHZ3FRaTY5RkdwS2M=",
"server.secretkey": "ckJsZ25OZnFCUzlKYWxJYkRjZDMzMWQ1TC9pRWFNRHlaNVg3YjNsLzVKOD0="
}
# argocd-cm 수정
kubectl apply -f argocd-cm-20251114.yaml
configmap/argocd-cm configured
howoo@ttokkang-ui-MacBookAir ~/Desktop/work/Gasida_series/practice kubectl rollout restart deploy argocd-server -n argocd
deployment.apps/argocd-server restarted
6. Keycloak 인증을 통한 로그인