실습 환경을 클라우드 포메이션으로 배포
이 스크립트는 CloudFormation 템플릿을 이용해 EC2 기반의 MinIO 환경을 자동 배포하고 관리하는 예제입니다.
스택 생성 시 SSH 키와 접속 허용 IP, 인스턴스 타입 등을 파라미터로 지정할 수 있습니다.
배포 후에는 EC2의 퍼블릭 IP를 확인해 SSH 접속 및 Kubernetes(k3s) 환경 구성을 확인할 수 있습니다.
# YAML 파일 다운로드
curl -O https://s3.ap-northeast-2.amazonaws.com/cloudformation.cloudneta.net/K8S/minio-ec2-1node.yaml

# CloudFormation 스택 배포
# aws cloudformation deploy --template-file kans-7w.yaml --stack-name mylab --parameter-overrides KeyName=<My SSH Keyname> SgIngressSshCidr=<My Home Public IP Address>/32 --region ap-northeast-2
예시) aws cloudformation deploy --template-file minio-ec2-1node.yaml --stack-name miniolab --parameter-overrides KeyName=kp-gasida SgIngressSshCidr=$(curl -s ipinfo.io/ip)/32 --region ap-northeast-2

## Tip. 인스턴스 타입 변경 : MyInstanceType=t3.xlarge (vCPU 4, Mem 16)
예시) aws cloudformation deploy --template-file minio-ec2-1node.yaml --stack-name miniolab --parameter-overrides MyInstanceType=t3.xlarge KeyName=kp-gasida SgIngressSshCidr=$(curl -s ipinfo.io/ip)/32 --region ap-northeast-2

# CloudFormation 스택 배포 완료 후 작업용 EC2 IP 출력
aws cloudformation describe-stacks --stack-name miniolab --query 'Stacks[*].Outputs[0].OutputValue' --output text --region ap-northeast-2

# [모니터링] CloudFormation 스택 상태 : 생성 완료 확인
while true; do
  date
  AWS_PAGER="" aws cloudformation list-stacks \
    --stack-status-filter CREATE_IN_PROGRESS CREATE_COMPLETE CREATE_FAILED DELETE_IN_PROGRESS DELETE_FAILED \
    --query "StackSummaries[*].{StackName:StackName, StackStatus:StackStatus}" \
    --output table
  sleep 1
done

# 배포된 aws ec2 유동 공인 IP 확인
aws ec2 describe-instances --query "Reservations[*].Instances[*].{PublicIPAdd:PublicIpAddress,InstanceName:Tags[?Key=='Name']|[0].Value,Status:State.Name}" --filters Name=instance-state-name,Values=running --output text
k3s-s   43.202.60.44    running

# EC2 SSH 접속 : 바로 접속하지 말고, 3~5분 정도 후에 접속 할 것
ssh -i ~/.ssh/kp-gasida.pem ubuntu@$(aws cloudformation describe-stacks --stack-name miniolab --query 'Stacks[*].Outputs[0].OutputValue' --output text --region ap-northeast-2)
...
(⎈|default:N/A) root@k3s-s:~# <- kubeps 가 나오지 않을 경우 ssh logout 후 다시 ssh 접속 할 것!
kc get node -owide
NAME     STATUS   ROLES                  AGE     VERSION         INTERNAL-IP      EXTERNAL-IP   OS-IMAGE             KERNEL-VERSION   CONTAINER-RUNTIME
k3s-s    Ready    control-plane,master   2m12s   v1.28.15+k3s1   192.168.10.10    <none>        Ubuntu 22.04.5 LTS   6.8.0-1029-aws   containerd://1.7.22-k3s1.28

hostnamectl
...
 Hardware Vendor: Amazon EC2
  Hardware Model: t3.xlarge

# Install Krew
wget -P /root "https://github.com/kubernetes-sigs/krew/releases/latest/download/krew-linux_amd64.tar.gz"
tar zxvf "/root/krew-linux_amd64.tar.gz" --warning=no-unknown-keyword
./krew-linux_amd64 install krew
export PATH="${KREW_ROOT:-$HOME/.krew}/bin:$PATH" # export PATH="$PATH:/root/.krew/bin"
echo 'export PATH="$PATH:/root/.krew/bin:/root/go/bin"' >> /etc/profile
kubectl krew install get-all neat rolesum pexec stern
kubectl krew list
이 스크립트는 Kubernetes 플러그인 관리 도구인 Krew를 EC2(k3s 클러스터) 환경에 설치하는 과정입니다.
설치 후 PATH를 설정하여 krew와 플러그인들을 전역에서 사용할 수 있게 합니다.
마지막으로 get-all, neat, rolesum, pexec, stern 등의 유용한 kubectl 플러그인들을 설치하고 목록을 확인합니다.
#
lsblk -a -o NAME,KNAME,MAJ:MIN,SIZE,TYPE,MOUNTPOINT,FSTYPE,UUID,MODEL,SERIAL
NAME         KNAME      MAJ:MIN  SIZE TYPE MOUNTPOINT                   FSTYPE   UUID                                 MODEL                      SERIAL
...
nvme0n1      nvme0n1    259:0     30G disk                                                                            Amazon Elastic Block Store vol0833a7ec553e64b74
├─nvme0n1p1  nvme0n1p1  259:5     29G part /                            ext4     0eec2352-4b50-40ec-ae93-7ce2911392bb
├─nvme0n1p14 nvme0n1p14 259:6      4M part
├─nvme0n1p15 nvme0n1p15 259:7    106M part /boot/efi                    vfat     2586-E57C
└─nvme0n1p16 nvme0n1p16 259:8    913M part /boot                        ext4     1eb1aa76-4a46-48d9-95d8-a2ecf2d505c2
nvme1n1      nvme1n1    259:1     30G disk                                                                            Amazon Elastic Block Store vol0da5a82ea4ada0efc
nvme3n1      nvme3n1    259:2     30G disk                                                                            Amazon Elastic Block Store vol079fd88ba55971938
nvme2n1      nvme2n1    259:3     30G disk                                                                            Amazon Elastic Block Store vol012134019ba9f1c8a
nvme4n1      nvme4n1    259:4     30G disk                                                                            Amazon Elastic Block Store vol04d49a7ef31a119a2

# fio 설치 되어 있음
apt install fio -y
fio -h

# 측정 기본
## IOPS: 초당 입출력 횟수
## Throughput: 초당 MB 전송량
## Block size, Queue depth, RW 패턴 (랜덤/순차, 읽기/쓰기) 조합에 따라 결과가 달라집니다.
## AWS gp3는 기본 IOPS 3000/Throughput 125MB/s

# 4k 랜덤 읽기/쓰기, iodepth=16, numjobs=4
## --rw=randrw : 랜덤 읽기/쓰기 혼합
## --rwmixread=70 : 70% 읽기 / 30% 쓰기
## --bs=4k : 4KB 블록 → IOPS 측정용
## --iodepth=16 : 큐 깊이 16
## --numjobs=4 : 4개의 병렬 job
## --time_based --runtime=60 : 60초 동안 측정
## --group_reporting : 그룹 단위 결과 요약
fio --name=randrw_test \
  --filename=/mnt/testfile \
  --size=4G \
  --rw=randrw \
  --rwmixread=70 \
  --bs=4k \
  --iodepth=16 \
  --numjobs=4 \
  --time_based \
  --runtime=60 \
  --group_reporting

## 읽기 평균 IOPS : 2388
  read: IOPS=2388, BW=9553KiB/s (9782kB/s)(560MiB/60003msec)

## 쓰기 평균 IOPS : 1030
  write: IOPS=1030, BW=4121KiB/s (4220kB/s)(241MiB/60003msec); 0 zone resets

## 디스크 활용률 : 읽기/쓰기 IO 수량(132k/49k) , 디스크 활용률 87%
Disk stats (read/write):
  nvme0n1: ios=132972/49709, sectors=1063776/420736, merge=0/8, ticks=232695/154017, in_queue=386713, util=87.09%
이 스크립트는 EC2에 연결된 EBS 디스크들의 상태를 확인한 뒤, fio를 이용해 성능을 벤치마크하는 과정입니다.
4KB 블록 단위로 랜덤 읽기·쓰기 테스트를 수행하며, iodepth=16, 병렬 4 job으로 60초간 측정합니다.
결과로 읽기/쓰기 IOPS와 전송량, 디스크 활용률을 확인하여 EBS 성능을 평가할 수 있습니다.
# mlocate or plocate
systemctl disable --now plocate-updatedb
systemctl list-timers | grep locate
# updatedb
systemctl disable --now updatedb.timer
systemctl list-timers | grep updatedb
# auditd
systemctl disable --now auditd
systemctl list-timers | grep audit
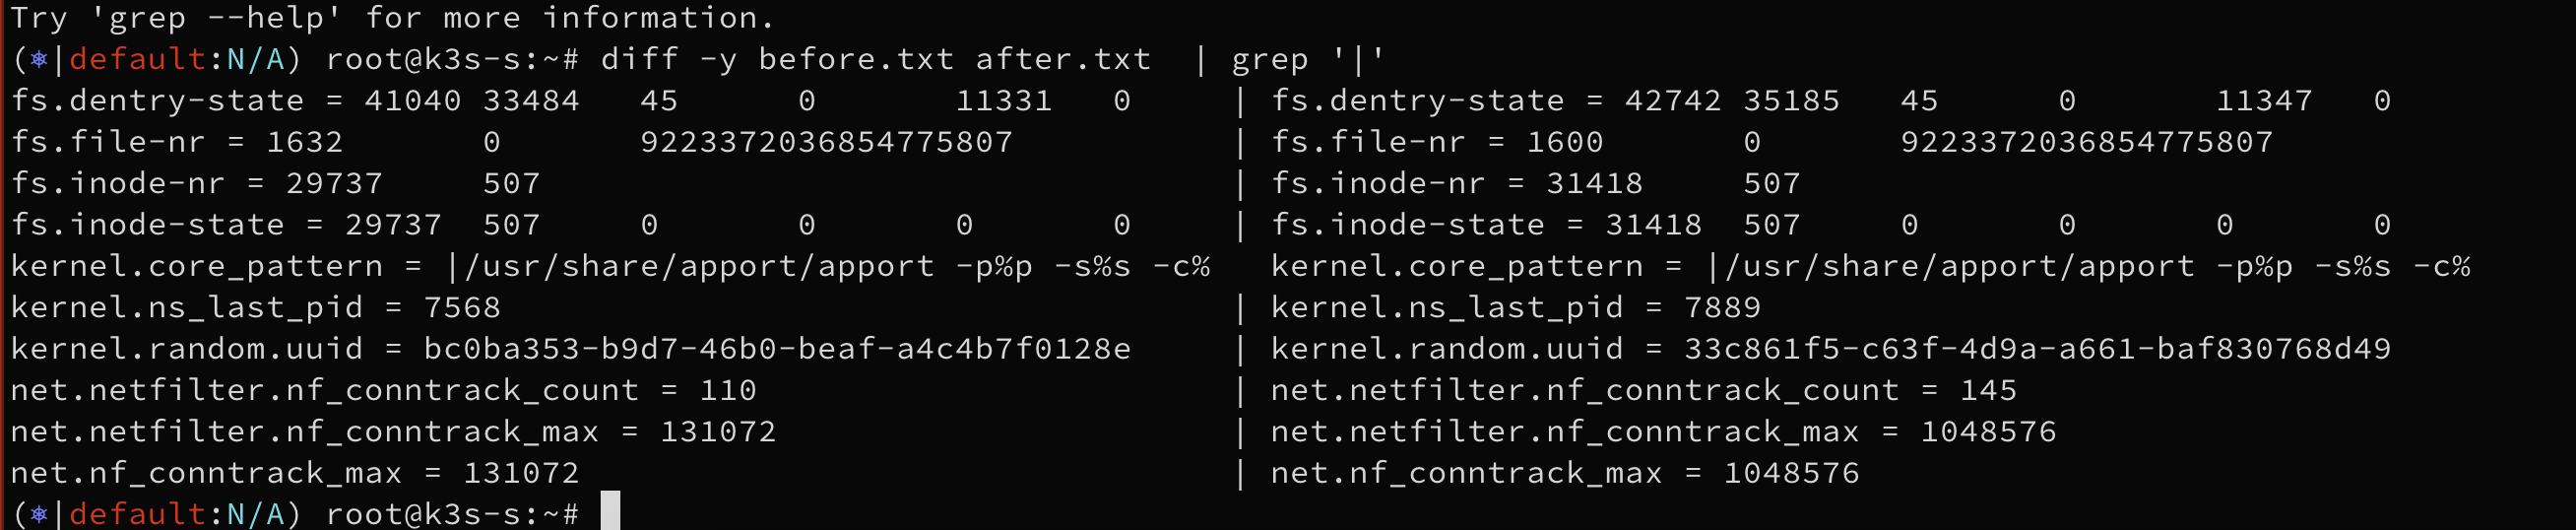
# Crowdstrike Falcon & Antivirus software (clamav)MinIO 최적화 튜닝
- 파일 시스템, 시스템 수준 호출 또는 커널 수준 호출을 인덱싱, 스캔 또는 감사하는 시스템 서비스를 비활성화합니다.
- 이러한 서비스는 리소스 경합이나 MinIO 작업 차단으로 인해 성능이 저하될 수 있습니다.
- MinIO는 MinIO를 실행하는 호스트에서 다음 서비스를 제거하거나 비활성화할 것을 강력히 권장합니다.
#
sysctl -a > before.txt


# 설치 되어 있음
apt install tuned -y

# 서비스 시작
systemctl start tuned && systemctl enable tuned
cat /usr/lib/systemd/system/tuned.service

# To see the current active profile, run:
tuned-adm active
Current active profile: throughput-performance

# To show the current profile selection mode, run:
tuned-adm profile_mode
Profile selection mode: auto

# To list all available profiles, run:
tuned-adm list
Available profiles:
- accelerator-performance     - Throughput performance based tuning with disabled higher latency STOP states
- aws                         - Optimize for aws ec2 instances
- balanced                    - General non-specialized tuned profile
- balanced-battery            - Balanced profile biased towards power savings changes for battery
- desktop                     - Optimize for the desktop use-case
- hpc-compute                 - Optimize for HPC compute workloads
- intel-sst                   - Configure for Intel Speed Select Base Frequency
- latency-performance         - Optimize for deterministic performance at the cost of increased power consumption
- network-latency             - Optimize for deterministic performance at the cost of increased power consumption, focused on low latency network performance
- network-throughput          - Optimize for streaming network throughput, generally only necessary on older CPUs or 40G+ networks
- optimize-serial-console     - Optimize for serial console use.
- powersave                   - Optimize for low power consumption
- throughput-performance      - Broadly applicable tuning that provides excellent performance across a variety of common server workloads
- virtual-guest               - Optimize for running inside a virtual guest
- virtual-host                - Optimize for running KVM guests
Current active profile: throughput-performance

# To switch to a different profile, run:
## The enabled profile is persisted into /etc/tuned/active_profile, which is read when the daemon starts or is restarted.
tuned-adm profile <profile-name>

# To disable all tunings, run:
tuned-adm off

tuned-adm active
No current active profile.

#
tuned-adm profile virtual-guest

tuned-adm active
Current active profile: virtual-guest

#
sysctl -a > after.txt

#
vi -d before.txt after.txt


# 4k 랜덤 읽기/쓰기, iodepth=16, numjobs=4
fio --name=randrw_test \
  --filename=/mnt/testfile \
  --size=4G \
  --rw=randrw \
  --rwmixread=70 \
  --bs=4k \
  --iodepth=16 \
  --numjobs=4 \
  --time_based \
  --runtime=60 \
  --group_reporting

## 읽기 평균 IOPS : 2388
  read: IOPS=2395, BW=9584KiB/s (9814kB/s)(562MiB/60003msec)

## 읽기 평균 IOPS : 1030
  write: IOPS=1033, BW=4134KiB/s (4233kB/s)(242MiB/60003msec); 0 zone resets

## 디스크 활용률 : 읽기/쓰기 IO 수량(132k/49k) , 디스크 활용률 87%
Disk stats (read/write):
  nvme0n1: ios=133343/49277, sectors=1066744/416808, merge=0/43, ticks=231976/154776, in_queue=386752, util=86.35%
tuned profiles
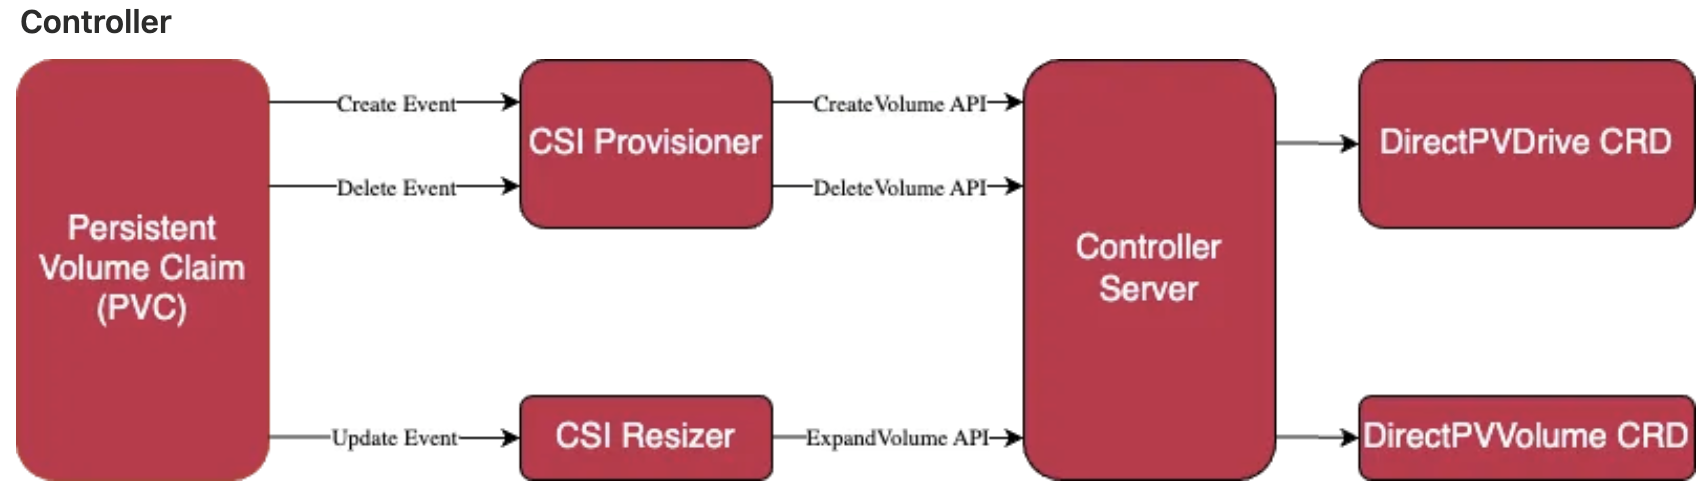
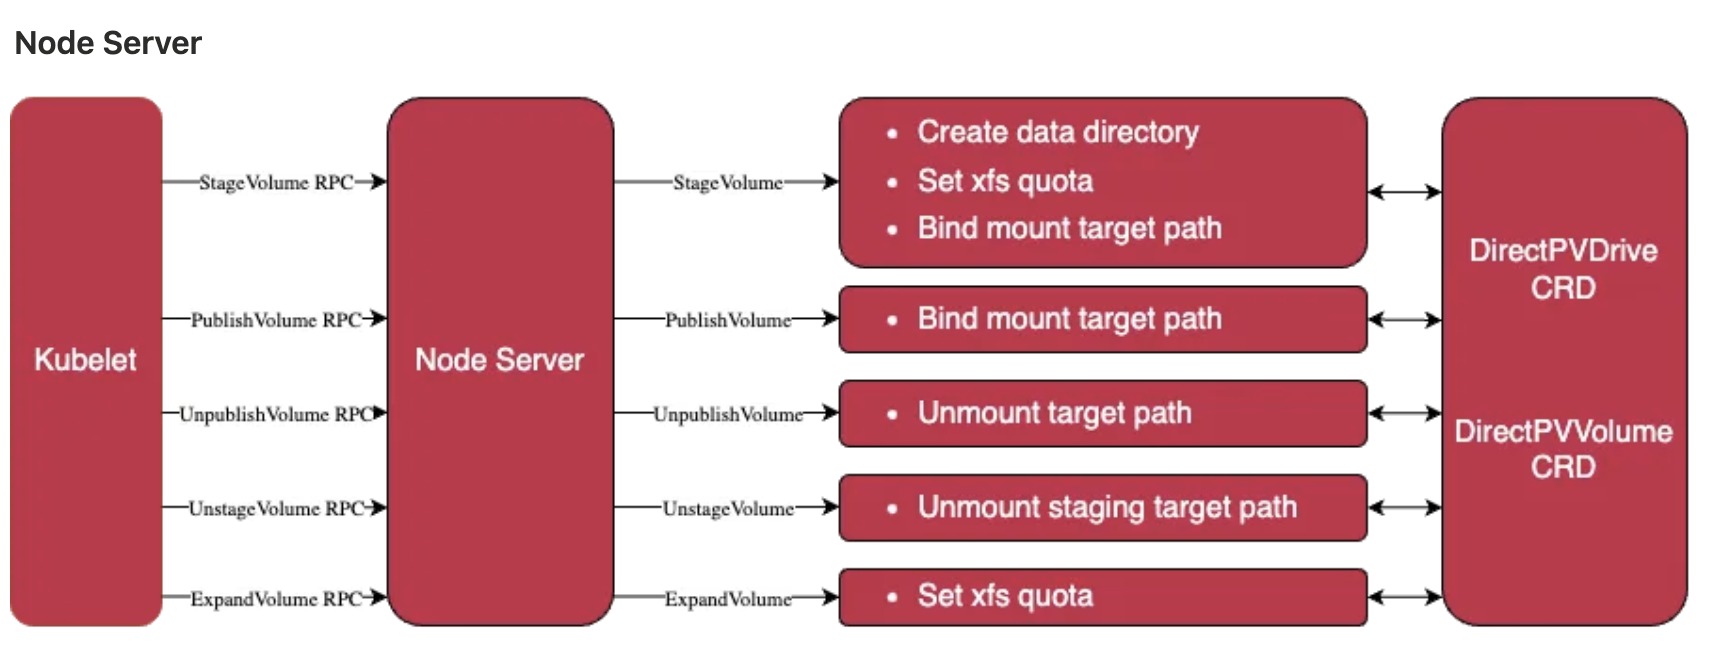
DirectPV
DirectPV란 ?
MinIO DirectPV는 AGPL 3.0 라이선스 하에 배포되는 Kubernetes용 Container Storage Interface(CSI) 드라이버로, 직접 연결된 스토리지(Direct Attached Storage)를 위한 분산 퍼시스턴트 볼륨 관리자입니다.
- DirectPV는 SAN(스토리지 영역 네트워크)이나 NAS(네트워크 연결 스토리지)와 같은 스토리지 시스템 자체가 아니라, 여러 서버에 걸친 로컬 드라이브를 발견(discover), 포맷(format), 마운트(mount), 스케줄(schedule), 모니터링(monitor)하는 기능을 제공합니다.
- Kubernetes에서 기존 hostPath나 local PV가 정적이고 제한적인 반면, DirectPV는 경량이며 수만 개의 드라이브를 확장 가능하게 관리할 수 있도록 설계되었습니다.
구성요소
- 명령줄 인터페이스를 통해 DirectPV CSI 드라이버를 관리하기 위해 로컬 머신에 설치된 DirectPV 플러그인
- 로컬 볼륨을 프로비저닝하는 Kubernetes 클러스터에 직접 설치된 DirectPV CSI 드라이버
DirectPV 설치
#
k krew install directpv
k directpv -h
#
k directpv install
┌──────────────────────────────────────┬──────────────────────────┐
│ NAME │ KIND │
├──────────────────────────────────────┼──────────────────────────┤
│ directpv │ Namespace │
│ directpv-min-io │ ServiceAccount │
│ directpv-min-io │ ClusterRole │
│ directpv-min-io │ ClusterRoleBinding │
│ directpv-min-io │ Role │
│ directpv-min-io │ RoleBinding │
│ directpvdrives.directpv.min.io │ CustomResourceDefinition │
│ directpvvolumes.directpv.min.io │ CustomResourceDefinition │
│ directpvnodes.directpv.min.io │ CustomResourceDefinition │
│ directpvinitrequests.directpv.min.io │ CustomResourceDefinition │
│ directpv-min-io │ CSIDriver │
│ directpv-min-io │ StorageClass │
│ node-server │ Daemonset │
│ controller │ Deployment │
└──────────────────────────────────────┴──────────────────────────┘
#
k get crd | grep min
directpvdrives.directpv.min.io 2025-09-13T05:23:40Z
directpvinitrequests.directpv.min.io 2025-09-13T05:23:40Z
directpvnodes.directpv.min.io 2025-09-13T05:23:40Z
directpvvolumes.directpv.min.io 2025-09-13T05:23:40Z
k get sc directpv-min-io -o yaml | yq
k get sc
NAME PROVISIONER RECLAIMPOLICY VOLUMEBINDINGMODE ALLOWVOLUMEEXPANSION AGE
directpv-min-io directpv-min-io Delete WaitForFirstConsumer true 4m17s
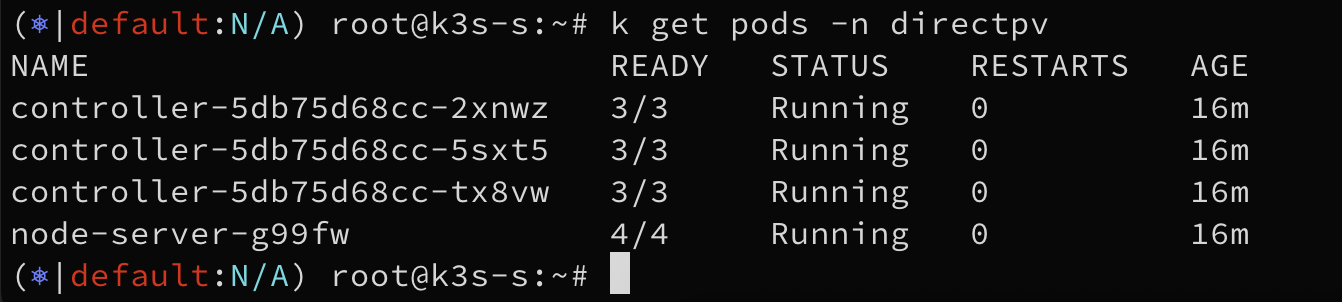
k get-all -n directpv
k get deploy,ds,pod -n directpv
k rolesum directpv-min-io -n directpv
k get directpvnodes.directpv.min.io
k get directpvnodes.directpv.min.io -o yaml | yq
# controller 파드 1대 정보 확인
kc describe pod -n directpv controller-75d5595d5b-bqwbs
...
Containers:
csi-provisioner:
...
Args:
--v=3
--timeout=300s
--csi-address=$(CSI_ENDPOINT)
--leader-election
--feature-gates=Topology=true
--strict-topology
...
Environment:
CSI_ENDPOINT: unix:///csi/csi.sock
Mounts:
/csi from socket-dir (rw)
...
csi-resizer:
...
Args:
--v=3
--timeout=300s
--csi-address=$(CSI_ENDPOINT)
--leader-election
...
Environment:
CSI_ENDPOINT: unix:///csi/csi.sock
Mounts:
/csi from socket-dir (rw)
...
controller:
...
Args:
controller
--identity=directpv-min-io
-v=3
--csi-endpoint=$(CSI_ENDPOINT)
--kube-node-name=$(KUBE_NODE_NAME)
--readiness-port=30443
...
Environment:
KUBE_NODE_NAME: (v1:spec.nodeName)
CSI_ENDPOINT: unix:///csi/csi.sock
Mounts:
/csi from socket-dir (rw)
...
Volumes:
socket-dir:
Type: HostPath (bare host directory volume)
Path: /var/lib/kubelet/plugins/controller-controller
HostPathType: DirectoryOrCreate
...
ls -l /var/lib/kubelet/plugins/controller-controller
total 0
srwxr-xr-x 1 root root 0 Sep 14 11:17 csi.sock
k get lease -n directpv -o yaml | yq
k get lease -n directpv
...
#
k get pod -n directpv -l selector.directpv.min.io.service=enabled
kc describe pod -n directpv -l selector.directpv.min.io.service=enabled
...
Containers:
node-driver-registrar:
...
Args:
--v=3
--csi-address=unix:///csi/csi.sock
--kubelet-registration-path=/var/lib/kubelet/plugins/directpv-min-io/csi.sock
node-server:
...
Args:
node-server
-v=3
--identity=directpv-min-io
--csi-endpoint=$(CSI_ENDPOINT)
--kube-node-name=$(KUBE_NODE_NAME)
--readiness-port=30443
--metrics-port=10443
node-controller:
...
Args:
node-controller
-v=3
--kube-node-name=$(KUBE_NODE_NAME)
liveness-probe:
...
Args:
--csi-address=/csi/csi.sock
--health-port=9898
Volumes:
socket-dir:
Type: HostPath (bare host directory volume)
Path: /var/lib/kubelet/plugins/directpv-min-io
HostPathType: DirectoryOrCreate
mountpoint-dir:
Type: HostPath (bare host directory volume)
Path: /var/lib/kubelet/pods
HostPathType: DirectoryOrCreate
registration-dir:
Type: HostPath (bare host directory volume)
Path: /var/lib/kubelet/plugins_registry
HostPathType: DirectoryOrCreate
plugins-dir:
Type: HostPath (bare host directory volume)
Path: /var/lib/kubelet/plugins
HostPathType: DirectoryOrCreate
directpv-common-root:
Type: HostPath (bare host directory volume)
Path: /var/lib/directpv/
HostPathType: DirectoryOrCreate
direct-csi-common-root:
Type: HostPath (bare host directory volume)
Path: /var/lib/direct-csi/
HostPathType: DirectoryOrCreate
sysfs:
Type: HostPath (bare host directory volume)
Path: /sys
HostPathType: DirectoryOrCreate
devfs:
Type: HostPath (bare host directory volume)
Path: /dev
HostPathType: DirectoryOrCreate
run-udev-data-dir:
Type: HostPath (bare host directory volume)
Path: /run/udev/data
HostPathType: DirectoryOrCreate
...
DirectPV로 물리디스크 관리하기
#
k directpv info
┌─────────┬──────────┬───────────┬─────────┬────────┐
│ NODE │ CAPACITY │ ALLOCATED │ VOLUMES │ DRIVES │
├─────────┼──────────┼───────────┼─────────┼────────┤
│ • k3s-s │ - │ - │ - │ - │
└─────────┴──────────┴───────────┴─────────┴────────┘
#
k directpv discover
Discovered node 'k3s-s' ✔
┌─────────────────────┬───────┬─────────┬────────┬────────────┬────────────────────────────┬───────────┬─────────────┐
│ ID │ NODE │ DRIVE │ SIZE │ FILESYSTEM │ MAKE │ AVAILABLE │ DESCRIPTION │
├─────────────────────┼───────┼─────────┼────────┼────────────┼────────────────────────────┼───────────┼─────────────┤
│ 259:1$Pna+Q57t+y... │ k3s-s │ nvme1n1 │ 30 GiB │ - │ Amazon Elastic Block Store │ YES │ - │
│ 259:3$QURUJfcllF... │ k3s-s │ nvme2n1 │ 30 GiB │ - │ Amazon Elastic Block Store │ YES │ - │
│ 259:2$/28TF0pThR... │ k3s-s │ nvme3n1 │ 30 GiB │ - │ Amazon Elastic Block Store │ YES │ - │
│ 259:4$+AaiQHygVH... │ k3s-s │ nvme4n1 │ 30 GiB │ - │ Amazon Elastic Block Store │ YES │ - │
└─────────────────────┴───────┴─────────┴────────┴────────────┴────────────────────────────┴───────────┴─────────────┘
Generated 'drives.yaml' successfully.
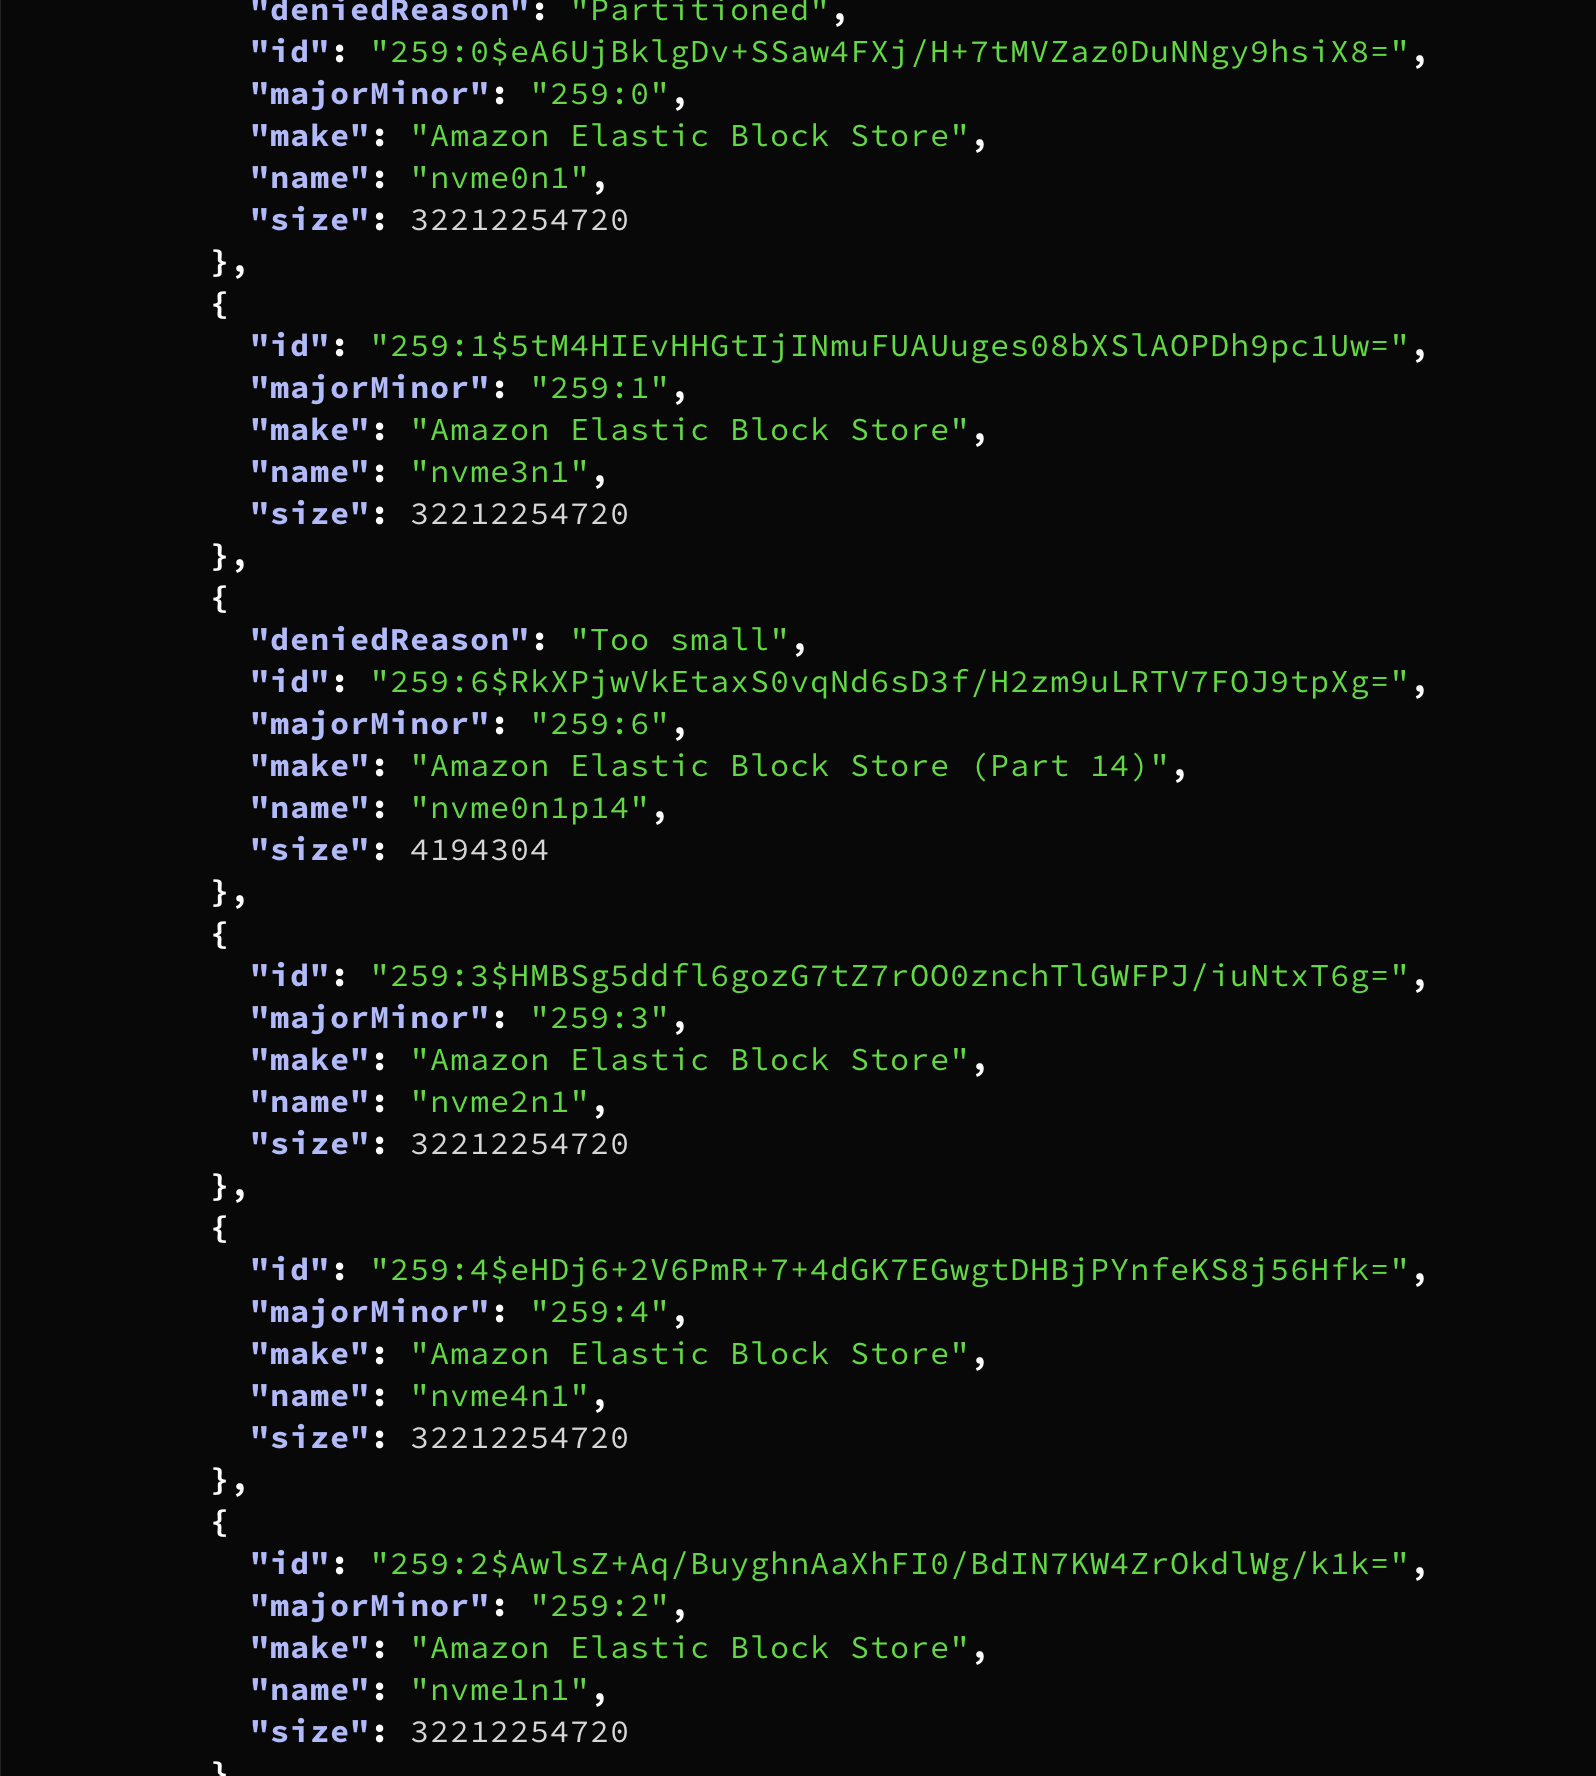
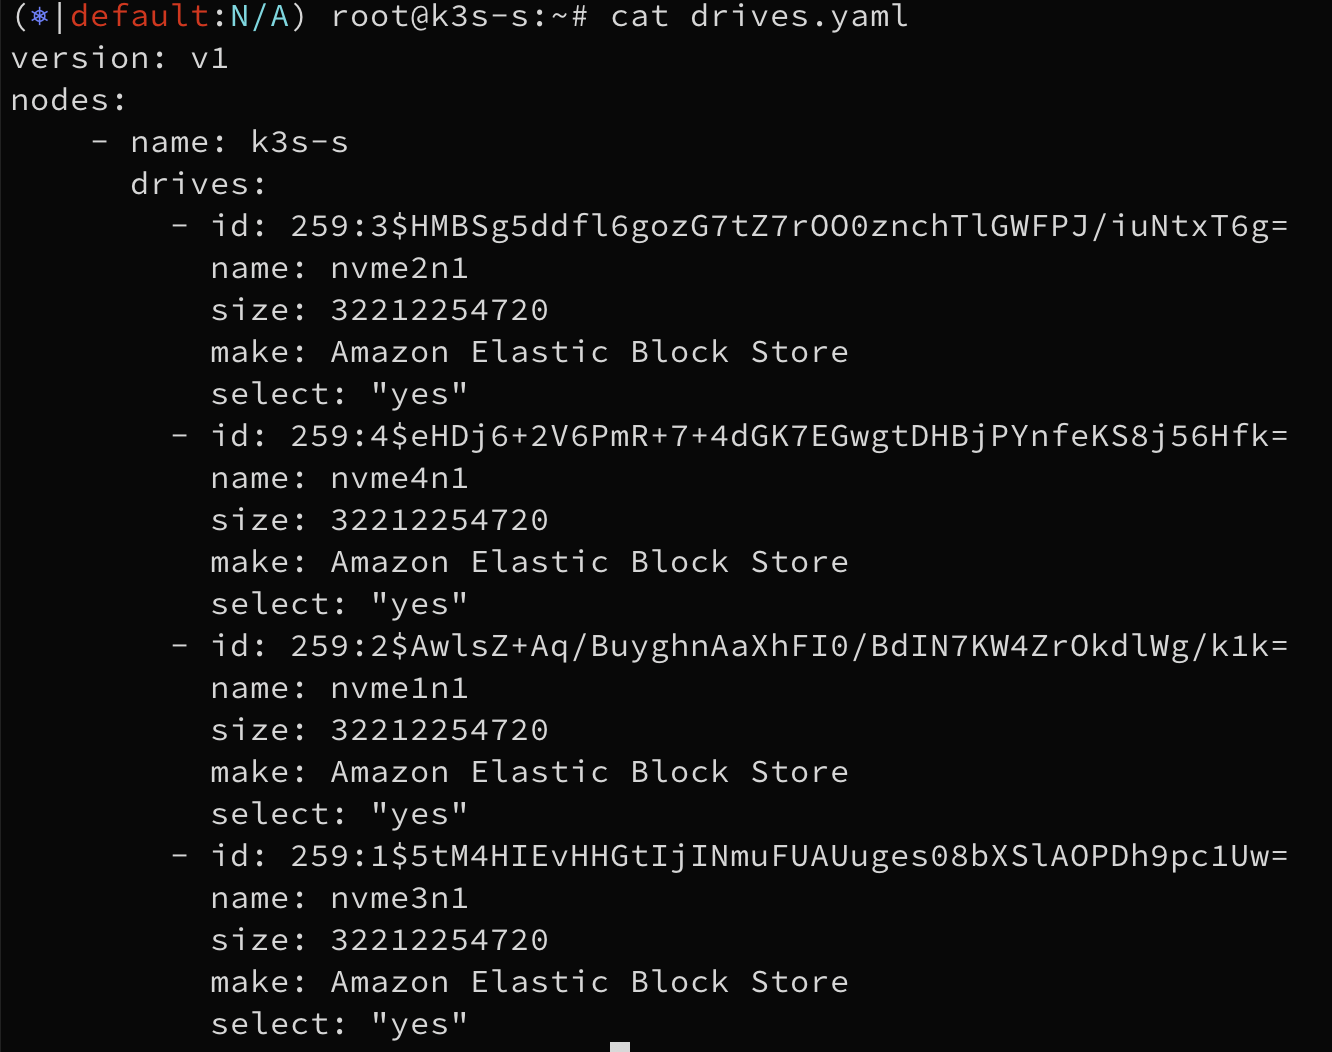
# (참고) 적용 예외 설정 시 select: "no" 설정
cat drives.yaml | yq
{
"version": "v1",
"nodes": [
{
"name": "k3s-s",
"drives": [
{
"id": "259:4$+AaiQHygVHSl7AmoNWxVgP1kJsoha2CeGIzxfuoqBvw=",
"name": "nvme4n1",
"size": 32212254720,
"make": "Amazon Elastic Block Store",
"select": "yes"
},
...
#
k directpv init drives.yaml
ERROR Initializing the drives will permanently erase existing data. Please review carefully before performing this *DANGEROUS* operation and retry this command with --dangerous flag.
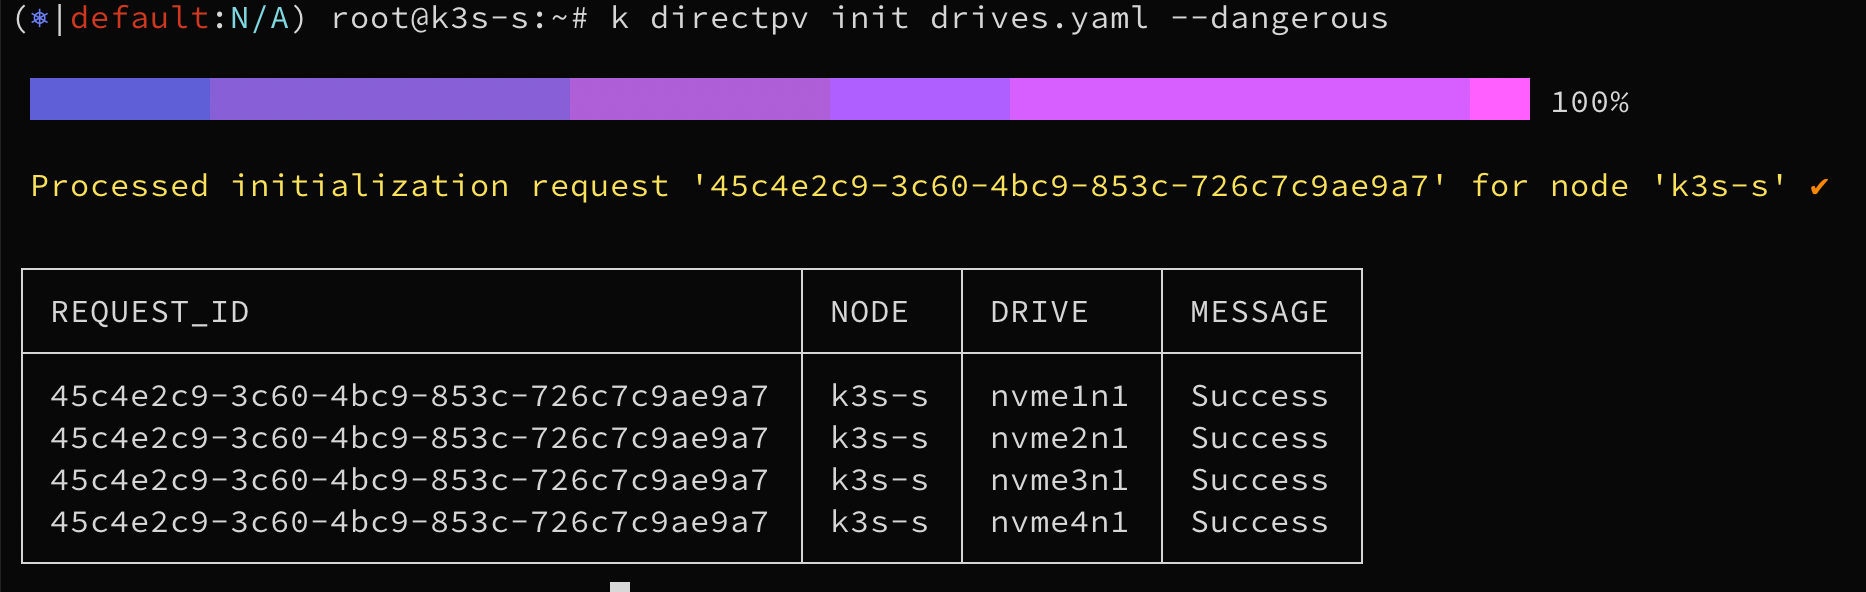
# Perform initialization of drives which will permanently erase existing data
k directpv init drives.yaml --dangerous
Processed initialization request '75caf826-e374-4ff2-b4d6-bdbf1ac0e847' for node 'k3s-s' ✔
┌──────────────────────────────────────┬───────┬─────────┬─────────┐
│ REQUEST_ID │ NODE │ DRIVE │ MESSAGE │
├──────────────────────────────────────┼───────┼─────────┼─────────┤
│ 75caf826-e374-4ff2-b4d6-bdbf1ac0e847 │ k3s-s │ nvme1n1 │ Success │
│ 75caf826-e374-4ff2-b4d6-bdbf1ac0e847 │ k3s-s │ nvme2n1 │ Success │
│ 75caf826-e374-4ff2-b4d6-bdbf1ac0e847 │ k3s-s │ nvme3n1 │ Success │
│ 75caf826-e374-4ff2-b4d6-bdbf1ac0e847 │ k3s-s │ nvme4n1 │ Success │
└──────────────────────────────────────┴───────┴─────────┴─────────┘
#
k directpv list drives
┌───────┬─────────┬────────────────────────────┬────────┬────────┬─────────┬────────┐
│ NODE │ NAME │ MAKE │ SIZE │ FREE │ VOLUMES │ STATUS │
├───────┼─────────┼────────────────────────────┼────────┼────────┼─────────┼────────┤
│ k3s-s │ nvme1n1 │ Amazon Elastic Block Store │ 30 GiB │ 30 GiB │ - │ Ready │
│ k3s-s │ nvme2n1 │ Amazon Elastic Block Store │ 30 GiB │ 30 GiB │ - │ Ready │
│ k3s-s │ nvme3n1 │ Amazon Elastic Block Store │ 30 GiB │ 30 GiB │ - │ Ready │
│ k3s-s │ nvme4n1 │ Amazon Elastic Block Store │ 30 GiB │ 30 GiB │ - │ Ready │
└───────┴─────────┴────────────────────────────┴────────┴────────┴─────────┴────────┘
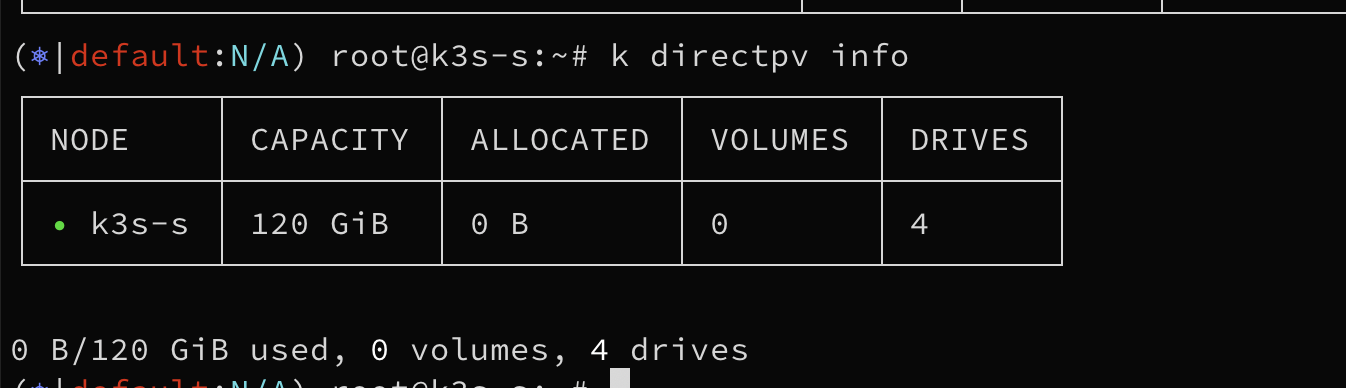
k directpv info
┌─────────┬──────────┬───────────┬─────────┬────────┐
│ NODE │ CAPACITY │ ALLOCATED │ VOLUMES │ DRIVES │
├─────────┼──────────┼───────────┼─────────┼────────┤
│ • k3s-s │ 120 GiB │ 0 B │ 0 │ 4 │
└─────────┴──────────┴───────────┴─────────┴────────┘
0 B/120 GiB used, 0 volumes, 4 drives
lsblk
NAME MAJ:MIN RM SIZE RO TYPE MOUNTPOINTS
...
nvme1n1 259:1 0 30G 0 disk /var/lib/directpv/mnt/03ab4af0-14e3-47d2-ae39-2742c986a71d
nvme3n1 259:2 0 30G 0 disk /var/lib/directpv/mnt/8d0c7b6f-07f8-4908-bca6-5c14ad068400
nvme2n1 259:3 0 30G 0 disk /var/lib/directpv/mnt/324af346-29f1-4a9b-93bf-fbae1f21302d
nvme4n1 259:4 0 30G 0 disk /var/lib/directpv/mnt/088e2e11-8708-4a6c-8466-631c89c03f5c
df -hT --type xfs
/dev/nvme1n1 xfs 30G 248M 30G 1% /var/lib/directpv/mnt/03ab4af0-14e3-47d2-ae39-2742c986a71d
/dev/nvme4n1 xfs 30G 248M 30G 1% /var/lib/directpv/mnt/088e2e11-8708-4a6c-8466-631c89c03f5c
/dev/nvme3n1 xfs 30G 248M 30G 1% /var/lib/directpv/mnt/8d0c7b6f-07f8-4908-bca6-5c14ad068400
/dev/nvme2n1 xfs 30G 248M 30G 1% /var/lib/directpv/mnt/324af346-29f1-4a9b-93bf-fbae1f21302d
tree -h /var/lib/directpv/
[4.0K] /var/lib/directpv/
├── [4.0K] mnt
│ ├── [ 75] 03ab4af0-14e3-47d2-ae39-2742c986a71d
│ ├── [ 75] 088e2e11-8708-4a6c-8466-631c89c03f5c
│ ├── [ 75] 324af346-29f1-4a9b-93bf-fbae1f21302d
│ └── [ 75] 8d0c7b6f-07f8-4908-bca6-5c14ad068400
└── [ 40] tmp
#
k get directpvdrives.directpv.min.io -o yaml | yq
k get directpvdrives.directpv.min.io
NAME AGE
03ab4af0-14e3-47d2-ae39-2742c986a71d 5m58s
088e2e11-8708-4a6c-8466-631c89c03f5c 5m58s
324af346-29f1-4a9b-93bf-fbae1f21302d 5m58s
8d0c7b6f-07f8-4908-bca6-5c14ad068400 5m58s
#
cat /etc/fstab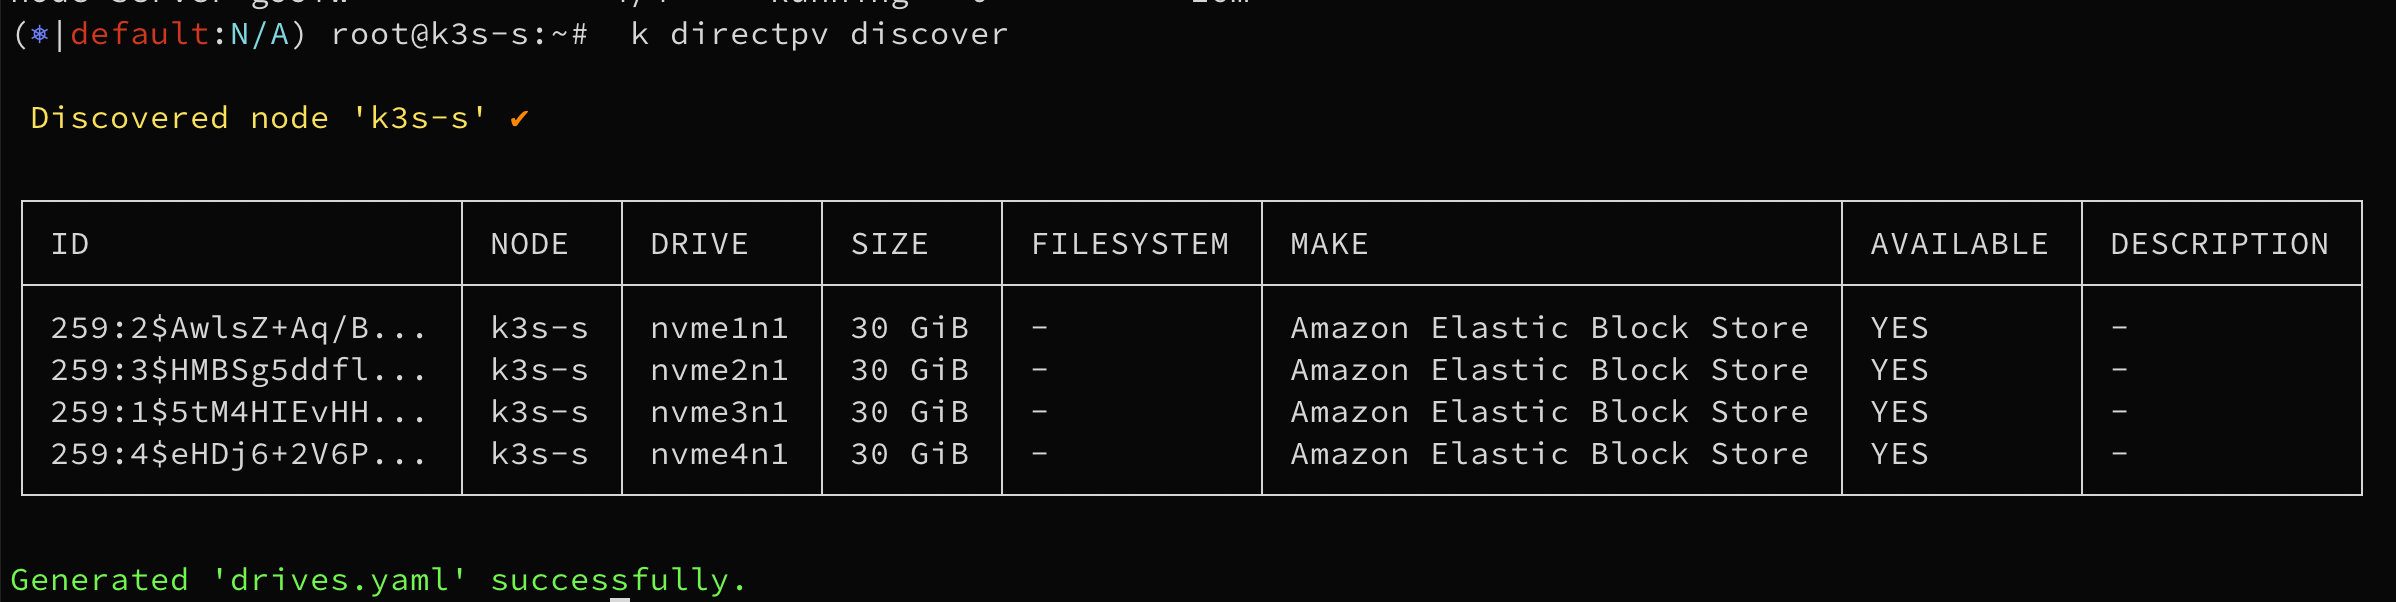
#
df -hT --type xfs
Filesystem Type Size Used Avail Use% Mounted on
/dev/nvme4n1 xfs 30G 248M 30G 1% /var/lib/directpv/mnt/ab82b195-5204-47fa-a864-a351f66b38d2
/dev/nvme2n1 xfs 30G 248M 30G 1% /var/lib/directpv/mnt/94be15e6-5d0d-49a9-a6d8-d139977a3446
/dev/nvme1n1 xfs 30G 248M 30G 1% /var/lib/directpv/mnt/dc26b422-5364-464e-bc54-a6ab6b8d4e32
/dev/nvme3n1 xfs 30G 248M 30G 1% /var/lib/directpv/mnt/246f427a-3e32-4311-b81c-fc9e45ebc6ad
lsblk
...
nvme1n1 259:0 0 30G 0 disk /var/lib/directpv/mnt/dc26b422-5364-464e-bc54-a6ab6b8d4e32
nvme3n1 259:2 0 30G 0 disk /var/lib/directpv/mnt/246f427a-3e32-4311-b81c-fc9e45ebc6ad
nvme4n1 259:3 0 30G 0 disk /var/lib/directpv/mnt/ab82b195-5204-47fa-a864-a351f66b38d2
nvme2n1 259:4 0 30G 0 disk /var/lib/directpv/mnt/94be15e6-5d0d-49a9-a6d8-d139977a3446
k get directpvdrives,directpvvolumes
#
cat << EOF | kubectl apply -f -
apiVersion: v1
kind: PersistentVolumeClaim
metadata:
name: nginx-pvc
spec:
volumeMode: Filesystem
storageClassName: directpv-min-io
accessModes: [ "ReadWriteOnce" ]
resources:
requests:
storage: 8Mi
---
apiVersion: v1
kind: Pod
metadata:
name: nginx-pod
spec:
volumes:
- name: nginx-volume
persistentVolumeClaim:
claimName: nginx-pvc
containers:
- name: nginx-container
image: nginx:alpine
volumeMounts:
- mountPath: "/mnt"
name: nginx-volume
EOF
#
k get pod,pvc,pv
NAME READY STATUS RESTARTS AGE
pod/nginx-pod 1/1 Running 0 2m27s
NAME STATUS VOLUME CAPACITY ACCESS MODES STORAGECLASS VOLUMEATTRIBUTESCLASS AGE
persistentvolumeclaim/nginx-pvc Bound pvc-97418e78-41db-4244-a3d5-e56b94c6c2bd 8Mi RWO directpv-min-io <unset> 2m27s
NAME CAPACITY ACCESS MODES RECLAIM POLICY STATUS CLAIM STORAGECLASS VOLUMEATTRIBUTESCLASS REASON AGE
persistentvolume/pvc-97418e78-41db-4244-a3d5-e56b94c6c2bd 8Mi RWO Delete Bound default/nginx-pvc directpv-min-io <unset> 2m27s
k exec -it nginx-pod -- df -hT -t xfs
Filesystem Type Size Used Available Use% Mounted on
/dev/nvme3n1 xfs 8.0M 4.0K 8.0M 0% /mnt
k exec -it nginx-pod -- sh -c 'echo hello > /mnt/hello.txt'
k exec -it nginx-pod -- sh -c 'cat /mnt/hello.txt'
hello
#
lsblk
nvme1n1 259:0 0 30G 0 disk /var/lib/directpv/mnt/dc26b422-5364-464e-bc54-a6ab6b8d4e32
nvme4n1 259:3 0 30G 0 disk /var/lib/directpv/mnt/ab82b195-5204-47fa-a864-a351f66b38d2
nvme2n1 259:4 0 30G 0 disk /var/lib/directpv/mnt/94be15e6-5d0d-49a9-a6d8-d139977a3446
nvme3n1 259:2 0 30G 0 disk /var/lib/kubelet/pods/171f29cf-45e1-458f-b20e-082a78702e03/volumes/kubernetes.io~csi/pvc-97418e78-41db-4244-a3d5-e56b94c6c2bd/mount
/var/lib/kubelet/plugins/kubernetes.io/csi/directpv-min-io/0a26dd2aeb3b456582028ecddabce74e4684252502203e78f857fa23e738649b/globalmount
/var/lib/directpv/mnt/246f427a-3e32-4311-b81c-fc9e45ebc6ad
tree -a /var/lib/directpv/mnt
/var/lib/directpv/mnt
├── 246f427a-3e32-4311-b81c-fc9e45ebc6ad
│ ├── .FSUUID.246f427a-3e32-4311-b81c-fc9e45ebc6ad -> .
│ ├── .directpv
│ │ └── meta.info
│ └── pvc-97418e78-41db-4244-a3d5-e56b94c6c2bd
│ └── hello.txt
├── 94be15e6-5d0d-49a9-a6d8-d139977a3446
│ ├── .FSUUID.94be15e6-5d0d-49a9-a6d8-d139977a3446 -> .
│ └── .directpv
│ └── meta.info
├── ab82b195-5204-47fa-a864-a351f66b38d2
│ ├── .FSUUID.ab82b195-5204-47fa-a864-a351f66b38d2 -> .
│ └── .directpv
│ └── meta.info
└── dc26b422-5364-464e-bc54-a6ab6b8d4e32
├── .FSUUID.dc26b422-5364-464e-bc54-a6ab6b8d4e32 -> .
└── .directpv
└── meta.info
cat /var/lib/directpv/mnt/*/pvc*/hello.txt
hello
#
k get directpvvolumes
k get directpvvolumes -o yaml | yq
#
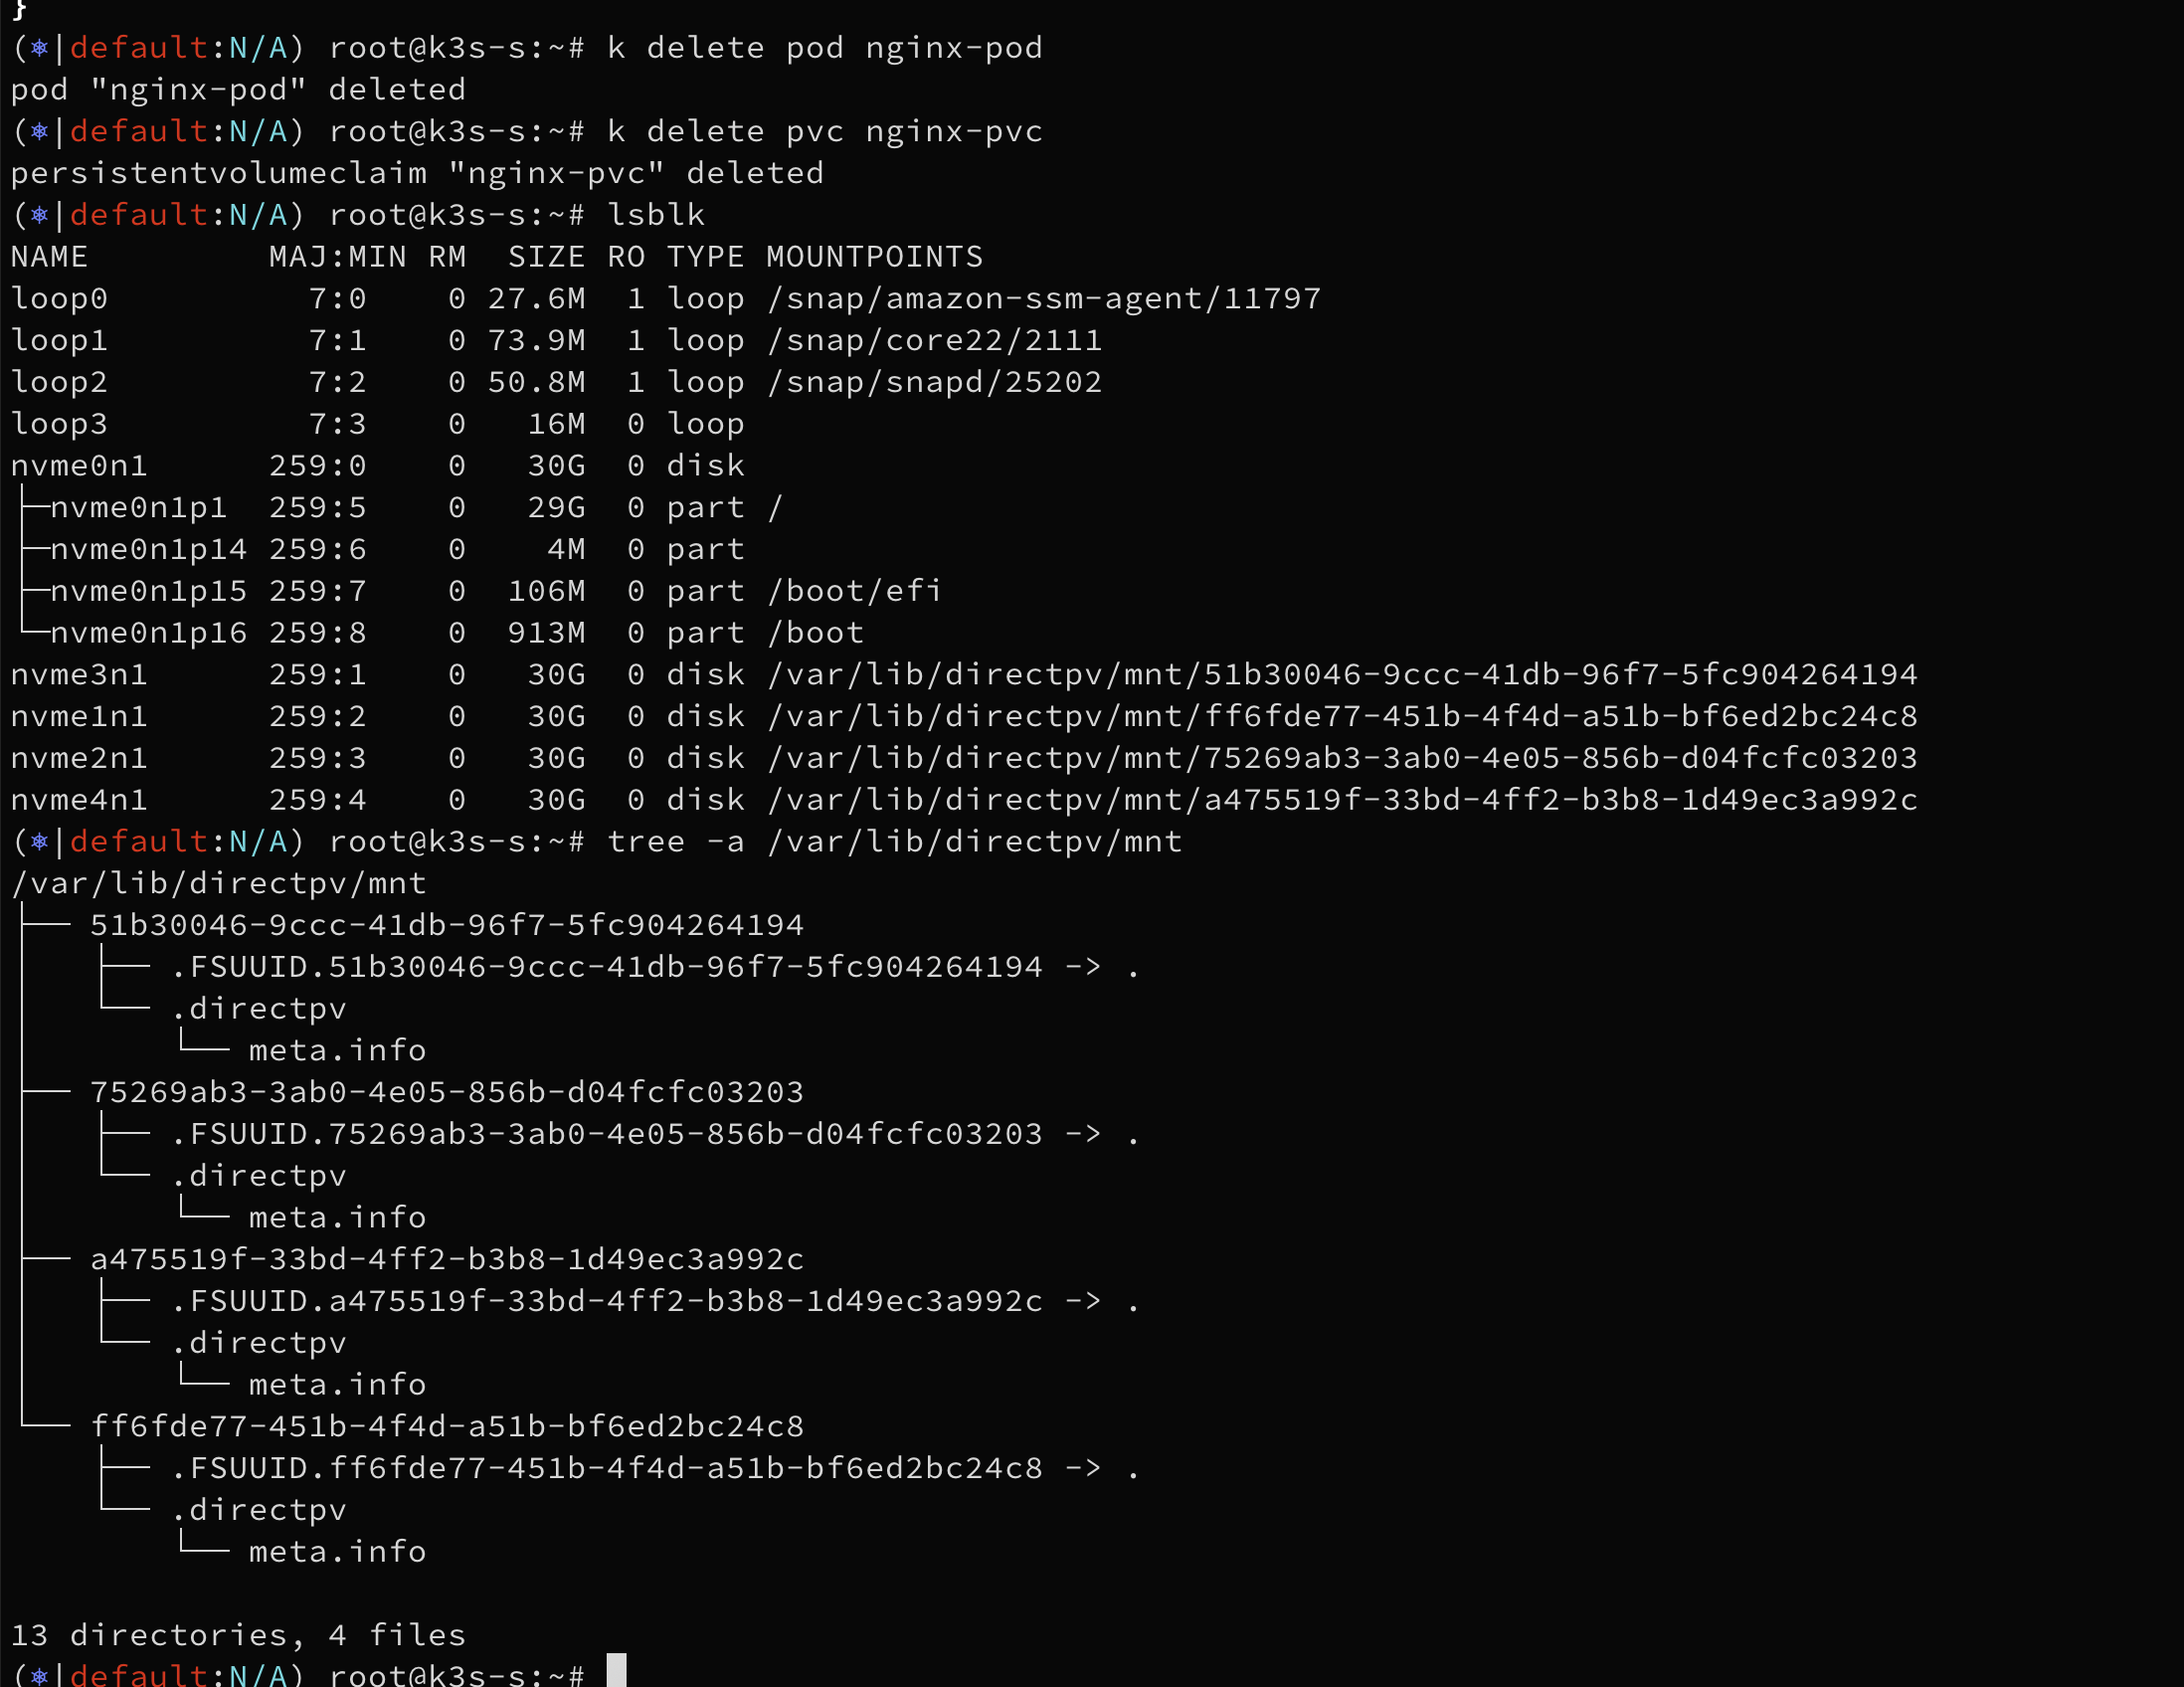
k delete pod nginx-pod
k get pvc,pv
k delete pvc nginx-pvc
k get pv
#
lsblk
tree -a /var/lib/directpv/mnt
특정 Drive에 볼륨 사용 테스트(label)
#
k directpv list drives
┌───────┬─────────┬────────────────────────────┬────────┬────────┬─────────┬────────┐
│ NODE  │ NAME    │ MAKE                       │ SIZE   │ FREE   │ VOLUMES │ STATUS │
├───────┼─────────┼────────────────────────────┼────────┼────────┼─────────┼────────┤
│ k3s-s │ nvme1n1 │ Amazon Elastic Block Store │ 30 GiB │ 30 GiB │ -       │ Ready  │
│ k3s-s │ nvme2n1 │ Amazon Elastic Block Store │ 30 GiB │ 30 GiB │ -       │ Ready  │
│ k3s-s │ nvme3n1 │ Amazon Elastic Block Store │ 30 GiB │ 30 GiB │ -       │ Ready  │
│ k3s-s │ nvme4n1 │ Amazon Elastic Block Store │ 30 GiB │ 30 GiB │ -       │ Ready  │
└───────┴─────────┴────────────────────────────┴────────┴────────┴─────────┴────────┘

# Label the 'nvme1n1' drive in all nodes as 'fast' with the 'tier' key.
kubectl directpv label drives --drives=nvme1n1 tier=fast

# Verify that the labels are properly set by using the list command with the
k directpv list drives --show-labels
kubectl directpv list drives --drives /dev/nvme1n1 --show-labels
┌───────┬─────────┬────────────────────────────┬────────┬────────┬─────────┬────────┬───────────┐
│ NODE  │ NAME    │ MAKE                       │ SIZE   │ FREE   │ VOLUMES │ STATUS │ LABELS    │
├───────┼─────────┼────────────────────────────┼────────┼────────┼─────────┼────────┼───────────┤
│ k3s-s │ nvme1n1 │ Amazon Elastic Block Store │ 30 GiB │ 30 GiB │ -       │ Ready  │ tier=fast │
└───────┴─────────┴────────────────────────────┴────────┴────────┴─────────┴────────┴───────────┘

#
k get sc
vi create-storage-class.sh
chmod +x create-storage-class.sh
./create-storage-class.sh -h

#
./create-storage-class.sh fast-tier-storage 'directpv.min.io/tier: fast'
k get sc
kc describe sc fast-tier-storage
...
Parameters:            directpv.min.io/tier=fast,fstype=xfs
...

#
cat << EOF | kubectl apply -f -
apiVersion: v1
kind: PersistentVolumeClaim
metadata:
  name: nginx-pvc
spec:
  volumeMode: Filesystem
  storageClassName: fast-tier-storage
  accessModes: [ "ReadWriteOnce" ]
  resources:
    requests:
      storage: 8Mi
---
apiVersion: v1
kind: Pod
metadata:
  name: nginx-pod
spec:
  volumes:
    - name: nginx-volume
      persistentVolumeClaim:
        claimName: nginx-pvc
  containers:
    - name: nginx-container
      image: nginx:alpine
      volumeMounts:
        - mountPath: "/mnt"
          name: nginx-volume
EOF

# 해당 drive가 있는 node 에 pv 가 만들어지고, 파드 역시 해당 node 에 기동되었음
k get pod,pvc,pv -owide
NAME            READY   STATUS    RESTARTS   AGE   IP           NODE    NOMINATED NODE   READINESS GATES
pod/nginx-pod   1/1     Running   0          11s   10.42.0.13   k3s-s   <none>           <none>

NAME                              STATUS   VOLUME                                     CAPACITY   ACCESS MODES   STORAGECLASS        VOLUMEATTRIBUTESCLASS   AGE   VOLUMEMODE
persistentvolumeclaim/nginx-pvc   Bound    pvc-127ee2bb-b4b6-4cc5-bfdd-d79b2e7e5957   8Mi        RWO            fast-tier-storage   <unset>                 11s   Filesystem

NAME                                                        CAPACITY   ACCESS MODES   RECLAIM POLICY   STATUS   CLAIM               STORAGECLASS        VOLUMEATTRIBUTESCLASS   REASON   AGE   VOLUMEMODE
persistentvolume/pvc-127ee2bb-b4b6-4cc5-bfdd-d79b2e7e5957   8Mi        RWO            Delete           Bound    default/nginx-pvc   fast-tier-storage   <unset>                          11s   Filesystem

kc describe pv
...
Node Affinity:
  Required Terms:
    Term 0:        directpv.min.io/identity in [directpv-min-io]
                   directpv.min.io/node in [k3s-s]
                   directpv.min.io/rack in [default]
                   directpv.min.io/region in [default]
                   directpv.min.io/zone in [default]
Message:
Source:
    Type:              CSI (a Container Storage Interface (CSI) volume source)
    Driver:            directpv-min-io
    FSType:            xfs
    VolumeHandle:      pvc-127ee2bb-b4b6-4cc5-bfdd-d79b2e7e5957
    ReadOnly:          false
    VolumeAttributes:      directpv.min.io/tier=fast
                           fstype=xfs
                           storage.kubernetes.io/csiProvisionerIdentity=1757816235335-1863-directpv-min-io

#
kc describe node
...
Labels:             beta.kubernetes.io/arch=amd64
                    beta.kubernetes.io/instance-type=k3s
                    beta.kubernetes.io/os=linux
                    directpv.min.io/identity=directpv-min-io
                    directpv.min.io/node=k3s-s
                    directpv.min.io/rack=default
                    directpv.min.io/region=default
                    directpv.min.io/zone=default
...

#
k get directpvnodes.directpv.min.io -o yaml | yq
kc describe directpvdrives.directpv.min.io
Name:         dc26b422-5364-464e-bc54-a6ab6b8d4e32
Namespace:
Labels:       directpv.min.io/access-tier=Default
              directpv.min.io/created-by=directpv-driver
              directpv.min.io/drive-name=nvme1n1
              directpv.min.io/node=k3s-s
              directpv.min.io/tier=fast
              directpv.min.io/version=v1beta1

# 삭제
kubectl delete pod nginx-pod && kubectl delete pvc nginx-pvc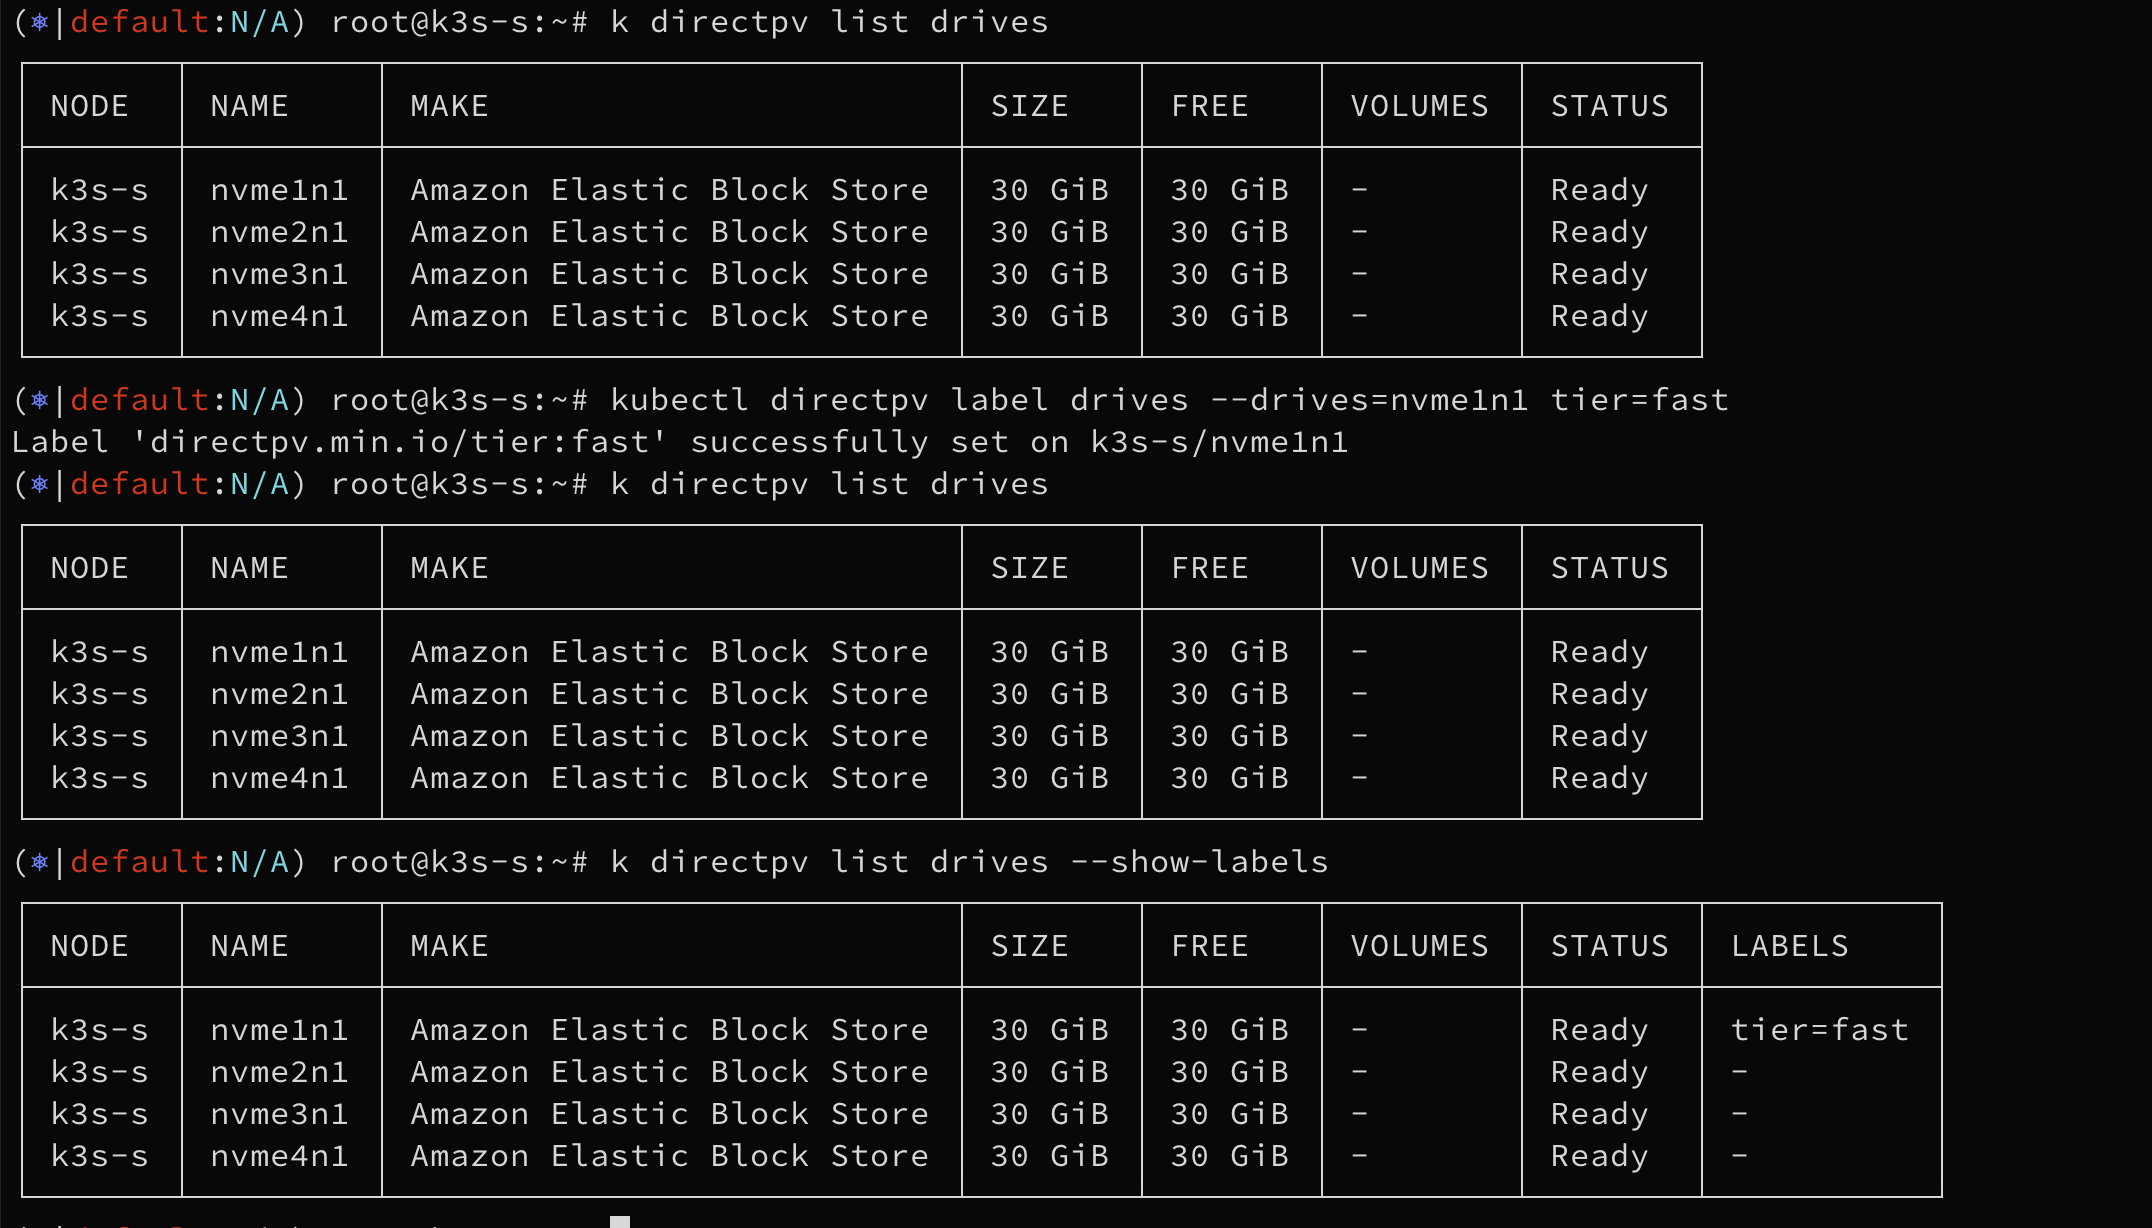


라벨 활용법
#
k label nodes k3s-s directpv.min.io/rack=rack01 --overwrite
node/k3s-s labeled

kc describe node
...
                    directpv.min.io/rack=rack01

kc describe directpvdrives.directpv.min.io
...
 Topology:
   directpv.min.io/rack:      default

#
cat << EOF | kubectl apply -f -
apiVersion: v1
kind: PersistentVolumeClaim
metadata:
  name: nginx-pvc
spec:
  volumeMode: Filesystem
  storageClassName: fast-tier-storage
  accessModes: [ "ReadWriteOnce" ]
  resources:
    requests:
      storage: 8Mi
---
apiVersion: v1
kind: Pod
metadata:
  name: nginx-pod
spec:
  volumes:
    - name: nginx-volume
      persistentVolumeClaim:
        claimName: nginx-pvc
  containers:
    - name: nginx-container
      image: nginx:alpine
      volumeMounts:
        - mountPath: "/mnt"
          name: nginx-volume
EOF

#
k get pod,pvc,pv
NAME            READY   STATUS    RESTARTS   AGE
pod/nginx-pod   0/1     Pending   0          4s

NAME                              STATUS    VOLUME   CAPACITY   ACCESS MODES   STORAGECLASS        VOLUMEATTRIBUTESCLASS   AGE
persistentvolumeclaim/nginx-pvc   Pending                                      fast-tier-storage   <unset>                 4s

#
kc describe pod
...
Events:
  Type     Reason            Age               From               Message
  ----     ------            ----              ----               -------
  Warning  FailedScheduling  15s               default-scheduler  running PreBind plugin "VolumeBinding": binding volumes: provisioning failed for PVC "nginx-pvc"
  Warning  FailedScheduling  9s (x2 over 13s)  default-scheduler  running PreBind plugin "VolumeBinding": binding volumes: provisioning failed for PVC "nginx-pvc"

# no drive found for requested topology
kc describe pvc
...
Events:
  Type     Reason                Age                From                                                                              Message
  ----     ------                ----               ----                                                                              -------
  Normal   WaitForFirstConsumer  66s                persistentvolume-controller                                                       waiting for first consumer to be created before binding
  Normal   ExternalProvisioning  7s (x9 over 66s)   persistentvolume-controller                                                       Waiting for a volume to be created either by the external provisioner 'directpv-min-io' or manually by the system administrator. If volume creation is delayed, please verify that the provisioner is running and correctly registered.
  Normal   Provisioning          7s (x8 over 66s)   directpv-min-io_controller-75d5595d5b-bqwbs_4e34d69c-36a7-4c94-8ce0-a02df9c63fc8  External provisioner is provisioning volume for claim "default/nginx-pvc"
  Warning  ProvisioningFailed    7s (x8 over 66s)   directpv-min-io_controller-75d5595d5b-bqwbs_4e34d69c-36a7-4c94-8ce0-a02df9c63fc8  failed to provision volume with StorageClass "fast-tier-storage": rpc error: code = ResourceExhausted desc = no drive found for requested topology; requested node(s): k3s-s; requested size: 8388608 bytes

# 해결 1 : label 값 원복
k label nodes k3s-s directpv.min.io/rack=default --overwrite

# 해결 2 : directpvdrives CR에 label 값 directpv.min.io/rack=rack01 로 수정

# 확인
k get pod,pvc,pv

# 삭제
kubectl delete pod nginx-pod && kubectl delete pvc nginx-pvc

Warning ProvisioningFailed 7s (x5 over 30s) directpv-min-io_controller-5db75d68cc-tx8vw_4d6e6fba-d62e-4a05-bd6c-82fc8a68a4c9 failed to provision volume with StorageClass "fast-tier-storage": rpc error: code = ResourceExhausted desc = no drive found for requested topology; requested node(s): k3s-s; requested size: 8388608 bytes

MinIO 설치 & 버킷 생성
#
helm repo add minio-operator https://operator.min.io
# https://github.com/minio/operator/blob/master/helm/operator/values.yaml
cat << EOF > minio-operator-values.yaml
operator:
env:
- name: MINIO_OPERATOR_RUNTIME
value: "Rancher"
replicaCount: 1
EOF
helm install --namespace minio-operator --create-namespace minio-operator minio-operator/operator --values minio-operator-values.yaml
# 확인 : 참고로 현재는 오퍼레이터 관리 웹 미제공
k get-all -n minio-operator
k get pod,svc,ep -n minio-operator
k get crd
k exec -it -n minio-operator deploy/minio-operator -- env | grep MINIO
MINIO_OPERATOR_RUNTIME=Rancher
------------------------------------------------------
# If using Amazon Elastic Block Store (EBS) CSI driver : Please make sure to set xfs for "csi.storage.k8s.io/fstype" parameter under StorageClass.parameters.
k get sc directpv-min-io -o yaml | grep -i fstype
csi.storage.k8s.io/fstype: xfs
# tenant values : https://github.com/minio/operator/blob/master/helm/tenant/values.yaml
cat << EOF > minio-tenant-1-values.yaml
tenant:
name: tenant1
configSecret:
name: tenant1-env-configuration
accessKey: minio
secretKey: minio123
pools:
- servers: 1
name: pool-0
volumesPerServer: 4
size: 10Gi
storageClassName: directpv-min-io
env:
- name: MINIO_STORAGE_CLASS_STANDARD
value: "EC:1"
metrics:
enabled: true
port: 9000
protocol: http
EOF
helm install --namespace tenant1 --create-namespace --values minio-tenant-1-values.yaml tenant1 minio-operator/tenant \
&& kubectl get tenants -A -w
#
kubectl get tenants -n tenant1
kubectl get tenants -n tenant1 -owide -o yaml | yq
kc describe tenants -n tenant1
#
lsblk
k directpv info
k directpv list drives
k directpv list volumes
┌──────────────────────────────────────────┬──────────┬───────┬─────────┬──────────────────┬──────────────┬─────────┐
│ VOLUME │ CAPACITY │ NODE │ DRIVE │ PODNAME │ PODNAMESPACE │ STATUS │
├──────────────────────────────────────────┼──────────┼───────┼─────────┼──────────────────┼──────────────┼─────────┤
│ pvc-ae274681-c458-409c-a61c-a018f26e2580 │ 10 GiB │ k3s-s │ nvme1n1 │ myminio-pool-0-0 │ tenant-0 │ Bounded │
│ pvc-8f8df2f7-7f93-4531-b0da-1dbc8affa8df │ 10 GiB │ k3s-s │ nvme2n1 │ myminio-pool-0-0 │ tenant-0 │ Bounded │
│ pvc-0ab32dfd-0330-405e-8902-78f917bd71ec │ 10 GiB │ k3s-s │ nvme3n1 │ myminio-pool-0-0 │ tenant-0 │ Bounded │
│ pvc-bfc21d48-87aa-4bf0-ab3f-c1b9acd6b716 │ 10 GiB │ k3s-s │ nvme4n1 │ myminio-pool-0-0 │ tenant-0 │ Bounded │
└──────────────────────────────────────────┴──────────┴───────┴─────────┴──────────────────┴──────────────┴─────────┘
k get directpvvolumes.directpv.min.io
k get directpvvolumes.directpv.min.io -o yaml | yq
kc describe directpvvolumes
tree -ah /var/lib/kubelet/plugins
tree -ah /var/lib/directpv/mnt
cat /var/lib/kubelet/plugins/kubernetes.io/csi/directpv-min-io/*/vol_data.json
{"driverName":"directpv-min-io","volumeHandle":"pvc-0ab32dfd-0330-405e-8902-78f917bd71ec"}
{"driverName":"directpv-min-io","volumeHandle":"pvc-8f8df2f7-7f93-4531-b0da-1dbc8affa8df"}
{"driverName":"directpv-min-io","volumeHandle":"pvc-ae274681-c458-409c-a61c-a018f26e2580"}
{"driverName":"directpv-min-io","volumeHandle":"pvc-bfc21d48-87aa-4bf0-ab3f-c1b9acd6b716"}
#
k get pvc -n tenant1
k get pvc -n tenant1 -o yaml | yq
kc describe pvc -n tenant1
#
kubectl get sts,pod,svc,ep,pvc,secret -n tenant1
kubectl get pod -n tenant1 -l v1.min.io/pool=pool-0 -owide
kc describe pod -n tenant1 -l v1.min.io/pool=pool-0
kubectl stern -n tenant1 -l v1.min.io/pool=pool-0
kubectl exec -it -n tenant1 sts/tenant1-pool-0 -c minio -- id
kubectl exec -it -n tenant1 sts/tenant1-pool-0 -c minio -- env
kubectl exec -it -n tenant1 sts/tenant1-pool-0 -c minio -- cat /tmp/minio/config.env
kubectl get secret -n tenant1 tenant1-env-configuration -o jsonpath='{.data.config\.env}' | base64 -d ; echo
kubectl get secret -n tenant1 tenant1-tls -o jsonpath='{.data.public\.crt}' | base64 -d
kubectl get secret -n tenant1 tenant1-tls -o jsonpath='{.data.public\.crt}' | base64 -d | openssl x509 -noout -text
...
X509v3 Subject Alternative Name:
DNS:tenant1-pool-0-0.tenant1-hl.tenant1.svc.cluster.local, DNS:minio.tenant1.svc.cluster.local, DNS:minio.tenant1, DNS:minio.tenant1.svc, DNS:*., DNS:*.tenant1.svc.cluster.local
#
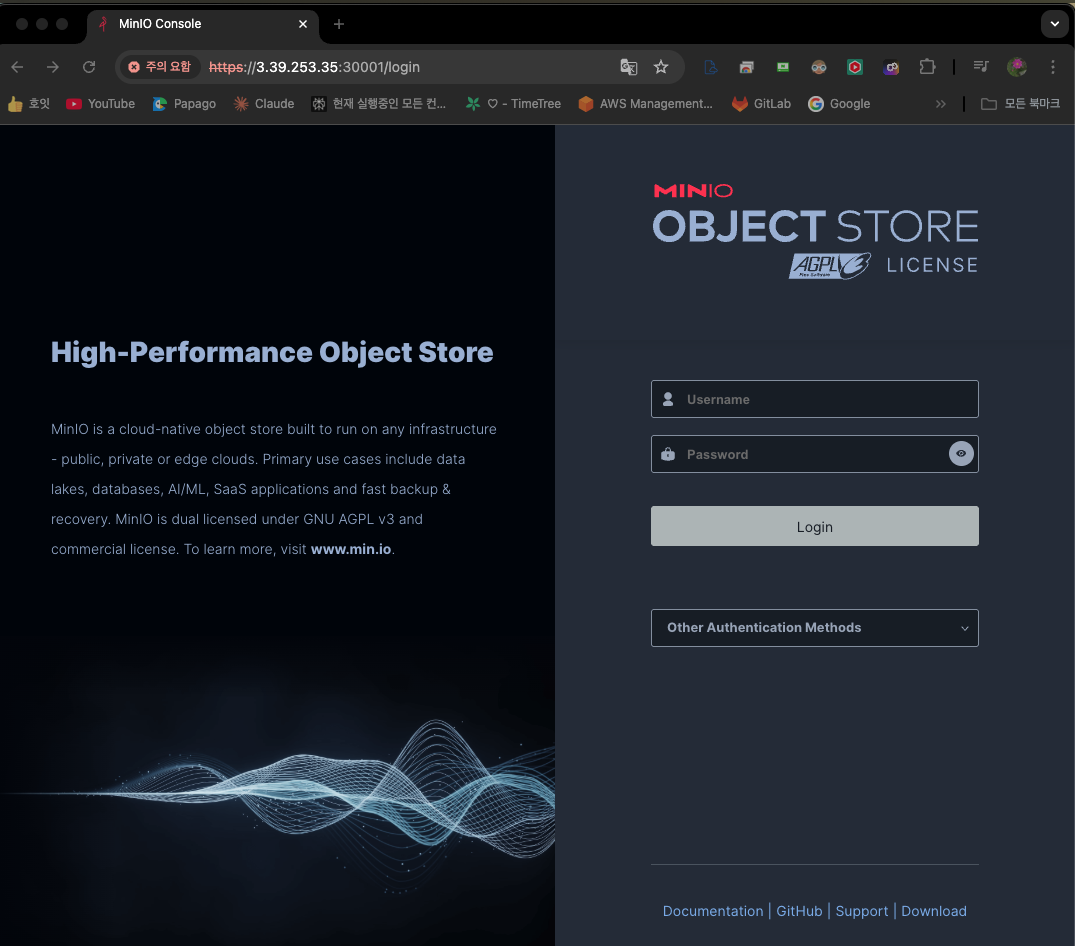
kubectl patch svc -n tenant1 tenant1-console -p '{"spec": {"type": "NodePort", "ports": [{"port": 9443, "targetPort": 9443, "nodePort": 30001}]}}'
# 기본키(minio , minio123)
echo "https://$(curl -s ipinfo.io/ip):30001"
#
kubectl patch svc -n tenant1 minio -p '{"spec": {"type": "NodePort", "ports": [{"port": 443, "targetPort": 9000, "nodePort": 30002}]}}'
# mc alias
mc alias set k8s-tenant1 https://127.0.0.1:30002 minio minio123 --insecure
mc alias list
mc admin info k8s-tenant1 --insecure
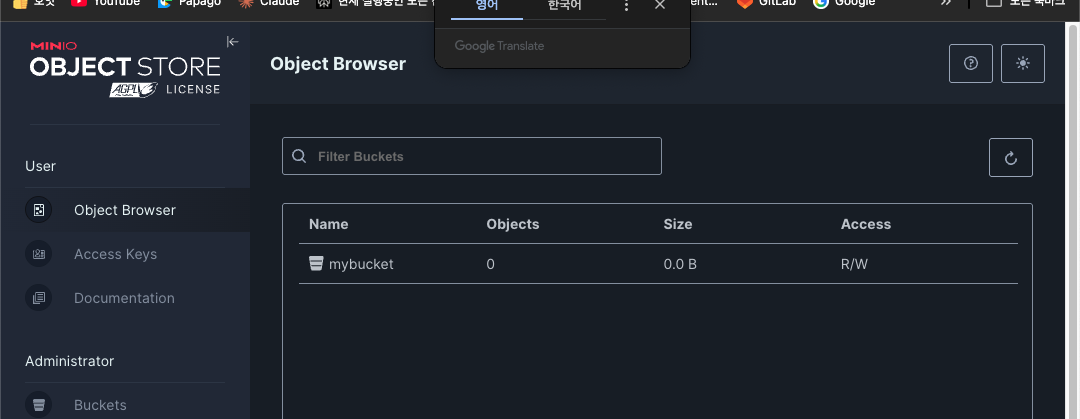
# 버킷 생성
mc mb k8s-tenant1/mybucket --insecure
mc ls k8s-tenant1 --insecure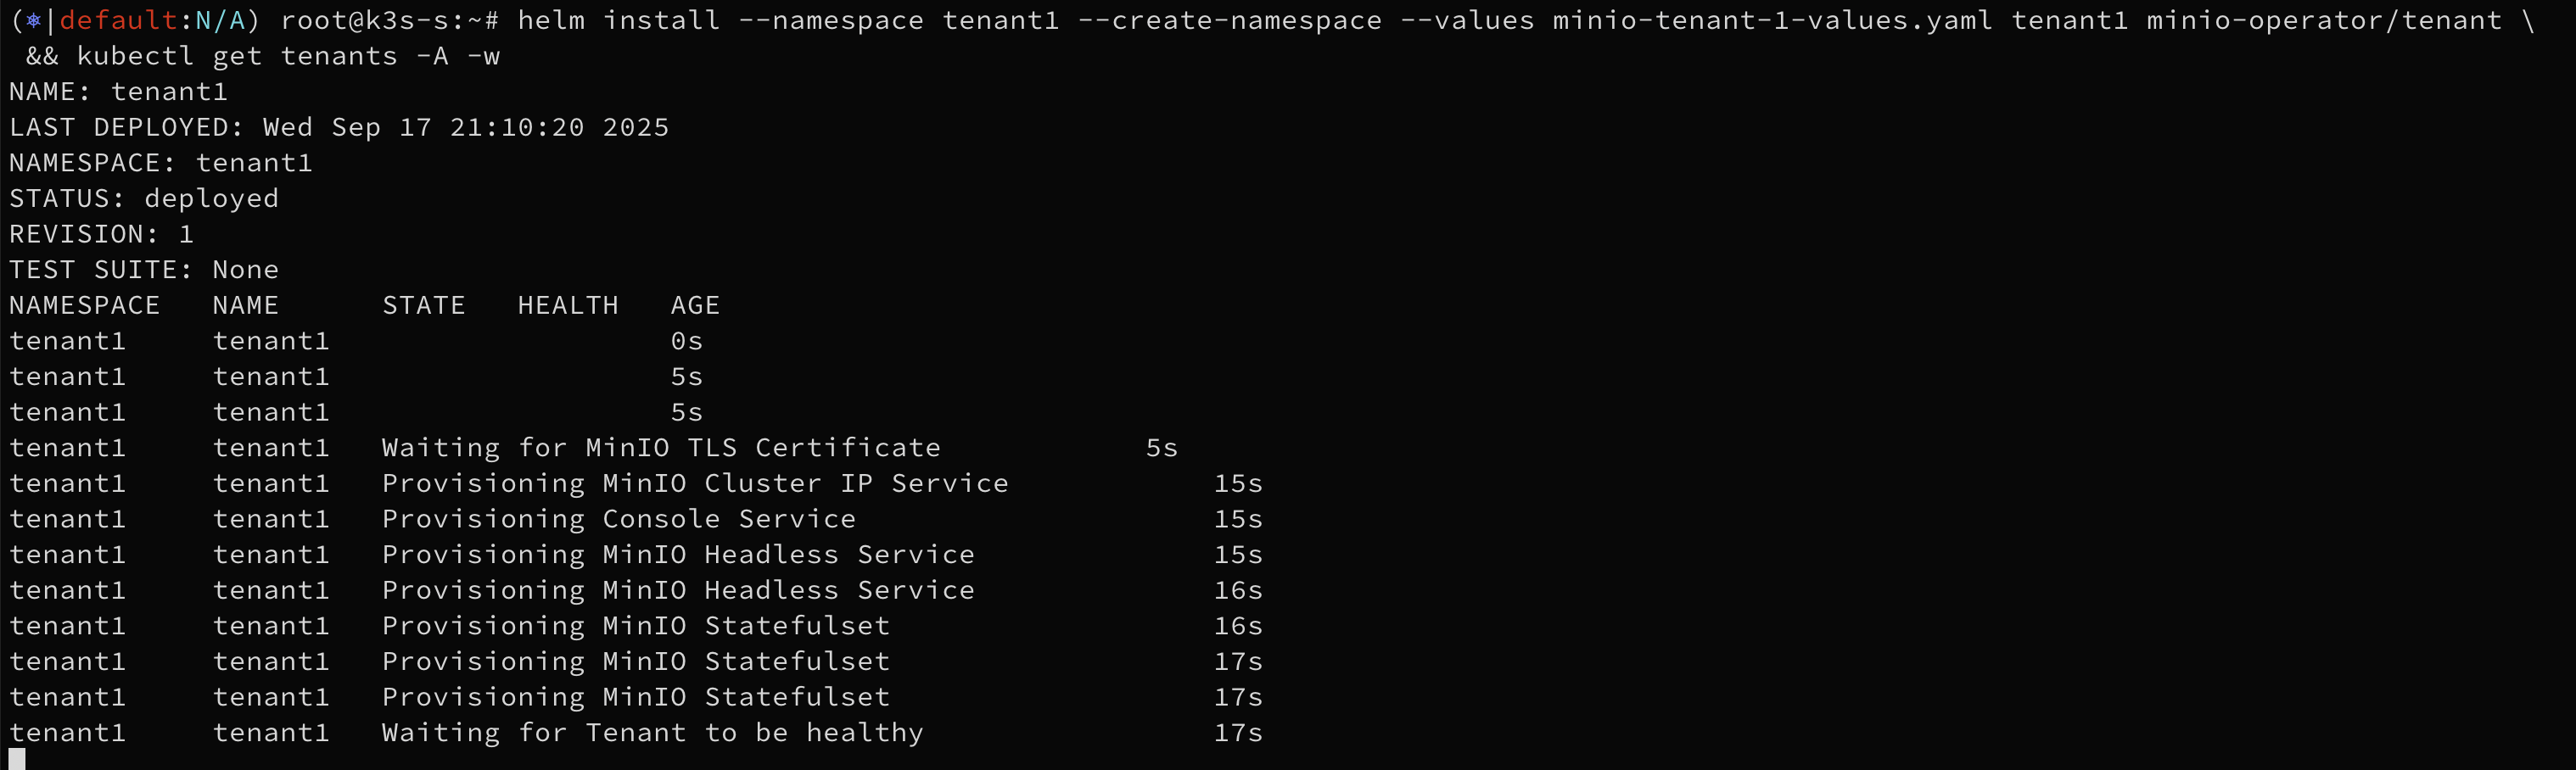


# mc alias
mc alias set k8s-tenant1 https://127.0.0.1:30002 minio minio123 --insecure
mc alias list
...
k8s-tenant1
URL : https://127.0.0.1:30002
AccessKey : minio
SecretKey : minio123
API : s3v4
Path : auto
Src : /root/.mc/config.json
...
tree -a ~/.mc
/root/.mc
├── certs # certificates
│ └── CAs # Certificate Authorities
├── config.json
├── config.json.old
└── share
├── downloads.json
└── uploads.json
mc admin info k8s-tenant1 --insecure
# 버킷 생성
mc mb k8s-tenant1/mybucket --insecure
mc ls k8s-tenant1 --insecure
# 바로 위에서 설정한 내용
------------------------------------------
# 아래 부터 실습 진행
# [신규 터미널] 모니터링 Show HTTP call trace for all incoming and internode on MinIO
# https://docs.min.io/community/minio-object-store/reference/minio-mc-admin/mc-admin-trace.html
mc admin trace -v -a k8s-tenant1 --insecure
# mc admin trace --errors -v -a k8s-tenant1 --insecure # 4xx, 5xx 에러만 보기
# https://docs.min.io/community/minio-object-store/reference/minio-mc/mc-ls.html
mc ls --summarize --recursive k8s-tenant1 --insecure
# https://docs.min.io/community/minio-object-store/reference/minio-mc/mc-cat.html
echo hello > hello.txt
mc cp ./hello.txt k8s-tenant1/mybucket/ --insecure
mc cat k8s-tenant1/mybucket/hello.txt --insecure
# 100MB 파일 생성
</dev/urandom tr -dc 'A-Za-z0-9' | head -c 100M > randtext.txt
ls -alh randtext.txt
-rw-r--r-- 1 root root 100M Sep 14 15:08 randtext.txt
cat randtext.txt | md5sum
# https://docs.min.io/community/minio-object-store/reference/minio-mc/mc-cp.html
mc cp ./randtext.txt k8s-tenant1/mybucket/ --insecure
/root/randtext.txt: 100.00 MiB / 100.00 MiB ┃▓▓▓▓▓▓▓▓▓▓▓▓▓▓▓▓▓▓▓▓▓▓▓▓▓▓▓▓▓▓▓▓▓▓▓▓▓▓▓▓▓▓▓▓▓▓▓▓▓▓▓▓▓▓▓▓▓▓▓▓▓▓▓▓▓┃ 320.47 MiB/s 0s
mc cat k8s-tenant1/mybucket/randtext.txt --insecure | md5sum
# MinIO Multipart Upload는 '큰 파일을 S3 방식으로 업로드할 때 쪼개서 올리고, 다 올리면 서버가 합쳐주는' 기능
[Client] ---CreateMultipartUpload---> [MinIO]
<--- UploadId ---------------
[Client] ---UploadPart(part1)--------> [MinIO]
[Client] ---UploadPart(part2)--------> [MinIO]
...
[Client] ---CompleteMultipartUpload--> [MinIO]
<--- OK + Final Object -------
mc admin trace -v -a k8s-tenant1 --insecure
127.0.0.1:30002 [REQUEST s3.CompleteMultipartUpload] [2025-09-14T15:11:04.710] [Client IP: 10.42.0.1]
127.0.0.1:30002 POST /mybucket/randtext.txt?uploadId=ZTMyZjNlMjAtZDkyNi00YjcyLTlhNGItZTI4ODBiNzBmZTM1LmY3N2ZiOTY0LWM5NmItNDE5YS1iNThmLWY3ODAyM2FmY2JjM3gxNzU3ODMwMjY0NDE5MzA0NDQ1
127.0.0.1:30002 Proto: HTTP/1.1
127.0.0.1:30002 Host: 127.0.0.1:30002
127.0.0.1:30002 Content-Type: application/octet-stream
127.0.0.1:30002 User-Agent: MinIO (linux; amd64) minio-go/v7.0.90 mc/RELEASE.2025-08-13T08-35-41Z
127.0.0.1:30002 X-Amz-Content-Sha256: 159a60374060e572e313b089f1d4658285b3676e38c08cdba940c0342f7431a9
127.0.0.1:30002 X-Amz-Date: 20250914T061104Z
127.0.0.1:30002 Accept-Encoding: zstd,gzip
127.0.0.1:30002 Authorization: AWS4-HMAC-SHA256 Credential=minio/20250914/us-east-1/s3/aws4_request, SignedHeaders=content-type;host;x-amz-content-sha256;x-amz-date, Signature=3006225675b1e83ec73a4acdc49e14912ea547e075be739cc9a580ebde31a858
127.0.0.1:30002 Content-Length: 687
127.0.0.1:30002 <CompleteMultipartUpload xmlns="http://s3.amazonaws.com/doc/2006-03-01/"><Part><PartNumber>1</PartNumber><ETag>2e7fda86cc02f78e25480c65efb94a29</ETag></Part><Part><PartNumber>2</PartNumber><ETag>e2b66d6f0368ce9a13de6ca12ed78a90</ETag></Part><Part><PartNumber>3</PartNumber><ETag>7b0ae1958b0f62992b13dfe4a7dddf07</ETag></Part><Part><PartNumber>4</PartNumber><ETag>942130b42c320b33a77ad9812416546b</ETag></Part><Part><PartNumber>5</PartNumber><ETag>81bea9efbeb94cadacb210343698806d</ETag></Part><Part><PartNumber>6</PartNumber><ETag>89c6655445c13b36c83a37b8b8e589c1</ETag></Part><Part><PartNumber>7</PartNumber><ETag>084d78f3c6126f91dc72c1933754ec46</ETag></Part></CompleteMultipartUpload>
127.0.0.1:30002 [RESPONSE] [2025-09-14T15:11:04.717] [ Duration 7.469ms TTFB 7.391942ms ↑ 793 B ↓ 321 B ]
...
<CompleteMultipartUploadResult xmlns="http://s3.amazonaws.com/doc/2006-03-01/"><Location>https://127.0.0.1:30002/mybucket/randtext.txt</Location><Bucket>mybucket</Bucket><Key>randtext.txt</Key><ETag>"2ab7293624b88db302add6a2cacdd804-7"</ETag></CompleteMultipartUploadResult>
# 참고) put https://docs.min.io/community/minio-object-store/reference/minio-mc/mc-put.html
#
cp randtext.txt randtext2.txt
mc cp ./randtext2.txt k8s-tenant1/mybucket/ --disable-multipart --insecure
/root/randtext2.txt: 100.00 MiB / 100.00 MiB ┃▓▓▓▓▓▓▓▓▓▓▓▓▓▓▓▓▓▓▓▓▓▓▓▓▓▓▓▓▓▓▓▓▓▓▓▓▓▓▓▓▓▓▓▓▓▓▓▓▓▓▓▓▓▓▓▓▓▓▓▓▓▓▓▓▓┃ 290.70 MiB/s 0s
#
mc ls --summarize --recursive --versions k8s-tenant1 --insecure
[2025-09-14 14:36:17 KST] 0B mybucket/
[2025-09-14 15:11:04 KST] 100MiB STANDARD null v1 PUT mybucket/randtext.txt
[2025-09-14 15:17:43 KST] 100MiB STANDARD null v1 PUT mybucket/randtext2.txt
Total Size: 200 MiB
Total Objects: 3
#
k exec -it -n tenant1 tenant1-pool-0-0 -c minio -- sh -c 'df -hT --type xfs'
Filesystem Type Size Used Avail Use% Mounted on
/dev/nvme2n1 xfs 10G 67M 10G 1% /export0
/dev/nvme1n1 xfs 10G 67M 10G 1% /export1
/dev/nvme3n1 xfs 10G 67M 10G 1% /export2
/dev/nvme4n1 xfs 10G 67M 10G 1% /export3
k exec -it -n tenant1 tenant1-pool-0-0 -c minio -- ls -R /export0
k exec -it -n tenant1 tenant1-pool-0-0 -c minio -- ls -R /export1
k exec -it -n tenant1 tenant1-pool-0-0 -c minio -- ls -R /export2
k exec -it -n tenant1 tenant1-pool-0-0 -c minio -- ls -R /export3
#
tree -a /var/lib/directpv/mnt
...
└── mybucket
├── randtext.txt
│ ├── 13a96fc7-0dc5-48c2-b949-24ec24322d31
│ │ ├── part.1
│ │ ├── part.2
│ │ ├── part.3
│ │ ├── part.4
│ │ ├── part.5
│ │ ├── part.6
│ │ └── part.7
│ └── xl.meta
└── randtext2.txt
├── 287967c0-a38e-4734-b797-36ea1c76147a
│ └── part.1
└── xl.meta
# rm - https://docs.min.io/community/minio-object-store/reference/minio-mc/mc-rm.html
mc rm k8s-tenant1/mybucket/randtext2.txt --insecure
127.0.0.1:30002 [REQUEST s3.DeleteMultipleObjects] [2025-09-14T15:34:27.955] [Client IP: 10.42.0.1]
127.0.0.1:30002 POST /mybucket/?delete=
...
#
mc cp k8s-tenant1/mybucket/randtext.txt ./randtext3.txt --insecure
127.0.0.1:9000 [OS os.OpenFileR] [2025-09-14T15:46:10.530] /export3/data/mybucket/randtext.txt/13a96fc7-0dc5-48c2-b949-24ec24322d31/part.4 25.794µs
127.0.0.1:9000 [OS os.OpenFileR] [2025-09-14T15:46:10.530] /export1/data/mybucket/randtext.txt/13a96fc7-0dc5-48c2-b949-24ec24322d31/part.4 32.617µs
127.0.0.1:9000 [STORAGE storage.ReadFileStream] [2025-09-14T15:46:10.530] /export3/data mybucket randtext.txt/13a96fc7-0dc5-48c2-b949-24ec24322d31/part.4 total-errs-availability=0 total-errs-timeout=0 54.316µs 5.3 MiB
127.0.0.1:9000 [STORAGE storage.ReadFileStream] [2025-09-14T15:46:10.530] /export1/data mybucket randtext.txt/13a96fc7-0dc5-48c2-b949-24ec24322d31/part.4 total-errs-timeout=0 total-errs-availability=0 63.241µs 5.3 MiB
...
127.0.0.1:30002 [REQUEST s3.GetObject] [2025-09-14T15:46:10.435] [Client IP: 10.42.0.1]
127.0.0.1:30002 GET /mybucket/randtext.txt
127.0.0.1:30002 Proto: HTTP/1.1
127.0.0.1:30002 Host: 127.0.0.1:30002
127.0.0.1:30002 Accept-Encoding: identity
127.0.0.1:30002 Authorization: AWS4-HMAC-SHA256 Credential=minio/20250914/us-east-1/s3/aws4_request, SignedHeaders=host;x-amz-content-sha256;x-amz-date, Signature=ae36a34bc4a7db66f08970b3f295da8084d03236448a04d23a23b79c87026710
127.0.0.1:30002 Content-Length: 0
127.0.0.1:30002 User-Agent: MinIO (linux; amd64) minio-go/v7.0.90 mc/RELEASE.2025-08-13T08-35-41Z
127.0.0.1:30002 X-Amz-Content-Sha256: e3b0c44298fc1c149afbf4c8996fb92427ae41e4649b934ca495991b7852b855
127.0.0.1:30002 X-Amz-Date: 20250914T064610Z
127.0.0.1:30002 <BLOB>
127.0.0.1:30002 [RESPONSE] [2025-09-14T15:46:10.645] [ Duration 209.83ms TTFB 4.247996ms ↑ 93 B ↓ 100 MiB ]
...mc ls, cp, rm 실습


파드 재기동 없이 볼륨 확장
#
kubectl get pvc -n tenant1

k directpv list drives
┌───────┬─────────┬────────────────────────────┬────────┬────────┬─────────┬────────┐
│ NODE  │ NAME    │ MAKE                       │ SIZE   │ FREE   │ VOLUMES │ STATUS │
├───────┼─────────┼────────────────────────────┼────────┼────────┼─────────┼────────┤
│ k3s-s │ nvme1n1 │ Amazon Elastic Block Store │ 30 GiB │ 20 GiB │ 1       │ Ready  │
│ k3s-s │ nvme2n1 │ Amazon Elastic Block Store │ 30 GiB │ 20 GiB │ 1       │ Ready  │
│ k3s-s │ nvme3n1 │ Amazon Elastic Block Store │ 30 GiB │ 20 GiB │ 1       │ Ready  │
│ k3s-s │ nvme4n1 │ Amazon Elastic Block Store │ 30 GiB │ 20 GiB │ 1       │ Ready  │
└───────┴─────────┴────────────────────────────┴────────┴────────┴─────────┴────────┘

k directpv info
┌─────────┬──────────┬───────────┬─────────┬────────┐
│ NODE    │ CAPACITY │ ALLOCATED │ VOLUMES │ DRIVES │
├─────────┼──────────┼───────────┼─────────┼────────┤
│ • k3s-s │ 120 GiB  │ 40 GiB    │ 4       │ 4      │
└─────────┴──────────┴───────────┴─────────┴────────┘

#
kubectl patch pvc -n tenant1 data0-tenant1-pool-0-0 -p '{"spec":{"resources":{"requests":{"storage":"20Gi"}}}}'
kubectl patch pvc -n tenant1 data1-tenant1-pool-0-0 -p '{"spec":{"resources":{"requests":{"storage":"20Gi"}}}}'
kubectl patch pvc -n tenant1 data2-tenant1-pool-0-0 -p '{"spec":{"resources":{"requests":{"storage":"20Gi"}}}}'
kubectl patch pvc -n tenant1 data3-tenant1-pool-0-0 -p '{"spec":{"resources":{"requests":{"storage":"20Gi"}}}}'

#
kubectl get pvc -n tenant1

k directpv list drives
┌───────┬─────────┬────────────────────────────┬────────┬────────┬─────────┬────────┐
│ NODE  │ NAME    │ MAKE                       │ SIZE   │ FREE   │ VOLUMES │ STATUS │
├───────┼─────────┼────────────────────────────┼────────┼────────┼─────────┼────────┤
│ k3s-s │ nvme1n1 │ Amazon Elastic Block Store │ 30 GiB │ 10 GiB │ 1       │ Ready  │
│ k3s-s │ nvme2n1 │ Amazon Elastic Block Store │ 30 GiB │ 10 GiB │ 1       │ Ready  │
│ k3s-s │ nvme3n1 │ Amazon Elastic Block Store │ 30 GiB │ 10 GiB │ 1       │ Ready  │
│ k3s-s │ nvme4n1 │ Amazon Elastic Block Store │ 30 GiB │ 10 GiB │ 1       │ Ready  │
└───────┴─────────┴────────────────────────────┴────────┴────────┴─────────┴────────┘

k directpv info
┌─────────┬──────────┬───────────┬─────────┬────────┐
│ NODE    │ CAPACITY │ ALLOCATED │ VOLUMES │ DRIVES │
├─────────┼──────────┼───────────┼─────────┼────────┤
│ • k3s-s │ 120 GiB  │ 80 GiB    │ 4       │ 4      │
└─────────┴──────────┴───────────┴─────────┴────────┘

# 아래 파드 내에서 볼륨 Size 가 20G 로 조금 시간 지나면 자동 확장 반영 된다.
k exec -it -n tenant1 tenant1-pool-0-0 -c minio -- sh -c 'df -hT --type xfs'
Filesystem     Type  Size  Used Avail Use% Mounted on
/dev/nvme1n1   xfs    10G   34M   10G   1% /export0
/dev/nvme2n1   xfs    10G   34M   10G   1% /export1
/dev/nvme3n1   xfs    10G   34M   10G   1% /export2
/dev/nvme4n1   xfs    10G   34M   10G   1% /export3

k exec -it -n tenant1 tenant1-pool-0-0 -c minio -- sh -c 'df -hT --type xfs'
Filesystem     Type  Size  Used Avail Use% Mounted on
/dev/nvme1n1   xfs    20G   34M   20G   1% /export0
/dev/nvme2n1   xfs    20G   34M   20G   1% /export1
/dev/nvme3n1   xfs    20G   34M   20G   1% /export2
/dev/nvme4n1   xfs    20G   34M   20G   1% /export3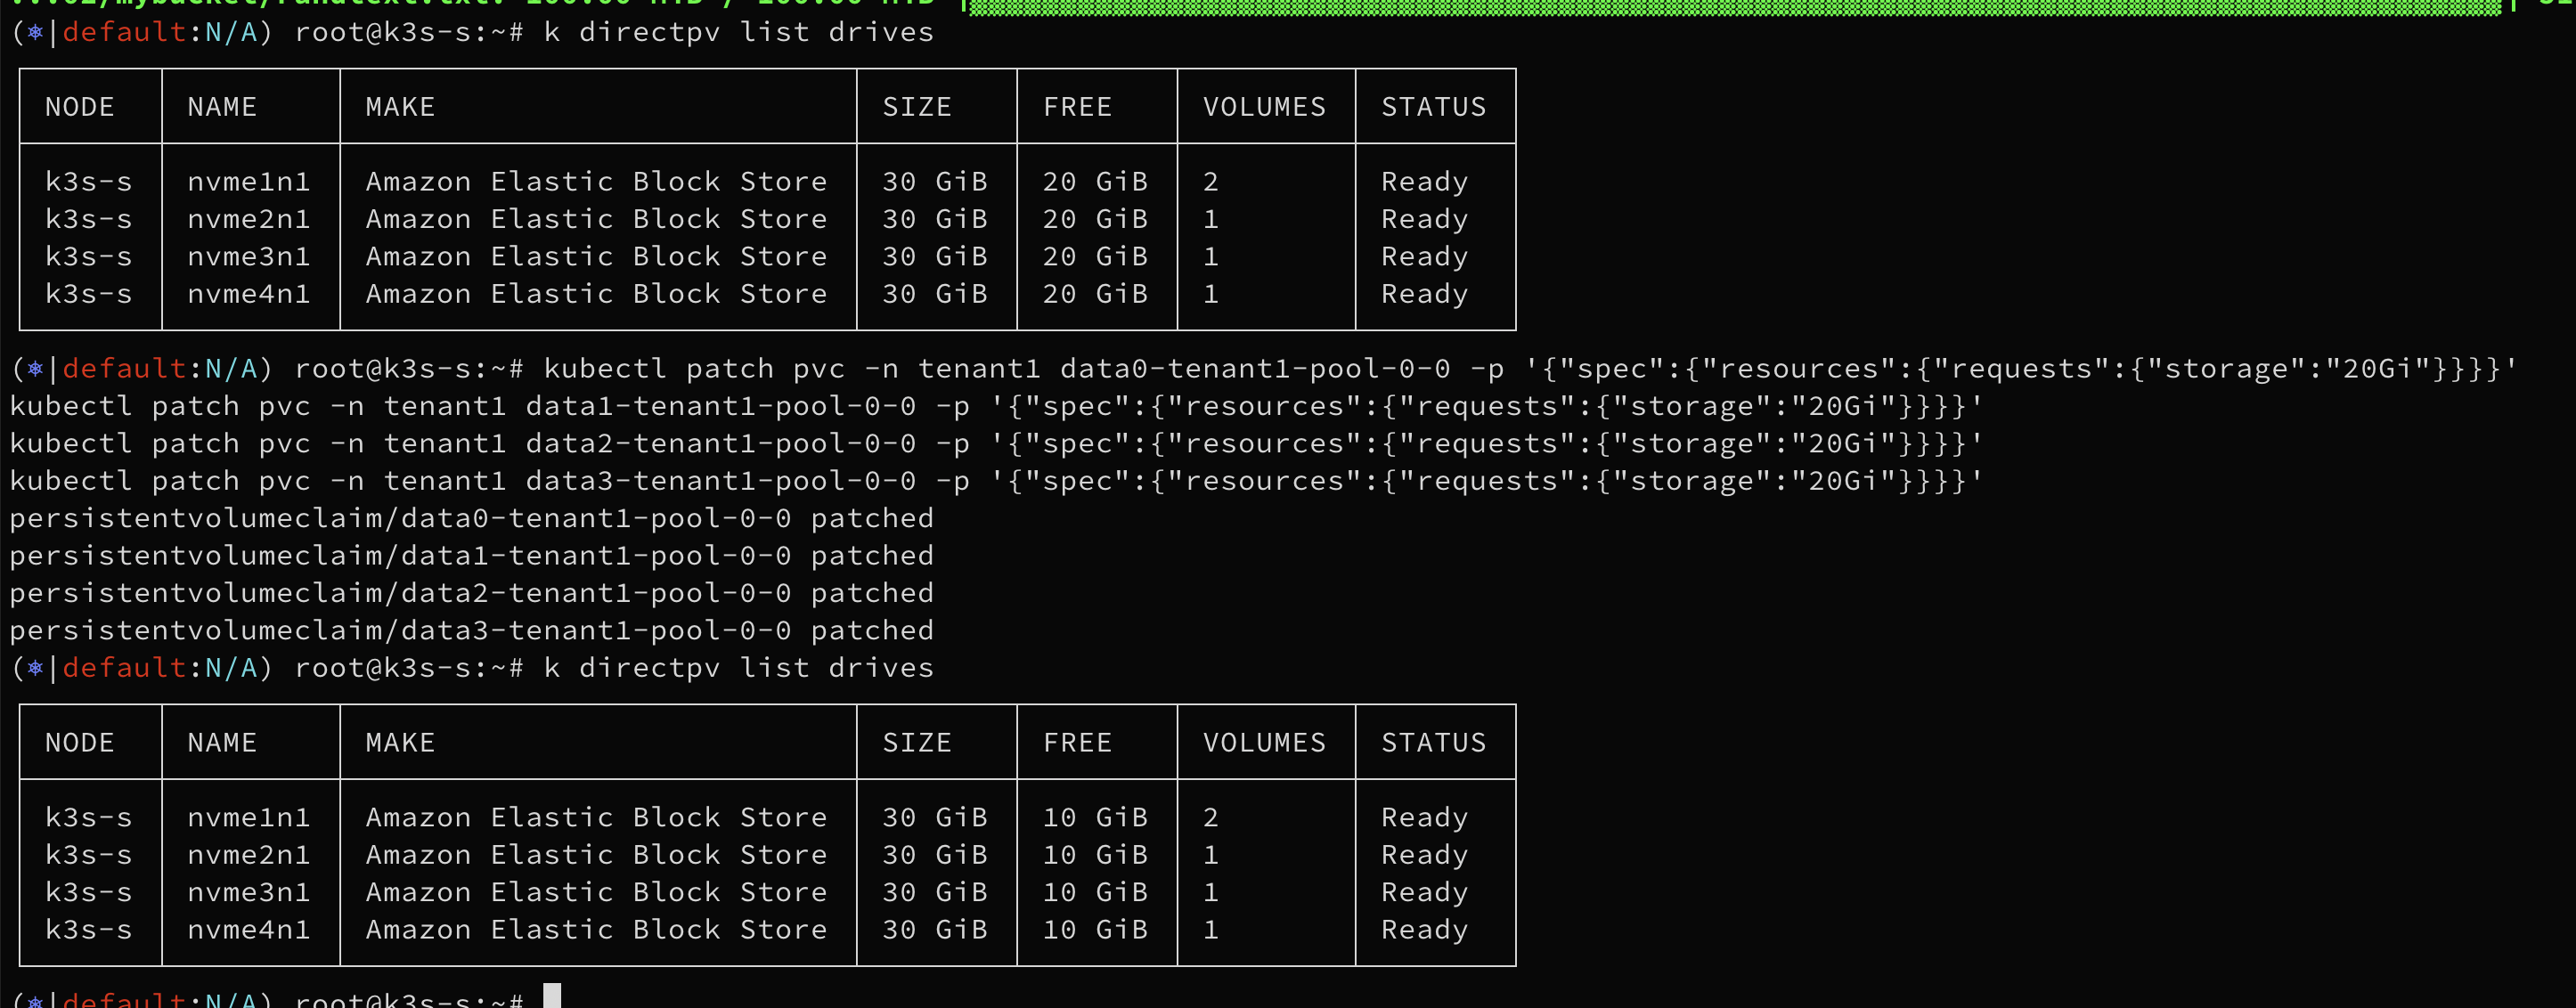

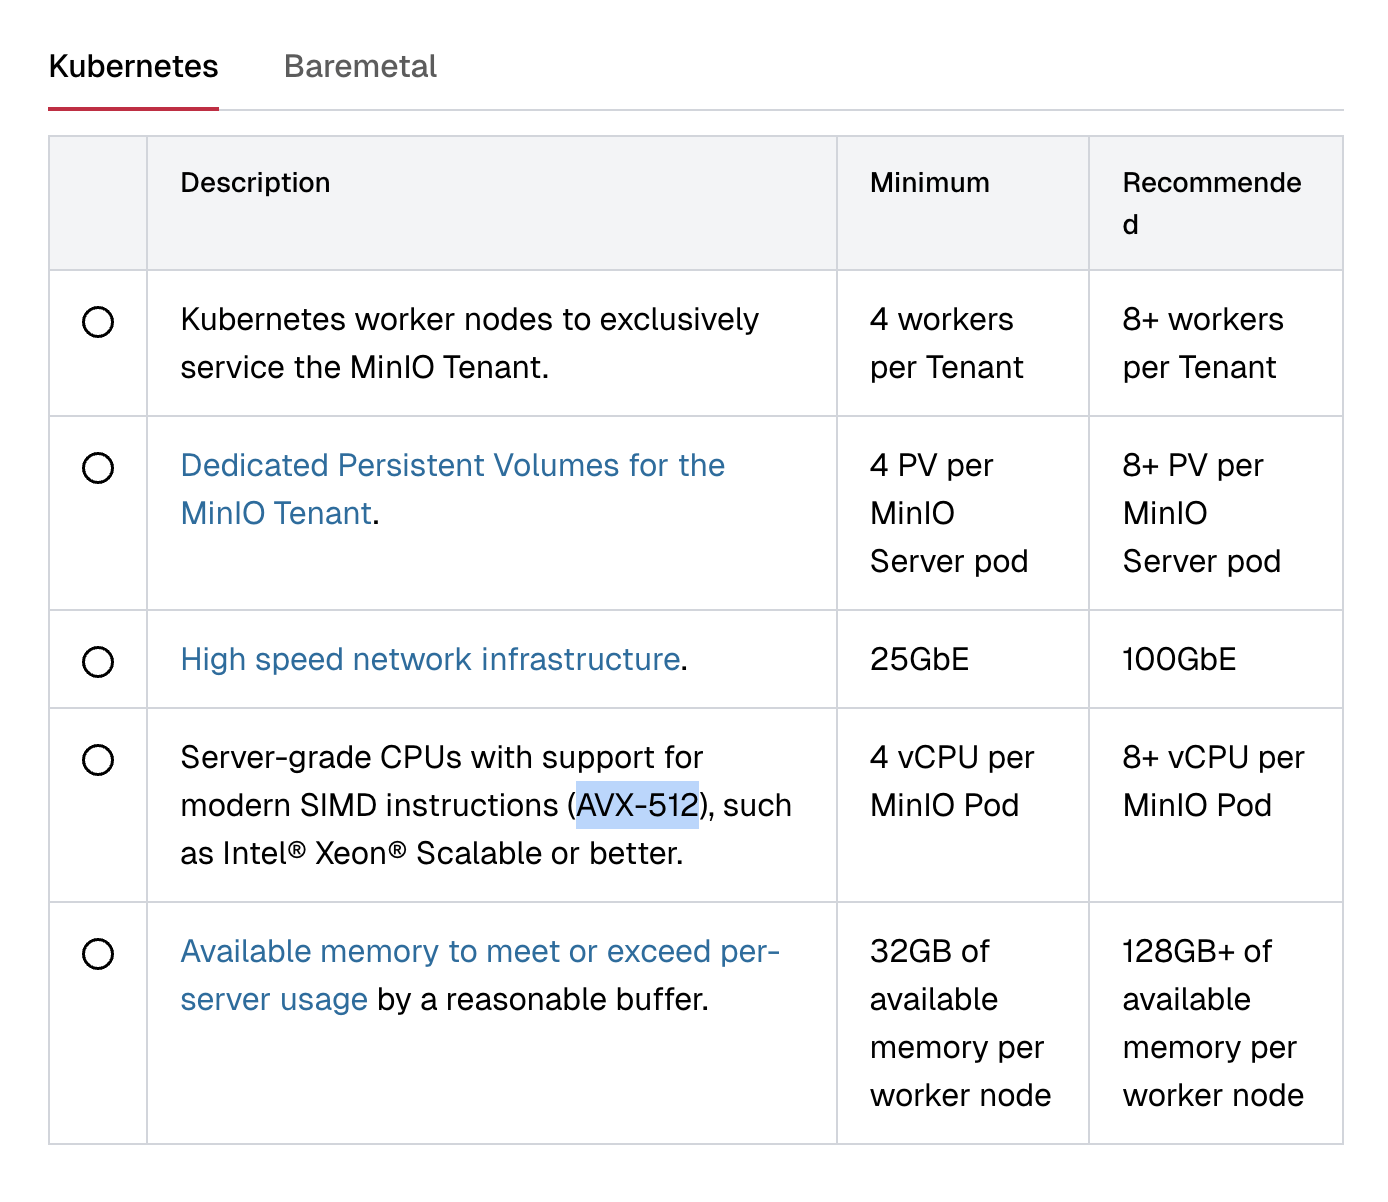
Perfomance & Warp
- 출시 시 저장할 테비바이트 단위의 예상 데이터 양
- 향후 최소 2년간 데이터 크기의 예상 성장률
- 평균 객체 크기별 객체 수
- 데이터의 평균 보존 시간(년)
- 배포할 사이트 수
- 예상 버킷 수

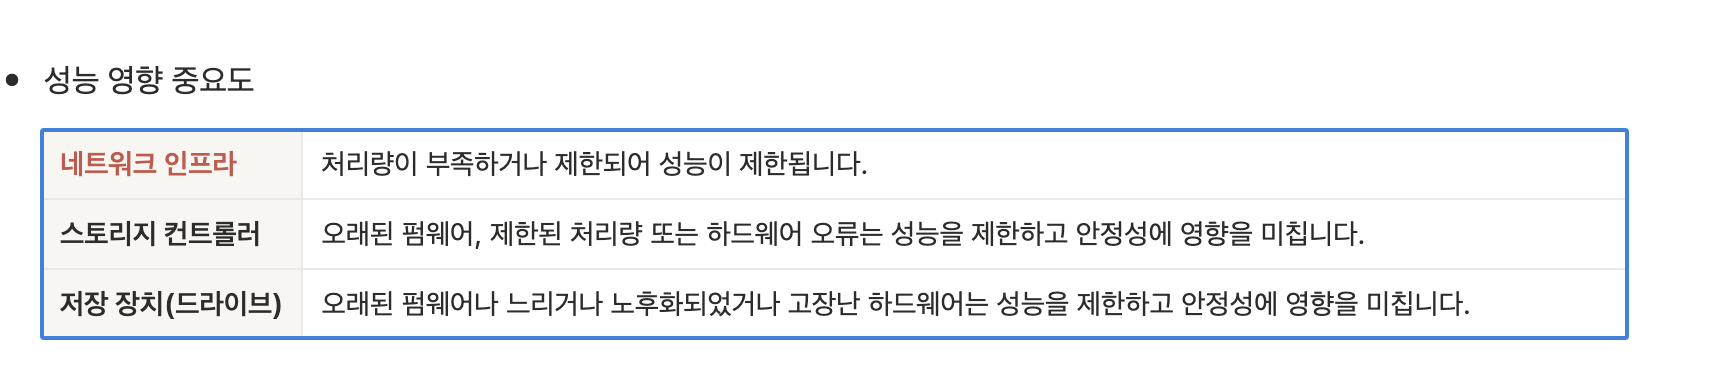
- 네트워킹은 MinIO 성능에 가장 큰 영향을 미치는데, 호스트당 낮은 대역폭은 스토리지의 잠재적 성능을 인위적으로 제한하기 때문입니다.
- 다음 네트워크 처리량 제약 조건 예시에서는 ~100MB/S의 지속 I/O를 제공하는 회전 디스크를 가정합니다.
- 1GbE 네트워크 링크는 최대 125MB/s 또는 회전 디스크 1개를 지원할 수 있습니다.
- 10GbE 네트워크는 약 1.25GB/s를 지원하여 잠재적으로 10~12개의 회전 디스크를 지원할 수 있습니다.
- 25GbE 네트워크는 약 3.125GB/s를 지원하여 잠재적으로 약 30개의 회전 디스크를 지원할 수 있습니다.
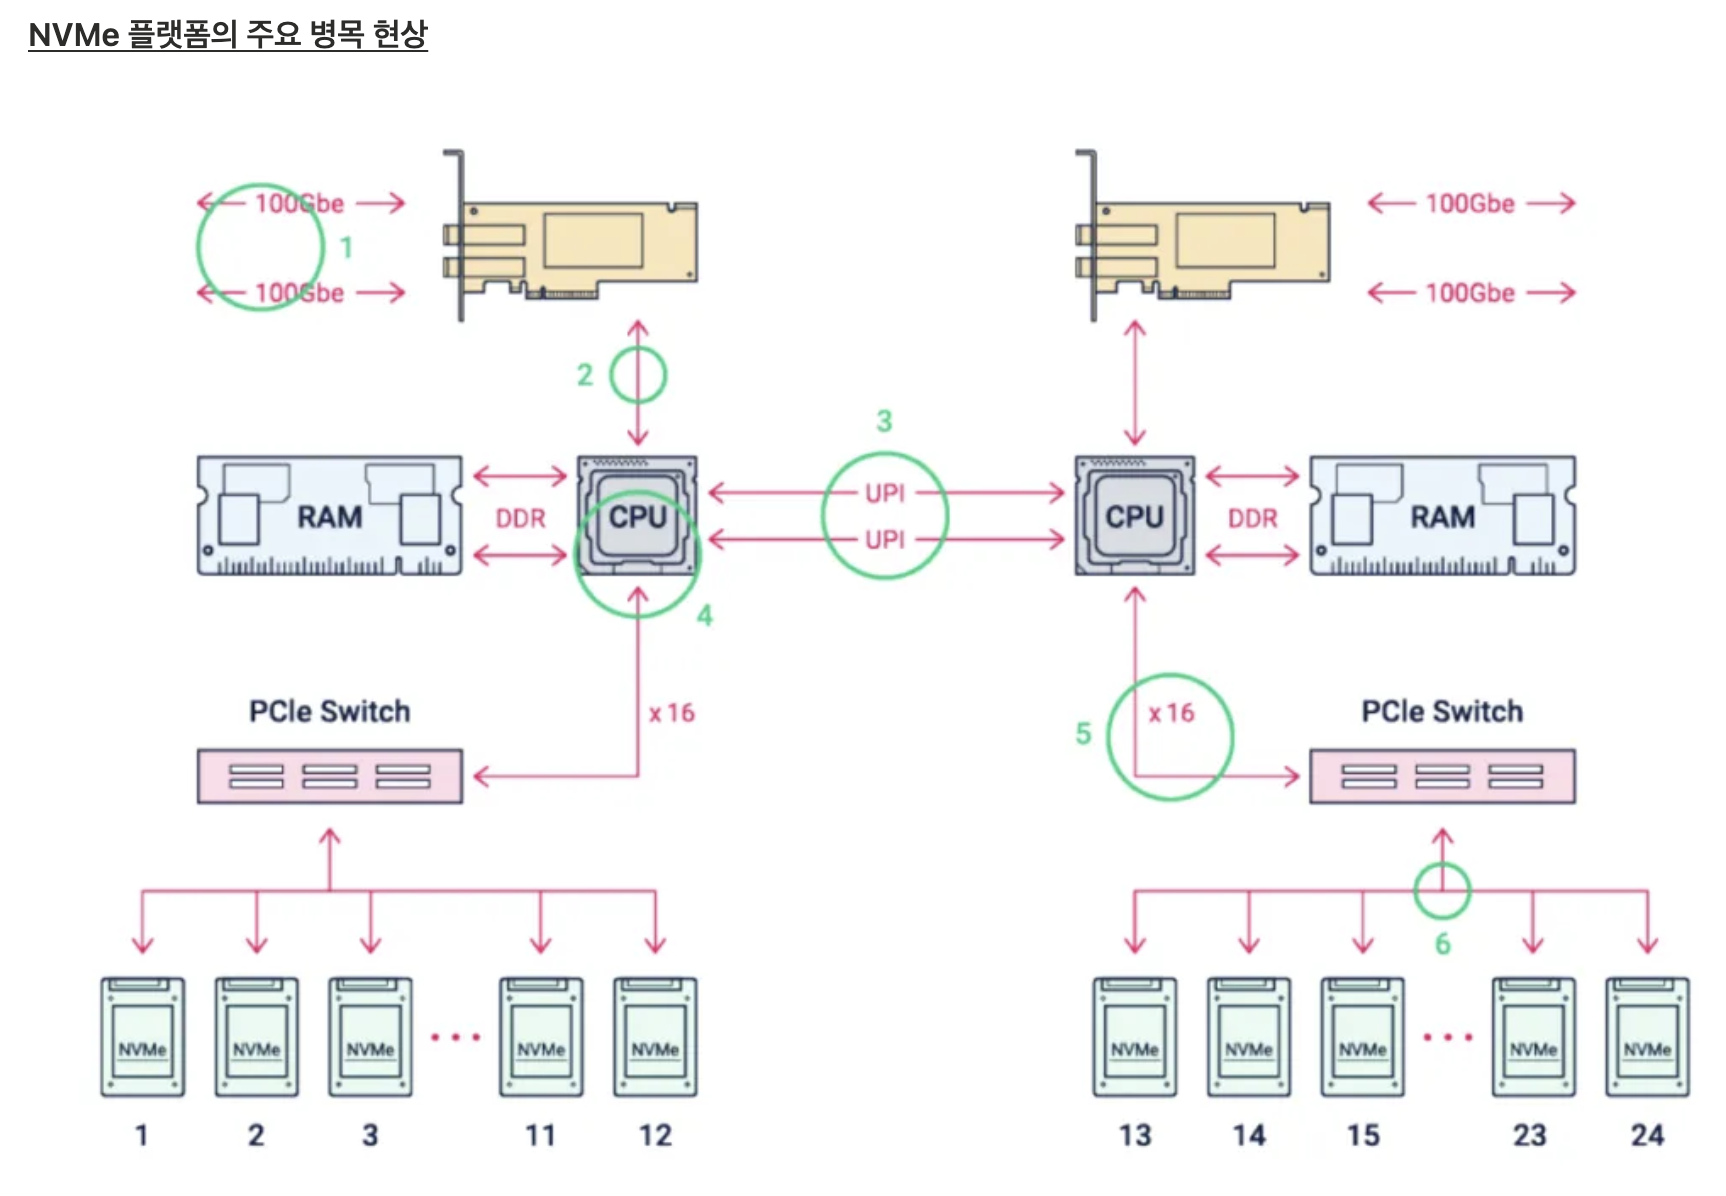
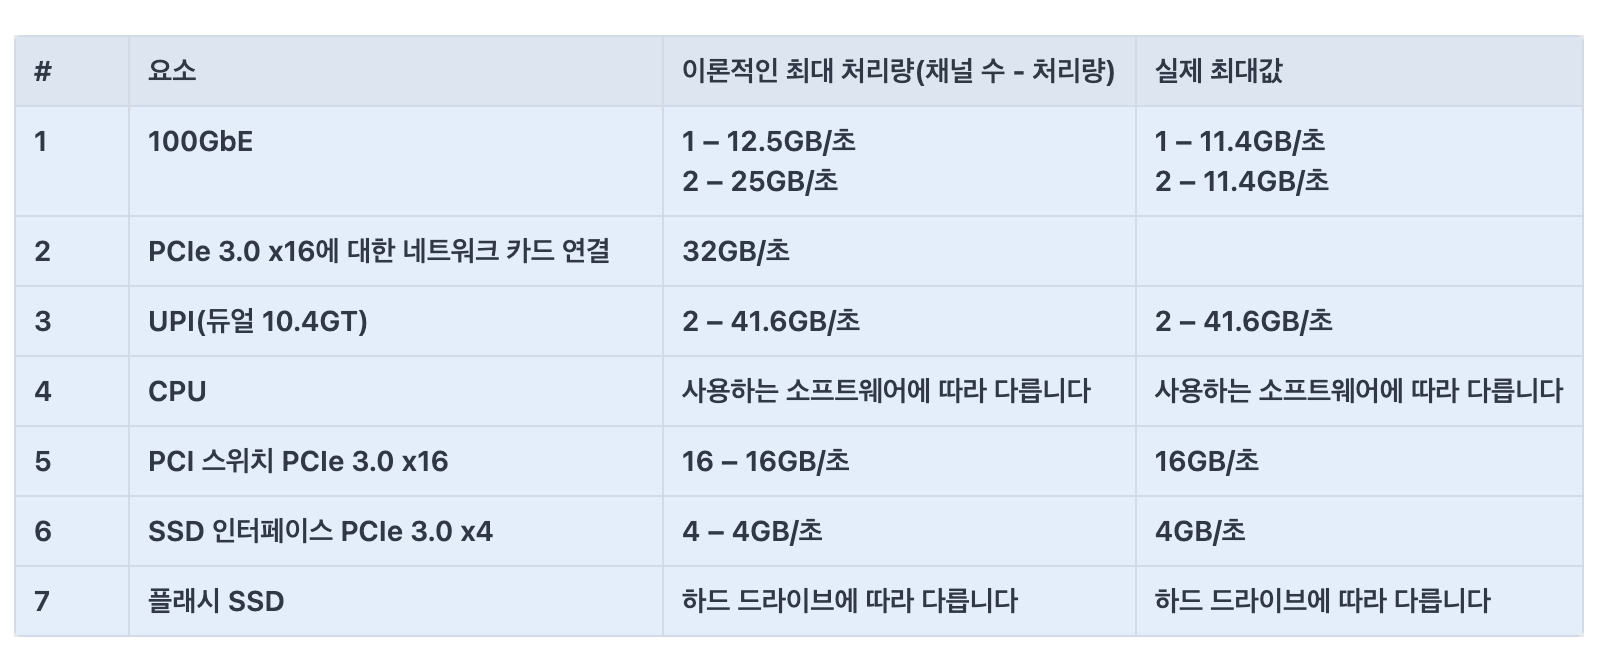
1. 네트워크 (100GbE) 병목
네트워크 카드가 데이터를 주고받는 속도는 처음부터 정해진 최대치가 있습니다.
100GbE(기가비트 이더넷) 카드 한 개는 초당 약 11.4GB의 데이터를 처리할 수 있고, 두 개 포트가 있으면 이론상 22.8GB/s까지 올라갑니다.
하지만 실제로는 네트워크 프로토콜(데이터를 안전하게 보내는 여러 규칙)에도 시간이 들고, 장비에 따라 성능 차이가 있어 명목 속도보다 느릴 수 있습니다.
2. 네트워크 카드와 메인보드 연결(PCIe 버스) 병목
네트워크 카드는 CPU와 직접 연결되지 않고, 컴퓨터 내부의 고속 통로(PCIe 슬롯)를 이용합니다.
100GbE 듀얼 포트 카드를 이 고속 통로(PCIe 3.0 x16)에 연결하면, 이 통로가 처리할 수 있는 최대 속도(14.5GB/s)보다 카드에서 쏟아내는 데이터가 더 많아서, 실제 전체 속도가 늦어질 수 있습니다.
즉, 데이터가 교차로에서 밀려 차가 막히듯, 내부 회선에서 좁아지는 구간이 생기는 것입니다.
3. 프로세서(코어/클럭) 병목
NVMe SSD는 CPU와 바로 연결되어 빠릅니다.
하지만 데이터를 처리하는 건 결국 CPU(프로세서)입니다.
각 디스크나 네트워크에서 들어오는 작업을 처리할 '두뇌(코어/클럭)'가 부족하면, 아무리 빠른 SSD라도 실제 속도가 떨어집니다.
실험상, 디스크 1개당 CPU코어 2개(2.5GHz 이상)가 있어야 SSD의 최대 속도를 쓸 수 있다는 결과가 있습니다.
4. 프로세서 간(소켓 간) 연결 병목 (NUMA, UPI 등)
최신 서버는 두 개 이상의 CPU(소켓)를 쓰는 경우가 많습니다.
서로 다른 CPU에 연결된 메모리·디스크·네트워크 장치가 있을 때, 이들 사이를 잇는 연결선(UPI 등)을 통해 데이터가 오가야 합니다.
이 연결 과정에서 지연이 생길 수 있는데, 장치를 같은 CPU 옆에 놓고 쓰면 빠르지만, 반대쪽 CPU와 연동하는 경우 느려집니다.
5. PCIe 스위치 병목
NVMe SSD가 많이 장착된 서버는 PCIe 확장용 스위치(중간 연결장치)를 씁니다.
스위치 한 개가 한꺼번에 관리할 수 있는 PCIe 대역폭엔 한계가 있으므로, SSD 12개가 한 스위치로 묶이면, 모든 SSD가 풀 성능을 낼 수는 없습니다.
즉, 모두가 동시에 빠른 속도로 데이터 전송을 시도하면, 중간 허브가 '나눠쓰기'가 되어 성능이 줄어듭니다.
6. NVMe 드라이브와 PCIe 연결 병목
각 NVMe SSD는 PC 내부 통로(PCIe) 4개 레인으로 연결되어 있고, 이론적으로 양방향 3.6GB/s를 지원합니다.
대부분의 일반적인 작업 환경에서는 이 정도면 충분하며, SSD 한 개만 독립적으로 사용할 때는 병목이 거의 없습니다.
7. NVMe 드라이브 자체 병목
SSD 각각은 여러 메모리칩(Cell)이 있어, 동시에 읽고 쓰기를 할 수 있습니다.
하지만, 각 SSD가 가진 설계나 내부 구조(분할 방식)에 따라 다 같이 완벽하게 빨라지진 않습니다.
동시에 여러 작업이 몰리거나, 저장 공간이 거의 찼을 때 성능 저하가 나타날 수 있습니다.
여러 SSD가 한 PCIe 스위치를 공유하면, 위에서 언급한 스위치 병목도 함께 작동합니다.
PCIe 정보 확인
# 각 PCI 디바이스의 Link Capabilities / Link Status 섹션에 현재 Lane과 속도가 표시
lspci -vv | grep -A40 -i "nvme"
예시)
LnkCap: Port #8, Speed 16GT/s, Width x16 # LnkCap = 최대 지원 속도/레인
LnkSta: Speed 8GT/s, Width x8            # LnkSta = 현재 동작 속도/레인

00:1f.0 Non-Volatile memory controller: Amazon.com, Inc. NVMe EBS Controller (prog-if 02 [NVM Express])
	Subsystem: Amazon.com, Inc. NVMe EBS Controller
	Physical Slot: 31
	Control: I/O+ Mem+ BusMaster+ SpecCycle- MemWINV+ VGASnoop- ParErr- Stepping- SERR- FastB2B- DisINTx+
	Status: Cap+ 66MHz- UDF- FastB2B- ParErr- DEVSEL=fast >TAbort- <TAbort- <MAbort- >SERR- <PERR- INTx-
	Latency: 0
	Interrupt: pin A routed to IRQ 11
	Region 0: Memory at c0400000 (32-bit, non-prefetchable) [size=16K]
	Capabilities: [70] Express (v2) Endpoint, MSI 00
		DevCap:	MaxPayload 256 bytes, PhantFunc 0, Latency L0s unlimited, L1 unlimited
			ExtTag- AttnBtn- AttnInd- PwrInd- RBE+ FLReset- SlotPowerLimit 0W
		DevCtl:	CorrErr- NonFatalErr- FatalErr- UnsupReq-
			RlxdOrd- ExtTag- PhantFunc- AuxPwr- NoSnoop-
			MaxPayload 128 bytes, MaxReadReq 128 bytes
		DevSta:	CorrErr- NonFatalErr- FatalErr- UnsupReq- AuxPwr- TransPend-
		LnkCap:	Port #0, Speed unknown, Width x0, ASPM not supported
			ClockPM- Surprise- LLActRep- BwNot- ASPMOptComp-
		LnkCtl:	ASPM Disabled; RCB 64 bytes, Disabled- CommClk-
			ExtSynch- ClockPM- AutWidDis- BWInt- AutBWInt-
		LnkSta:	Speed unknown, Width x0
			TrErr- Train- SlotClk- DLActive- BWMgmt- ABWMgmt-
		DevCap2: Completion Timeout: Not Supported, TimeoutDis- NROPrPrP- LTR-
			 10BitTagComp- 10BitTagReq- OBFF Not Supported, ExtFmt- EETLPPrefix-
			 EmergencyPowerReduction Not Supported, EmergencyPowerReductionInit-
			 FRS- TPHComp- ExtTPHComp-
			 AtomicOpsCap: 32bit- 64bit- 128bitCAS-
		DevCtl2: Completion Timeout: 50us to 50ms, TimeoutDis- LTR- 10BitTagReq- OBFF Disabled,
			 AtomicOpsCtl: ReqEn-
		LnkSta2: Current De-emphasis Level: -6dB, EqualizationComplete- EqualizationPhase1-
			 EqualizationPhase2- EqualizationPhase3- LinkEqualizationRequest-
			 Retimer- 2Retimers- CrosslinkRes: unsupported
	Capabilities: [b0] MSI-X: Enable+ Count=3 Masked-
		Vector table: BAR=0 offset=00002000
		PBA: BAR=0 offset=000

# /sys/bus/pci에서 직접 확인 : sysfs 경로에 current_link_width와 current_link_speed 파일이 있음
cat /sys/bus/pci/devices/0000\:00\:1f.0/current_link_width
0

cat /sys/bus/pci/devices/0000\:00\:1f.0/current_link_speed
Unknown

#
apt install hwinfo -y
hwinfo --pci
예시)
x8
8.0 GT/s PCIe Gen3

15: PCI 1d.0: 0108 Non-Volatile memory controller (NVM Express)
  [Created at pci.386]
  Unique ID: 1GTX.vA1igerW3PA
  SysFS ID: /devices/pci0000:00/0000:00:1d.0
  SysFS BusID: 0000:00:1d.0
  Hardware Class: storage
  Model: "Amazon.com NVMe EBS Controller"
  Vendor: pci 0x1d0f "Amazon.com, Inc."
  Device: pci 0x8061 "NVMe EBS Controller"
  SubVendor: pci 0x1d0f "Amazon.com, Inc."
  SubDevice: pci 0x8061
  Driver: "nvme"
  Driver Modules: "nvme"
  Memory Range: 0xc0408000-0xc040bfff (rw,non-prefetchable)
  IRQ: 10 (no events)
  Module Alias: "pci:v00001D0Fd00008061sv00001D0Fsd00008061bc01sc08i02"
  Config Status: cfg=new, avail=yes, need=no, active=unknown

WARP란
MinIO에서 제공하는 대표적인 S3 벤치마크 도구
# Linux x86_64
wget https://github.com/minio/warp/releases/download/v1.3.0/warp_Linux_x86_64.tar.gz
tar zxvf warp_Linux_x86_64.tar.gz
chmod +x warp
mv warp /usr/local/bin
warp --version
#
kubectl get secret -n tenant1 tenant1-tls -o jsonpath='{.data.public\.crt}' | base64 -d > tenant1.crt
kubectl get secret -n tenant1 tenant1-tls -o jsonpath='{.data.public\.crt}' | base64 -d | openssl x509 -noout -text
...
X509v3 Subject Alternative Name:
DNS:tenant1-pool-0-0.tenant1-hl.tenant1.svc.cluster.local, DNS:minio.tenant1.svc.cluster.local, DNS:minio.tenant1, DNS:minio.tenant1.svc, DNS:*., DNS:*.tenant1.svc.cluster.local
#
cp tenant1.crt /usr/local/share/ca-certificates/tenant1.crt
update-ca-certificates
#
echo "127.0.0.1 minio.tenant1.svc" >> /etc/hosts
#
mc alias set k8s-tenant1 https://minio.tenant1.svc:30002 minio minio123
mc ls --summarize --recursive k8s-tenant1
#
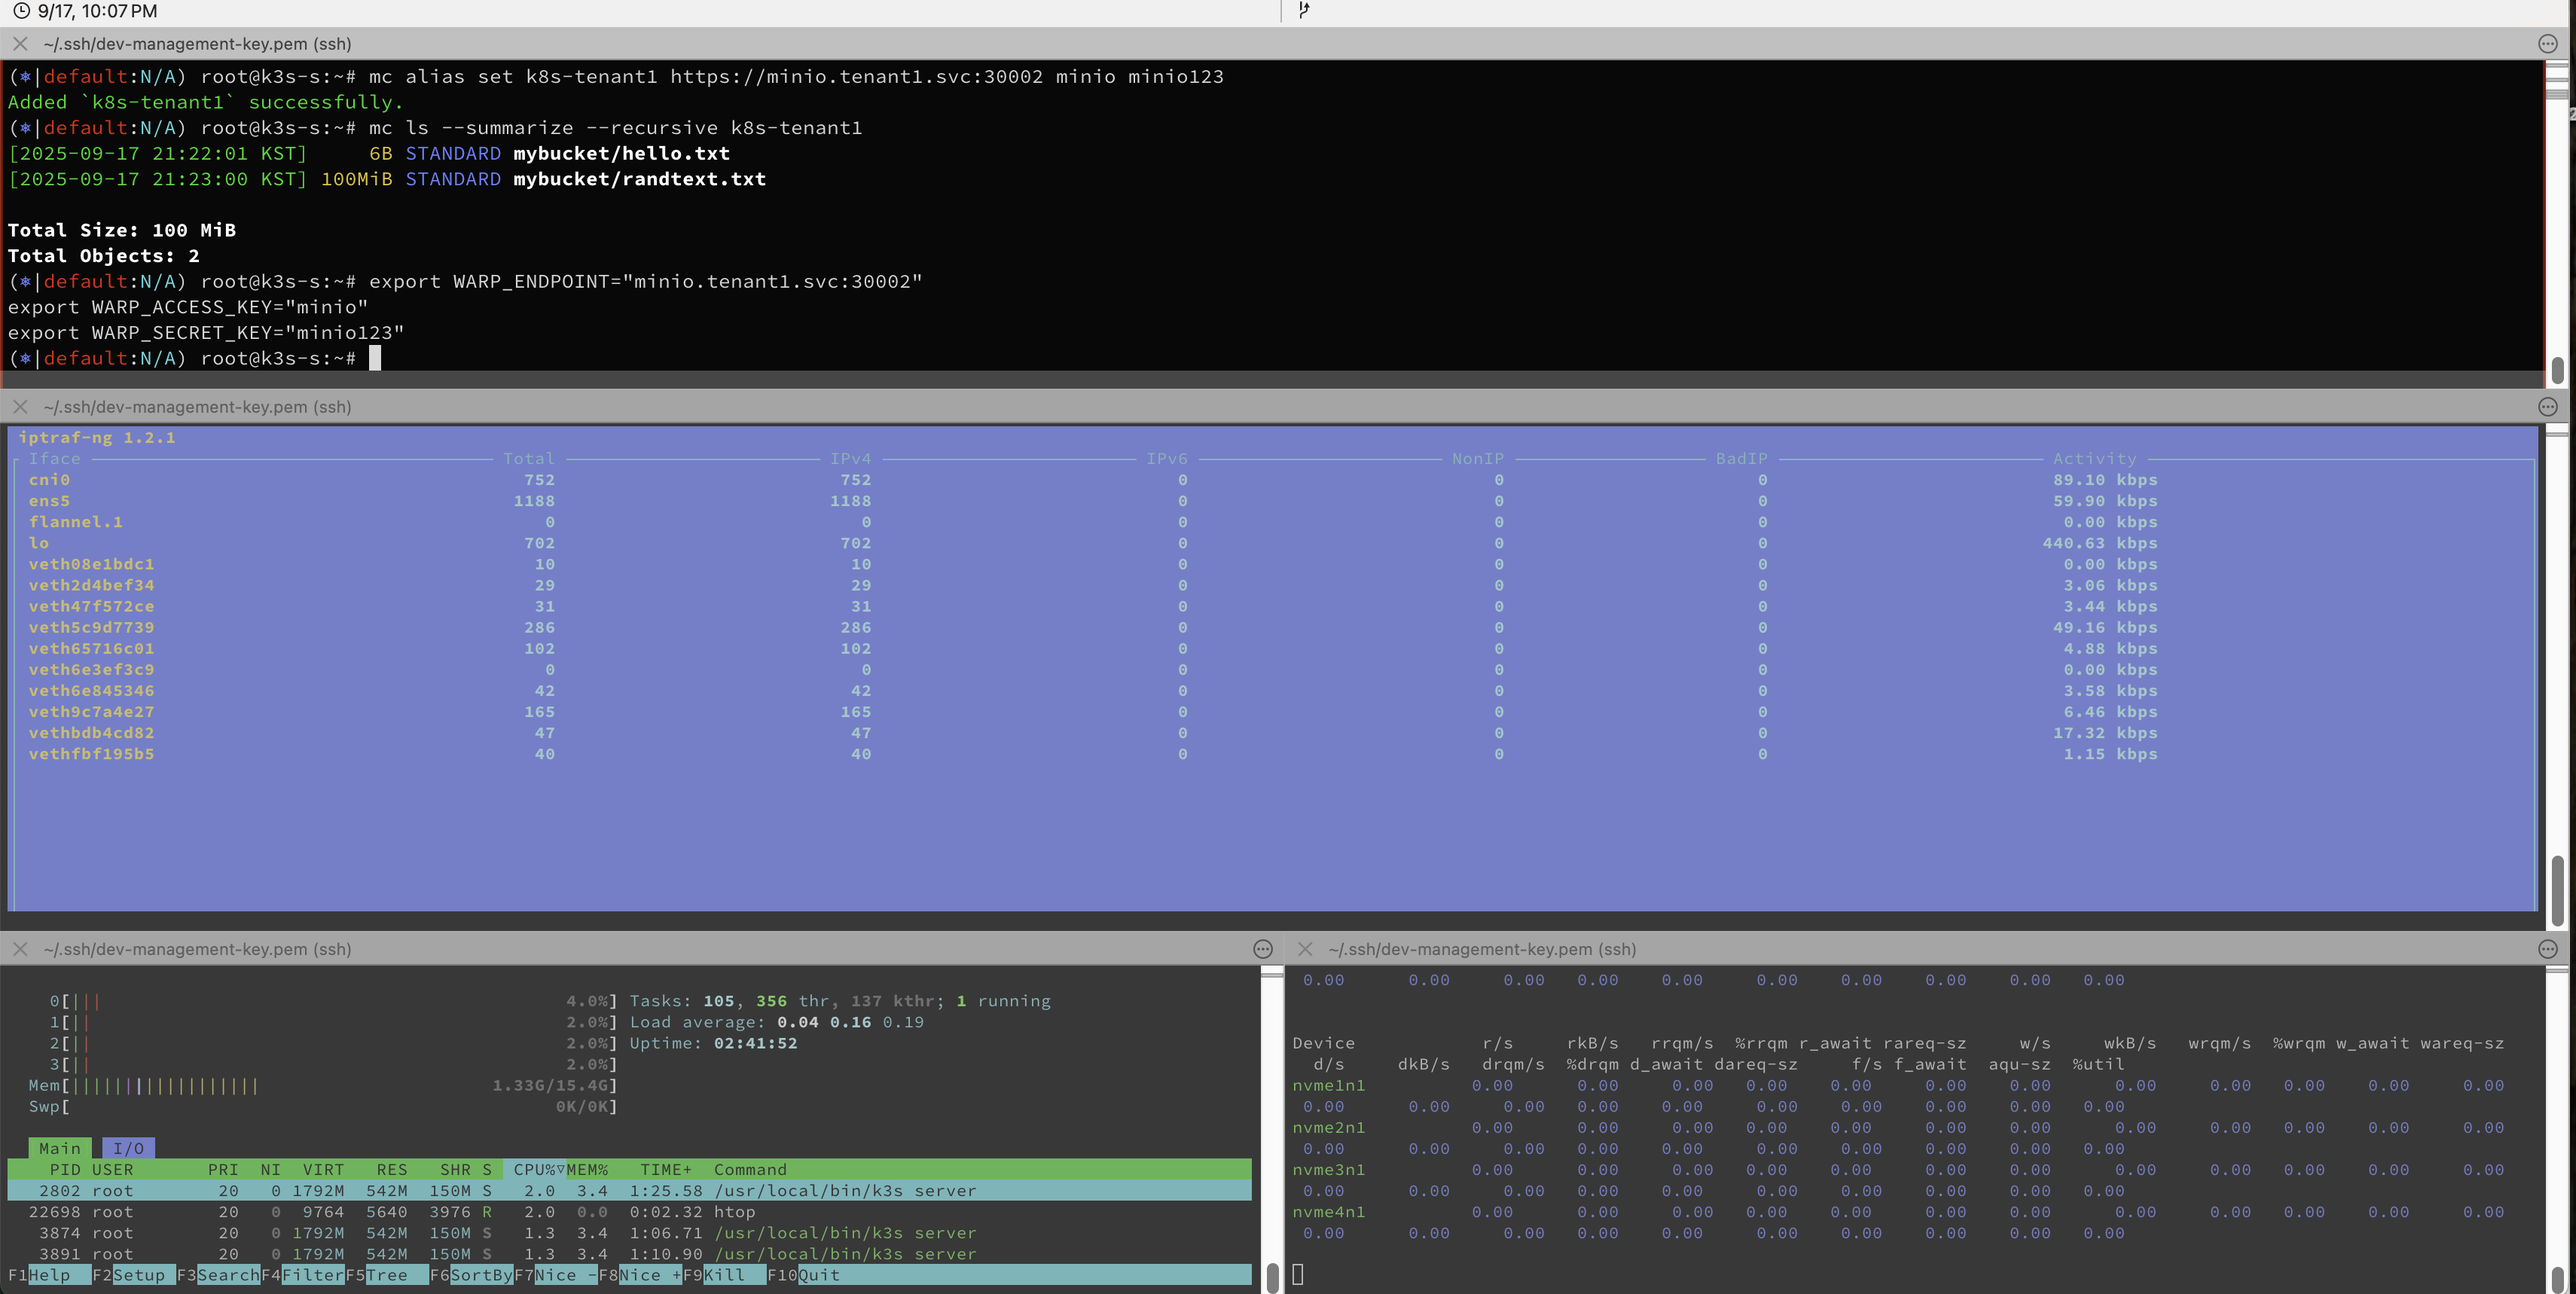
export WARP_ENDPOINT="minio.tenant1.svc:30002"
export WARP_ACCESS_KEY="minio"
export WARP_SECRET_KEY="minio123"
# 신규 터미널1 : 모니터링 disk
iostat nvme1n1 nvme2n1 nvme3n1 nvme4n1 1
iostat nvme1n1 nvme2n1 nvme3n1 nvme4n1 1 -d
iostat nvme1n1 nvme2n1 nvme3n1 nvme4n1 1 -x
iostat nvme1n1 nvme2n1 nvme3n1 nvme4n1 1 -x -d
r/s 초당 읽기 I/O 요청 수 (Read IOPS) 초당 몇 번의 읽기 요청이 발생했는지
rkB/s 읽기 KB/초 초당 읽은 데이터 양
rrqm/s 읽기 merge 요청 수 디바이스에서 merge 된 read 요청 수
%rrqm 읽기 merge 비율 merge된 read 요청의 비율
r_await 읽기 평균 대기 시간(ms) 읽기 요청이 큐에서 대기한 시간 평균
rareq-sz 평균 읽기 요청 크기(kB) I/O 요청당 데이터 크기 평균
w/s 초당 쓰기 I/O 요청 수 (Write IOPS) 초당 쓰기 요청 건수
wkB/s 쓰기 KB/초 초당 기록한 데이터 양
wrqm/s 쓰기 merge 요청 수 디바이스에서 merge 된 write 요청 수
%wrqm 쓰기 merge 비율 merge된 write 요청 비율
w_await 쓰기 평균 대기 시간(ms) write 요청이 큐에서 대기한 평균 시간
wareq-sz 평균 쓰기 요청 크기(kB) I/O 요청당 write 크기 평균
...
f/s 초당 플러시 요청 수 fsync 같은 flush 호출 수
f_await 플러시 평균 대기 시간(ms) flush 요청이 큐에서 대기한 시간
aqu-sz 평균 I/O 큐 깊이 디바이스 큐에 평균 몇 건의 요청이 쌓였는지
%util 디바이스 사용률 디바이스가 바쁜 비율(100%면 완전히 포화)
# 신규 터미널2 : 모니터링 cpu
htop
# 신규 터미널3 : 모니터링 network -> 실행 후 General interface statistics 선택
apt install iptraf-ng -y
iptraf-ng
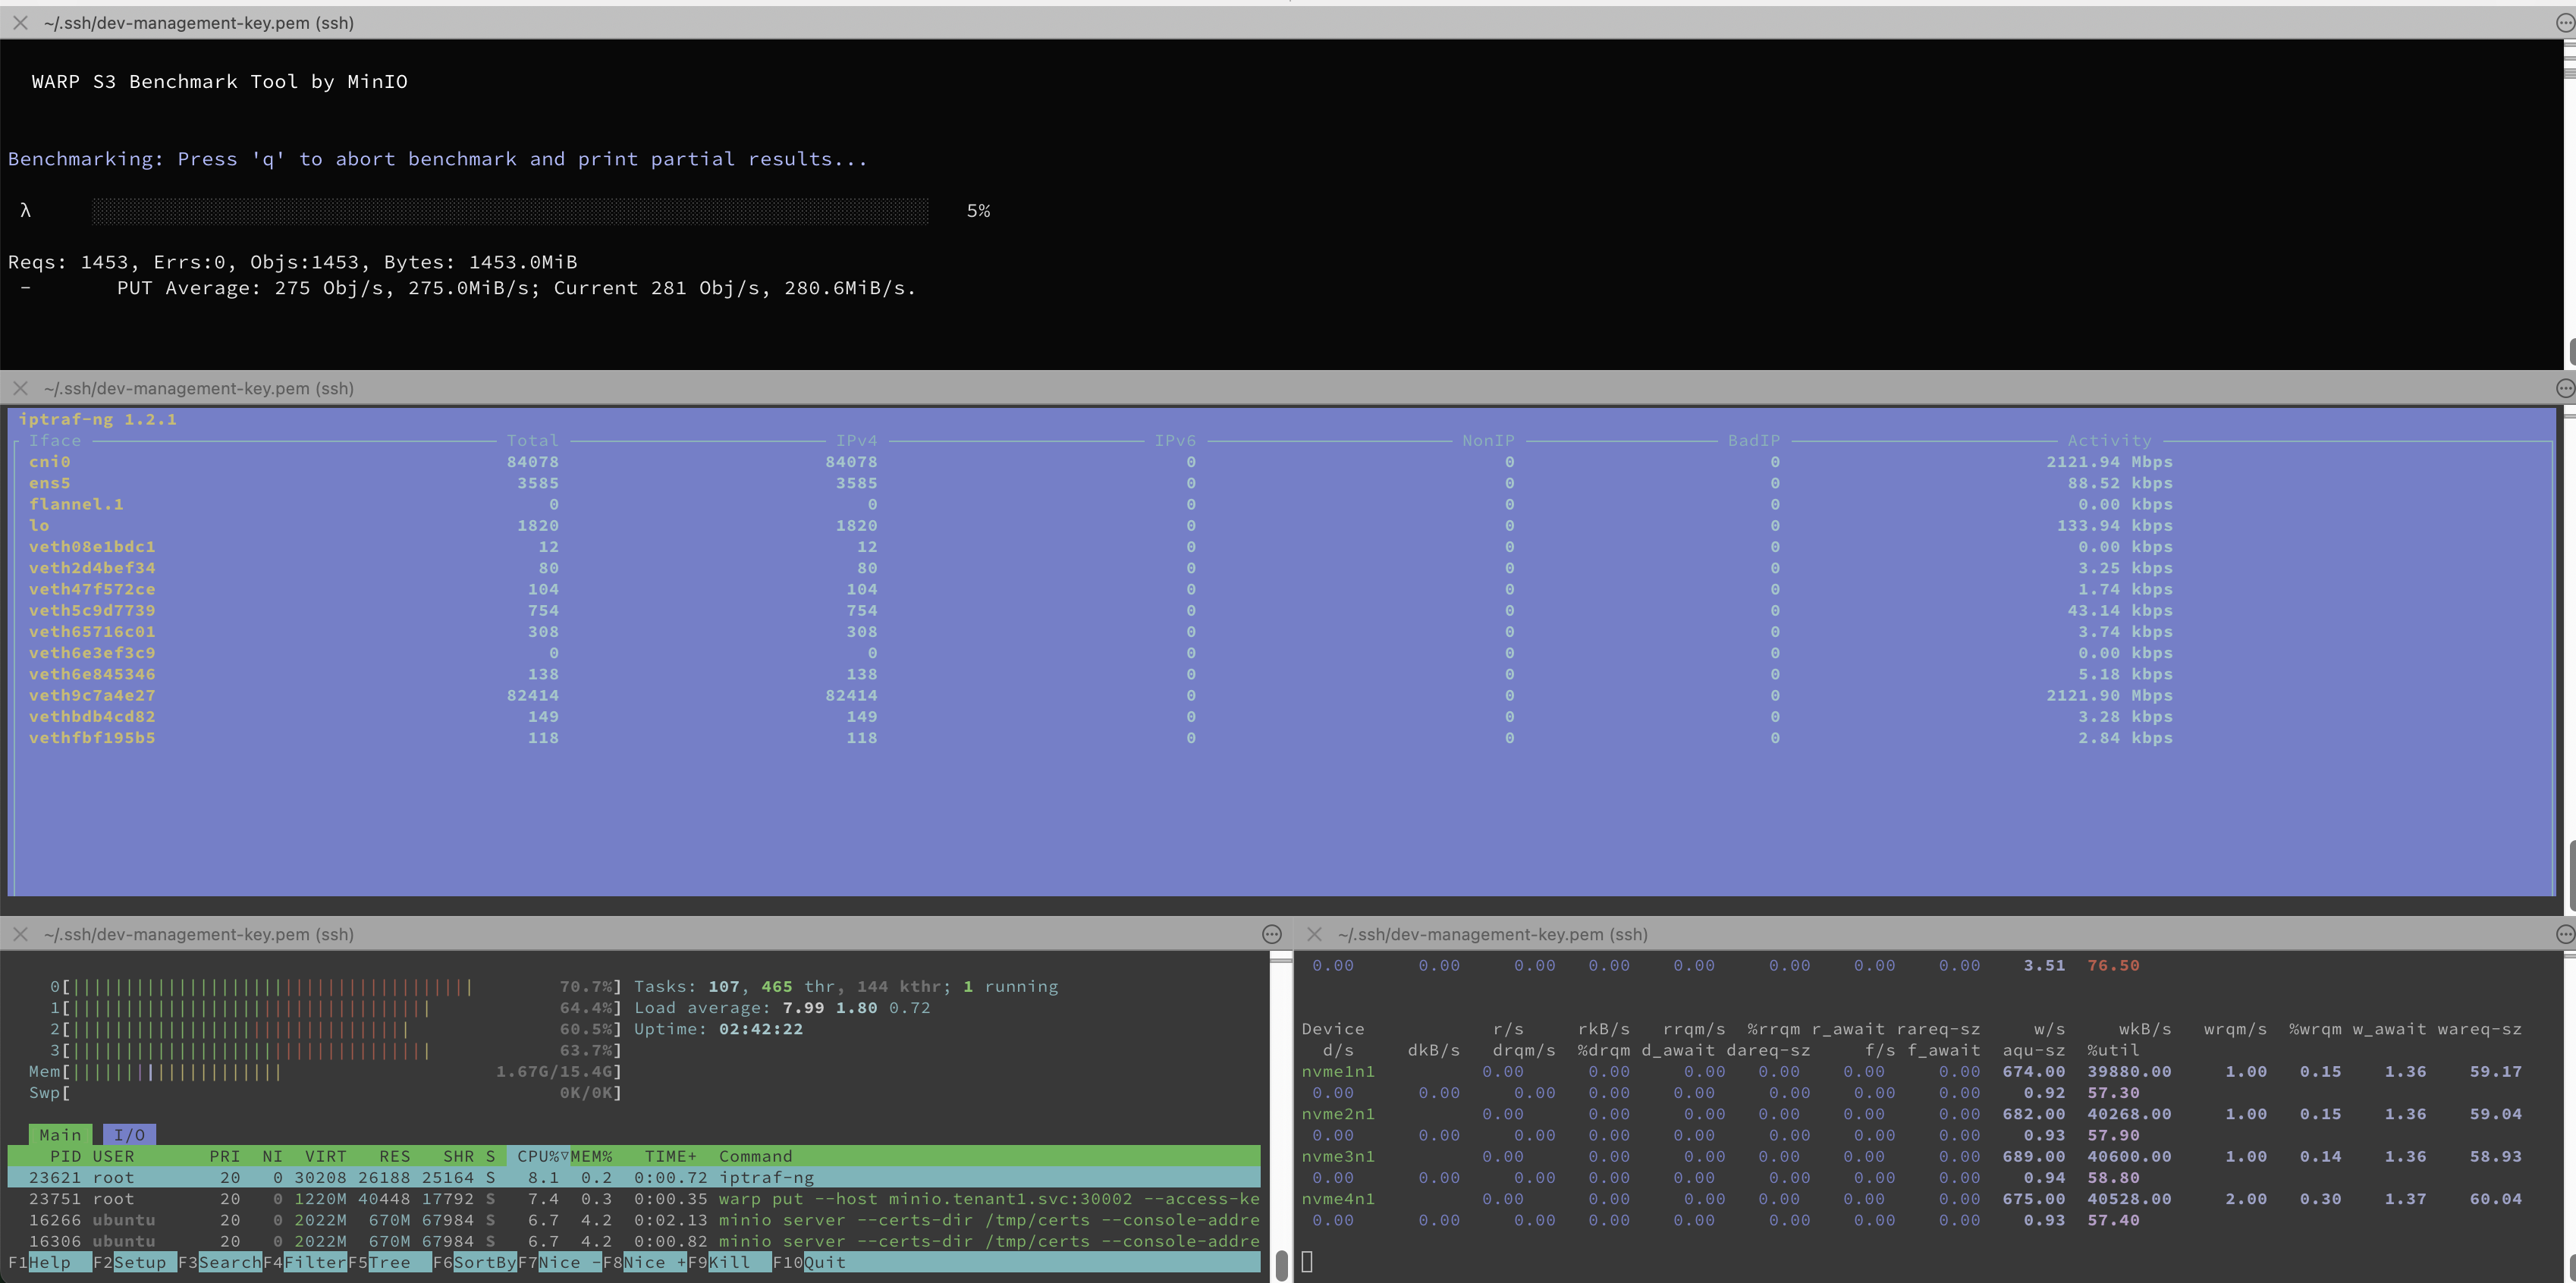
# 신규 터미널4 : 부하 실행
# 기본 부하 테스트 실행 : mybucket 버킷에 임시 객체들을 업로드하며 성능 측정 :32개의 동시 클라이언트로 1GB 객체 100개 업로드.
# 객체 업로드 실시간 확인 해보자. 해당 버킷에 기본의 객체는 실행 종료 시 삭제됨.
warp put --host $WARP_ENDPOINT \
--access-key $WARP_ACCESS_KEY \
--secret-key $WARP_SECRET_KEY \
--tls \
--obj.size 1MiB \
--duration 2m \
--concurrent 32 \
--bucket mybucket
Reqs: 21625, Errs:0, Objs:21625, Bytes: 21.12GiB
- PUT Average: 180 Obj/s, 180.2MiB/s; Current 187 Obj/s, 187.3MiB/s, 142.8 ms/req
Reqs: 보낸 총 요청 수 (21625건)
Errs: 에러 발생 건수 (0 → 오류 없음)
Objs: 업로드된 객체 수(=요청 수와 같음)
Bytes: 총 업로드된 데이터 용량(21.12GiB)
PUT Average: 평균 업로드 속도
180 Obj/s → 초당 평균 180개의 객체 업로드
180.2MiB/s → 초당 평균 180MiB 데이터 전송
Current: 지금 이 시점의 속도(실시간)
187 Obj/s / 187.3MiB/s
142.8 ms/req: 현재 요청당 평균 지연시간(ms)
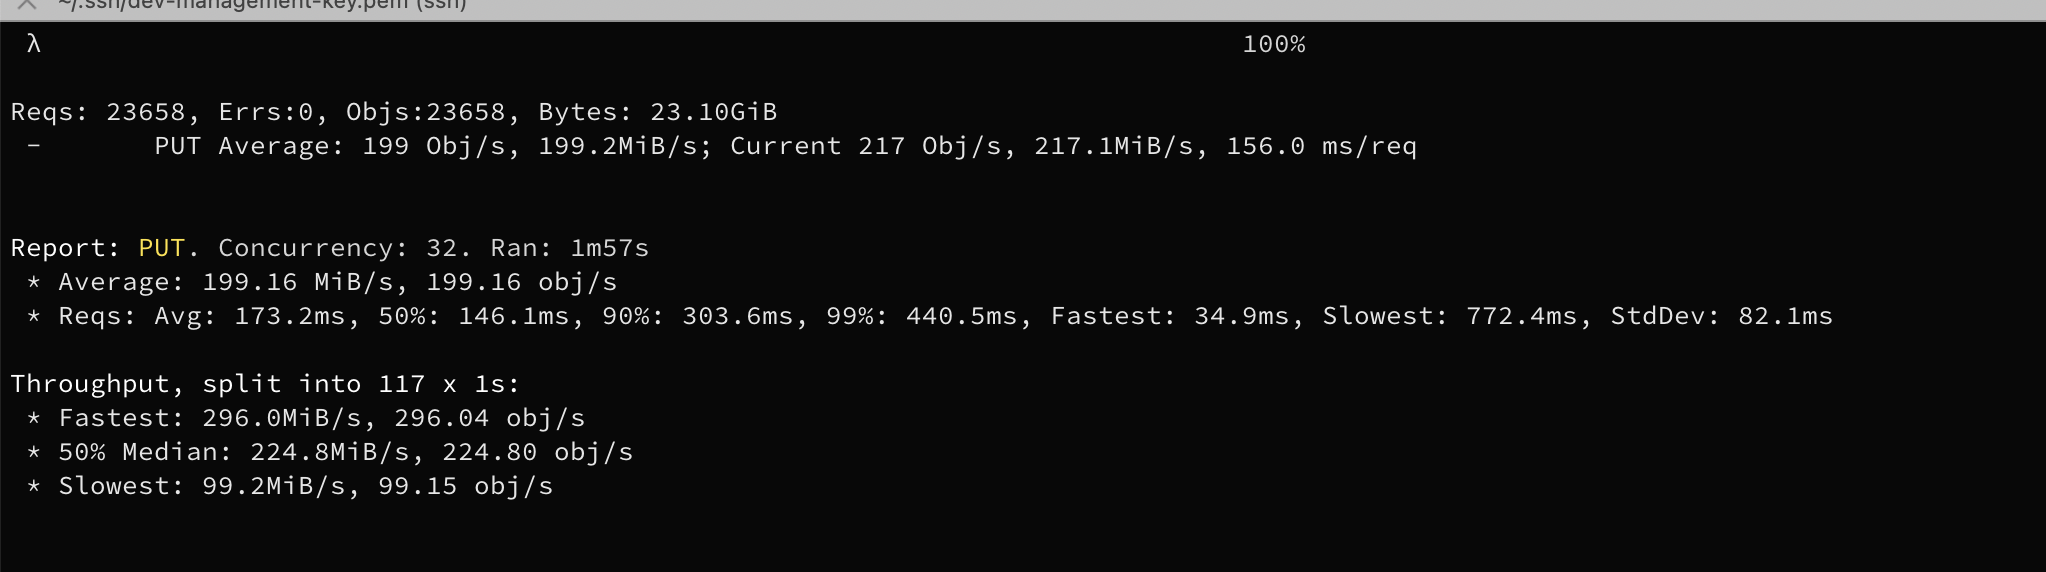
Report: PUT. Concurrency: 32. Ran: 1m57s
* Average: 180.23 MiB/s, 180.23 obj/s
* Reqs: Avg: 182.5ms, 50%: 154.9ms, 90%: 311.0ms, 99%: 423.4ms, Fastest: 37.0ms, Slowest: 598.0ms, StdDev: 85.6ms
PUT: PUT(업로드) 테스트
Concurrency: 32: 동시에 32개의 병렬 스레드(커넥션)로 업로드
Ran: 1m57s: 전체 테스트 1분57초 동안 실행
Average: 전체 테스트 동안 평균 전송속도
180.23 MiB/s / 180.23 obj/s
Reqs (latency): 요청 지연 시간 통계
Avg: 182.5ms → 요청 평균 처리시간
50%: 154.9ms → 중간값(절반의 요청이 155ms 이내)
90%: 311.0ms → 90%가 311ms 이내
99%: 423.4ms → 99%가 423ms 이내
Fastest: 37.0ms / Slowest: 598.0ms
StdDev: 85.6ms → 응답 시간 분산 정도
Throughput, split into 117 x 1s:
* Fastest: 296.6MiB/s, 296.65 obj/s
* 50% Median: 176.8MiB/s, 176.78 obj/s
* Slowest: 100.2MiB/s, 100.17 obj/s
테스트 전체를 1초 단위로 쪼개서, 각 초마다의 처리량을 계산
Fastest: 가장 높은 처리량을 보인 구간(296MiB/s)
50% Median: 중앙값 구간(176MiB/s)
Slowest: 가장 낮았던 구간(100MiB/s)
# GET 테스트 + 병렬 : 동시에 32개의 워커(thread)로 GET 요청 , 병렬 처리로 최대 throughput 측정 가능
# --autoterm 시간절약을 위해 변화가 어느정도 안정되면 자동으로 종료.
warp get --host $WARP_ENDPOINT \
--access-key $WARP_ACCESS_KEY \
--secret-key $WARP_SECRET_KEY \
--tls \
--obj.size 1MiB \
--duration 2m \
--concurrent 32 \
--bucket mybucket # --autoterm
# 평균 다운로드 속도: 약 498 MiB/s, 초당 객체 수 약 498개
Reqs: 8402, Errs:0, Objs:8402, Bytes: 8402.0MiB
- GET Average: 499 Obj/s, 499.2MiB/s; Current 515 Obj/s, 515.2MiB/s, 65.8 ms/req, TTFB: 41.5ms
Reqs: 8402 총 GET 요청 수
Errs: 0 오류 발생 건수 (0 → 모든 요청 성공)
Objs: 8402 다운로드된 객체 수
Bytes: 8402.0MiB 총 다운로드 데이터 용량
GET Average 평균 전송 속도
499 Obj/s 초당 객체 수
499.2 MiB/s 초당 데이터 전송량
Current 최근 측정 시점의 실시간 속도
515 Obj/s, 515.2MiB/s 현재 초당 객체/데이터 속도
65.8 ms/req 요청당 평균 지연 시간
TTFB: 41.5ms Time To First Byte, 서버에서 첫 바이트를 받기까지 평균 시간
Throughput 540202802.0MiB/s within 7.500000% for 7s. Assuming stability. Terminating benchmark.
Report: GET. Concurrency: 32. Ran: 15s
* Average: 498.48 MiB/s, 498.48 obj/s
* Reqs: Avg: 64.8ms, 50%: 61.2ms, 90%: 101.5ms, 99%: 146.8ms, Fastest: 4.5ms, Slowest: 262.5ms, StdDev: 28.2ms
* TTFB: Avg: 40ms, Best: 1ms, 25th: 27ms, Median: 38ms, 75th: 50ms, 90th: 64ms, 99th: 105ms, Worst: 223ms StdDev: 20ms
Latency 통계 (요청 지연 시간)
Avg: 64.8ms → 전체 요청 평균 지연
50%: 61.2ms → 절반의 요청은 61.2ms 이내 처리
90%: 101.5ms, 99%: 146.8ms → 상위 퍼센타일 지연 시간
Fastest: 4.5ms, Slowest: 262.5ms → 가장 빠르고 느린 요청
StdDev: 28.2ms → 지연 시간 분산
TTFB(Time To First Byte)
평균 40ms → 서버가 첫 바이트를 응답하기까지 걸린 시간
Best: 1ms, Worst: 223ms
퍼센타일 통계도 제공 (25th/50th/75th/90th/99th)
TTFB가 낮으면 서버 응답이 빠르고, 네트워크가 병목이 아님을 의미
Throughput, split into 15 x 1s:
* Fastest: 568.4MiB/s, 568.37 obj/s
* 50% Median: 497.1MiB/s, 497.08 obj/s
* Slowest: 428.3MiB/s, 428.27 obj/s
테스트 전체를 1초 단위로 나누어 초당 처리량 계산
Fastest / Median / Slowest로 속도 변동 확인 가능
예시: 한 구간에서는 568MiB/s, 다른 구간은 428MiB/s → 변동폭 존재