gitlab에서 프로그램내의 다중프로젝트의 코드 검색을 하기 위해서는 깃랩의 고급 검색기능을 사용해야 한다.
advanced search 사용을 위해서는 gitlab/elasticsearch 를 연동이 필요함
gitlab - elasticsearch intergration to use the advanced search(premium feature)
순서
1.설치전 주의사항등 확인
2.엘라스틱서치 설치
3.gitlab-엘라스틱서치 연동
위와 같이 진행
1.설치전 주의사항 등 확인
server1 - gitlab(docker containor)
server2 - elasticsearch(docker containor)
ㄴRunning Elasticsearch on the same server as GitLab is not recommended and will likely cause a degradation in GitLab instance performance.(깃랩 독스에 보는것처럼 동일 서버에의 설치는 성능저하가 있을 수 있으니 지양하라 적혀있다)
elasticsearch server Use SSD storage. You will need enough storage for 50% of the total size of your Git repositories.
2.엘라스틱서치 설치
엘라스틱서치 노드구성은 멀티노드로 셋팅한다.
ㄴ제공되는 도커 컴포즈가 멀티노드용으로 제공되기도 하고. 엘라스틱서치가 각 노드들의 사용처에 맞게 클러스터링 구성하여 운영하는게 좋기 때문에 멀티노드로 구성한다.
www.elastic.co/guide/en/elasticsearch/reference/7.11/docker.html 참고
2-1 docker image pull
docker pull docker.elastic.co/elasticsearch/elasticsearch:7.11.0docker.elastic.co/elasticsearch/elasticsearch:7.11.0
2-2 writing docker-compose file
www.elastic.co/guide/en/elasticsearch/reference/7.11/docker.html#docker-compose-file 참고
ps.ES_JAVA_OPTS 옵션은 서버 메모리에 맞게 수정이 필요함 - 최소 4gb는 필요하지 않나 싶다. 디폴트가 512메가였는데 디폴트로하면 메모리부족으로 ES 다운된다. 4기가로 변경하니 잘 돌아감(프로젝트 용량 약 80기가)
2-3 포트는 9200, 9300 사용하니까 서버에서 사용되고 있는지 아닌지 체크 필요.
2-4 볼륨방식이 아닌 바인드 방식으로 마운트 하고자 할 경우는 아래와같이 수정하면 된다.
volumes:
data01:
driver: local
driver_opts:
type: 'none'
o: 'bind'
device: '/home/data/elasticsearch/es01_data'
data02:
driver: local
driver_opts:
type: 'none'
o: 'bind'
device: '/home/data/elasticsearch/es02_data'
data03:
driver: local
driver_opts:
type: 'none'
o: 'bind'
device: '/home/data/elasticsearch/es03_data'
3.gitlab-엘라스틱서치 연동(인덱서 설치)
3-1. 깃랩 인덱서 설치
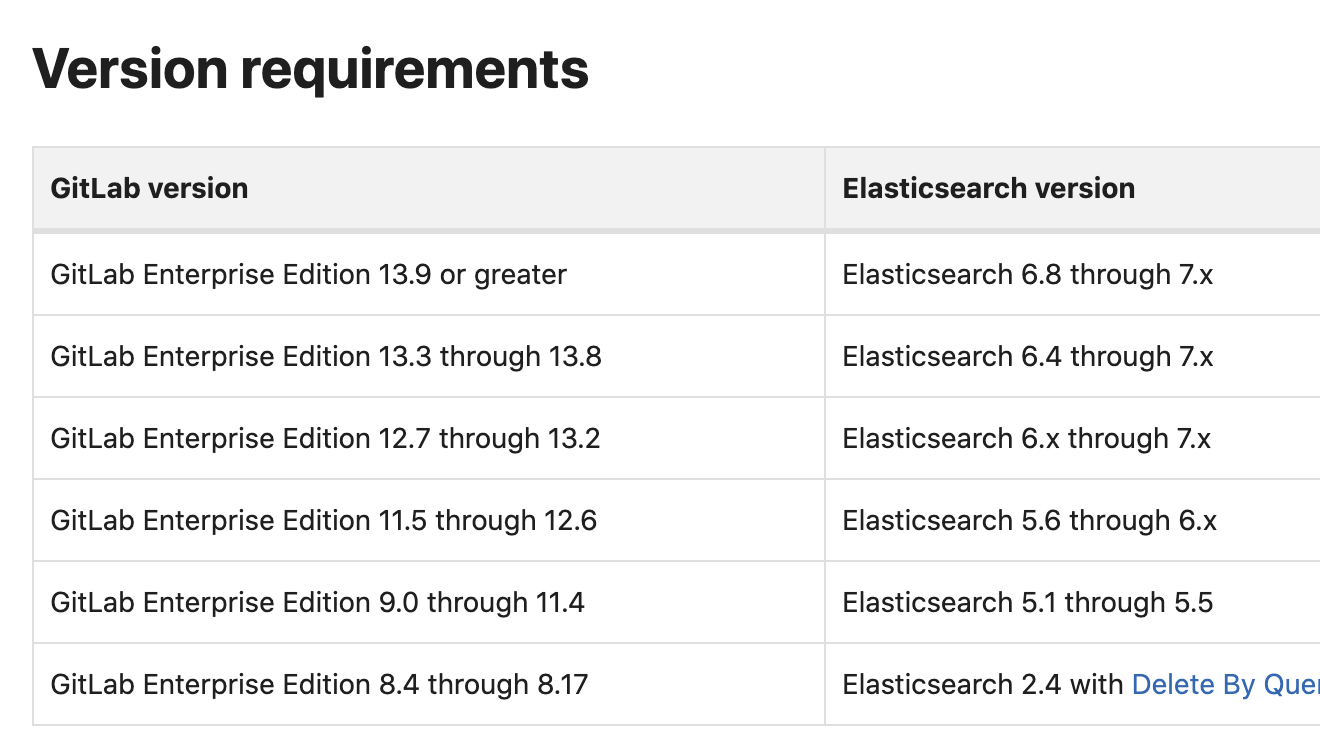
11.8버전 이상의 깃랩은 전부 옴니버스 깃랩이라고 설치한 깃랩내에 패키지로 다 들어가 있다.따라서 깃랩 버전이 11.8 이상이라면 3-2로 가면 됨
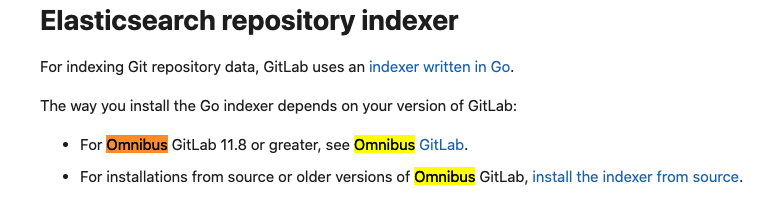
나도 11.8 이상(13.0이였음)이라서 인덱서 따로 설치하지 않았다.(설치방법은
docs.gitlab.com/ee/////integration/elasticsearch.html#from-source 참고)
3-2.깃랩 > 엘라스틱으로 아이피 연동
admin area > settings > intergration > elasticsearch 에서 아이피 설정(다른건 아직 안해도 됨)
3-3. gitlab-rake gitlab:elastic:create_empty_index 입력
ㄴ인덱싱. 용량크면 시간 좀 소요됨
3-4. 인덱싱 완료후 깃랩 설정 페이지(admin area > settings > intergration > elasticsearch) 에서 고급검색기능 사용하기 체크하여 사용하면 된다.
기타,
16 gitlab-rake gitlab:elastic:index_projects_status
ㄴ프로젝트가 전부 인덱싱 됐는지 체크하는 명령어 . 당연히 깃랩 서버에서 실행
17 gitlab-rake gitlab:check
깃랩 이상있는지 체크하는 명령어. 입력해서 빨간거 나오면 그에 맞춰서 수정 필요
gitlab-elasticsearch intergration docs : docs.gitlab.com/ee/integration/elasticsearch.html
ㄴversion/system requirements check , Enabling Advanced Search
elasticsearch install(docker) docs : www.elastic.co/guide/en/elasticsearch/reference/7.x/docker.html
elasticsearch licence setting docs : www.elastic.co/guide/en/elasticsearch/reference/7.x/license-settings.html
'job > linux' 카테고리의 다른 글
| du -sch --exclude (0) | 2022.07.11 |
|---|---|
| systemd: Created slice libcontainer_number_systemd_test_default.slice. (0) | 2022.07.11 |
| centos 5 iptables에 geoip 올리기(2020-03-05) (0) | 2020.03.05 |
| pgsql 해킹 프로세스 (0) | 2019.12.30 |
| tls 1.1 지원 중단 (0) | 2019.12.09 |